


 Рейтинг: 4.4/5.0 (1775 проголосовавших)
Категория: Windows: Восстановление данных
Power Data Recovery 7.0.0.0 Personal + Rus / Commercial / Enterprise / Technician License
Предлагаю вам еще одну утилиту способную быстро и надежно ( если верить конечно описанию разработчиков ) восстановить утерянные данные с жестких дисков, также программа работает с различными носителями, flash картами, картами памяти и так далее, в общем со всеми типами носителей, а скачать Power Data Recovery вы сможете как всегда в полной новости.
Собственно расписывать на самом деле нечего, все как везде, разработчики уверяют, что восстановить данные можно будет даже если полостью удалили файл с вашего компьютера, даже если система подверглась атакой вирусов и все файлы были удалены, даже если вы отформатировали раздел, даже если произошел аппаратный сбой, в общем случаев много, а ответ один, надо пользоваться Power Data Recovery, все файлы будут целые, проверить можете сами, мне повезло, пока не приходилось серьезно тестировать такие программы, доверяю это нуждающимся.
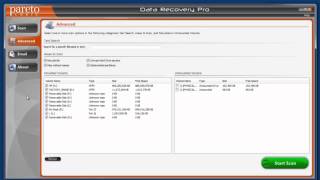
Данная программа способна работать с разными файловыми системами, это конечно же логично, иначе зачем нужная утилита способная принимать только какую-то конкретную систему. Встроен и удобный мастер, который шаг за шагом позволит вам найти нужный файл, вам надо выбрать тип сканирования, место указать, формат файла, заполнить некоторые другие параметры, хотя делать это и не обязательно, дальше надо просто дождаться окончания процесса и просмотреть файлы, которые выдала Power Data Recovery, после уже решаете, восстанавливать их или нет, хорошо что есть предварительный просмотр, а то было бы тяжело, не всегда по именам помнишь.
Интерфейс вполне удобный, все выполнено достаточно стильно и понятно, в самом начале вам надо выбрать пункт, который вас интересует, далее надо уже указывать параметры о которых я писал выше и собственно на этом все. Power Data Recovery проста в понимании и легка в использовании, надеюсь проблем у вас не возникнет, а еще больше надеюсь, что программа вам не пригодится, так как терять нужную информацию всегда большой стресс, лучше конечно делать копию и хранить ее на схемных носителях, но обычно бывает, что про такие меры забываем, а вот потом уже ищем программы типа Power Data Recovery, которые способны помочь.
Название выпуска. MiniTool.Power.Data.Recovery.7.0.0.0


Power Data Recovery - мощное средство для восстановления утерянных по разным причинам данных с жестких и SD дисков, Flash-карт, CD/DVD, USB-дисков, Memory Stick и других накопителей информации. Бывает, что в результате случайного удаления, форматирования, атаки вирусов, проблем при создании разделов, неправильном выключении компьютера, форматировании носителя, воздействия различных программ, повреждения загрузочного сектора MBR и т.д. становятся недоступными важные файлы на ПК, получить доступ к которым невозможно. В этом случае прибегают к помощи утилит восстановления данных, одной из которых и является Power Data Recovery .
Эта программа содержит 5 модулей восстановления:
Power Data Recovery использует специально разработанные алгоритмы сканирования носителей информации, выявляя малейшие следы и остатки данных, с помощью которых и удается восстанавливать файлы с максимальной точностью.
Работать с Power Data Recovery достаточно легко и удобно благодаря интуитивно понятному интерфейсу и пошаговому мастеру, который поможет определиться с необходимыми действиями на каждом этапе восстановления. В целом, для "возвращения к жизни" утерянных файлов нужно сделать 3 основных шага: определиться с модулем восстановления, указать носитель данных и запустить его сканирование, выбрать для восстановления нужные файлы среди найденных. При этом доступен предварительный просмотр, что особенно удобно, когда не знаете точное название файла.
Одним словом, если Вам нужно восстановить какие-либо данные с любого носителя, то рекомендуем обратить внимание на программу Power Data Recovery от MiniTool Solution.
Примечание. В бесплатной версии доступно суммарное восстановление данных объемом не более 1 Гб.
Скриншоты Power Data Recovery :
Last time we talked about when to use data recovery software and 10 features to look for when choosing recovery software.
Today, we’ll take it one step further and look at the steps involved in using one such product. Then, we’ll discuss what to do to keep yourself out of these predicaments to begin with.
Before we can begin, there are a few basics we need to go over.
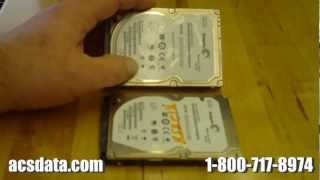
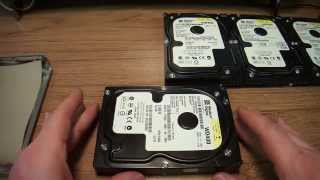
The Basics That You Need to Know When Using Data Recovery SoftwareInstalling the recovery software on the unstable drive could write on top of your files. This is a no-brainer if you are trying to recover removable storage like the below example.
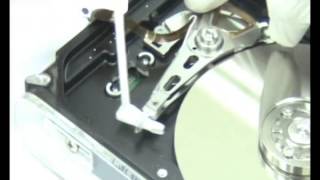
In this case you don’t have to do anything special. However, there is an extra step if you want to recover an internal drive.
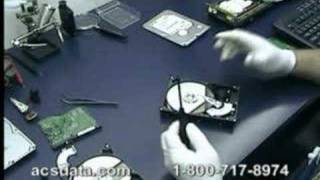
When recovering an internal drive, you will have to remove the unstable hard drive and connect to a stable computer with a stable operating system. I have dealt with this in the past and had decided to purchase a case that turns my hard drive into an USB connected external hard drive.
This is the cleanest and easiest way but has an additional cost (approximate $10-30 depending on quality and appearance of the case) and slows down the scan because it is running through USB. Buying this is unavoidable in most instances when you are trying to recover a laptop hard drive.
If it is a tower you are attempting to recover, you can bust open a second tower and plug in the unstable hard drive. Then you should see the unstable drive show up in (My) Computer or in Disk Management .
You may, or may not, be able to see some of the files you are looking for without any recovery software at all.
A Step-by-Step Example of How to Use a Data Recovery ProductIf you remember from my last article, all the files were absent from my frantic mother-in-law’s USB flash drive.
I am still not sure exactly what happened to it, but my theory is that a coworker had inadvertently done a quick format, perhaps when hastily clicking through prompts. The actual name of the drive was changed to “public”, along with the fact that all of her files had gone missing, hinted me to this conclusion.
I knew right away that using a data recovery program was the route for me. There was no physical damage, and system restore was not an option.
As mentioned last time, I already had GetDataBack for NTFS from a previous mishap. I decided to use their FAT version too because I was familiar with the software.
If I knew then what I know now, I probably wouldn’t have chosen that product. The reason is not that it is a bad product; actually it worked quite well and was rather intuitive. I just wish I had paid for one product that did both file systems.
Now let’s get started. I have recreated the problem and will take you step by step through recovering the files.
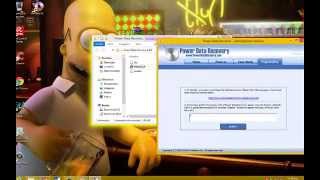
I decided to try out a different program this time. They have very different GUIs, but the results were the same. Here are the steps I took using Recover My Files on a USB flash drive from a computer running Vista Professional .
Have the drive you want to recover attached to a computer with an operating system. In my case I simply had to plug the USB flash drive into my computer.
Download and install the free version of Recover My Files. Don’t forget that you need to install it someplace other than the drive that you want to recover.
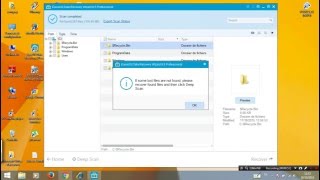
Start Recover My Files. You have 4 general options.
The first two are for files that you accidentally deleted. Use the second two if you want to recover after a format. I chose Complete Format Recover and then clicked next.
Next an information box comes up that tells you when to choose a physical drive and when to pick a logical one. The program tells you to choose a physical drive if you have simply reformatted, and choose a logical one if you have already installed something on the drive.
The logical version of the drives will show up with their normal names. The physical version will be numbered.
I chose physical number 1. You should never be choosing number 0 because that would mean you are trying to recover the main (boot) drive that you are running the program from. Click next.
The next window asks you for the main types of files that you want to recover. It seems like the point of this step is simply to confuse you or worry you unnecessarily.
GetDataBack didn’t have a step like this. I’m sure it is for a very important super efficient algorithm. You don’t need to rack your brain trying to remember all of the file types you had on the disk. It assures you that all of your files will be recovered even if you don’t select all your file types.
Allow for about an hour to scan 50 GB of space or even longer if you are scanning via USB. The program will maintain a list of how many files found so far in the small window, and break down the list by file type in the left pane of the main window under the file type view.
When the scan is done you see a list of all your recovered files.
In my case the files lost their names, but they open fine. You can preview them in the lower right part of the window. Click the check box on the files you want to save, or click the box next to the name of the drive to select all the files.
Next, click the save button. If you only have a trial version, this will be the time when you will need to obtain and enter your license key.
Direct the program to save the files anywhere other than the drive you recovered. Once your files are saved you can close the Recover My Files Program.
What To Do To Avoid Needing Data Recovery At All (Or Ever Again)You have heard it before but I’m telling you again. There are often warning signs that a hard drive is failing. Back up at the first inkling of a problem.
Then, if the drive does go, you can just recycle it and buy a new one. This can cost you much less than paying to recover it.
Common Warning Signs of Imminent Failure:
Physical damage can sometimes be caused by a drive working too hard because of a fragmented hard drive. You can help to prevent this by scheduling your Disk Defragmenter to run automatically. This is especially important if you are running pre-2000 Windows.
The bottom line is that if your files turn up missing for any reason they probably can be recovered. The price of data professional recovery services are fair if you have extensive physical damage, but unnecessary in many cases.
Many data recovery programs are very powerful, and most have thorough help files and customer support. Give it a try!
Oh and Mom… you should have had your data backed up to begin with.
Want to prepare yourself for a new role in IT? Check out our MTA Networking Fundamentals course.
Note: The technique described in this article may also be used to recover data from a reformatted disk.
External USB disks are becoming larger, faster and more affordable every day. This makes them nearly ideal for use as mass storage devices for music, videos, photos or as backup storage for files and systems.
While USB disks are generally very reliable as file storage, they do introduce some unique risks when compared to internal disks and non-removable media. The most obvious risks are physical hazards, such as a disk being dropped on the ground, mishandled or exposed to harsh environments (extreme heat or cold, moisture or direct sunlight) for a prolonged time.
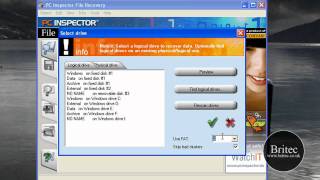
Logical errors caused by improper removal from a computer or sudden power loss are also a common risk for removable hard disk and flash drives. All major operating systems include an "eject" command, which prepares your disk to be physically removed from the computer or device. This ensures that no write operations are currently in progress when the disk is removed. If a disk is roughly disconnected while the operating system is accessing it, the disk's file system may be damaged, causing the disk (and the files on it) to become inaccessible. When attempting to mount the disk, the computer will be unable to recognize the file system or may see it as unallocated space (and therefore ask to format the disk). The screenshot below shows a damaged disk in Windows Disk Manager.
Click image to enlarge
Other operating systems show such disks much the same way
Click image to enlarge
Click image to enlarge
Judging by the information given by these disk utilities, it may appear that the data on the disk has been completely wiped out or lost. However, in most cases, it hasn't been. Some or all of your data may still be on the disk, albeit invisible to the operating system.
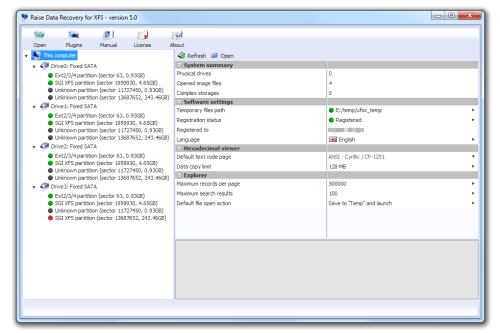
R-Studio is a data recovery utility that lets you "see" that data in ways that the operating system can't. R-Studio can identify and analyze the contents of the damaged disk without relying on an intact file system. This allows you to recover your important data, even if the disk is damaged beyond readability. This article will show you how to do that, step by step.
Before We Begin
Important: This step-by-step data recovery tutorial presumes that your disk is in good physical shape and is damaged due to a logical error (e.g. improper disconnection or accidental reformat ). If there appears to be a hardware problem with the disk or if the disk has suffered some sort of physical trauma, it's best to seek out the services of a professional data recovery specialist. Beyond checking that the cables are firmly connected, any "do it yourself" data recovery efforts may actually worsen your chances of recovering the data if your disk has a serious physical malfunction. Signs that a disk has a physical failure include:
All these cases are best handled by qualified data recovery professionals only. They have special equipment, software, and, most important, the required skills to work with such drives. Neither R-Studio, nor other data recovery software will help you in such cases. Moreover, any further tampering with such a drive will surely inflict more damage to your data. Quite often, such damage will render the data completely irrecoverable.
There are a few other general tips before we begin. First, it's best to use the fastest interface available when performing data recovery. Many USB drives have additional eSATA interfaces, which are faster than even USB 3.0. Also, make sure you have enough space to restore recovered files. R-Studio can save files to any local or network drive visible to the host OS. Never save recovered files onto the same disk that they are being recovered from. Lastly, you don't have to buy R-Studio to start the data recovery process. You can perform most of these steps using the Demo mode. This will let you estimate your chances for a successful file recovery. If it appears that your files can be recovered, you can purchase an R-Studio license and enter the registration key on the fly without re-installing the software or restarting the process.
With all that being said, let's begin.
(Note: The screenshots in this tutorial are from R-Studio for Windows, but the procedure is the same for the Mac and Linux versions.)
To recover data from a formatted or damaged disk, perform the following steps:
Start R-Studio and locate the damaged disk. Most likely, it'll be shown as a disk without a valid file system.
Click image to enlarge
Scan the damaged disk. To do so, right-click the damaged disk and select Scan on the shortcut menu. This opens the Scan dialog box.
In the Scan dialog box, you'll be presented with a number of options.
Click image to enlarge
For most file systems, the information about the file structure may be scattered over the entire disk, so it's best to scan the entire disk (default).
File System
If you know for sure which file system the disk used, select it here. If you aren't sure, use one of the default file systems:
Extra Search for Known File Types
Check the box next to "Extra Search for Known File Types" to activate an additional data recovery algorithm, also known as search for file signatures or raw file recovery.
You can also select which specific file types you want to search for. To do so, click the Known File Types button. In the Known File Types dialog box, select each file type you want to include in the search and click OK.
Click image to enlarge
For more information on which file types R-Studio supports, refer to the on-line help documentation: R-Studio on-line help: List of known file types.
If a certain file type isn't natively supported, you can specify your own known file type. The article Creating a Custom Known File Type for R-Studio explains how.
If you are unsure or don't know which file signature you are looking for, leave the selection as it is.
Save to File
Although it is optional, we recommend checking the box next to "Save to File." This will save the scan info to a file so you don't have to re-scan the disk if the process is interrupted. Note that, depending on the complexity of the file and folder structure, the scan info (.scn) file may be as large as 10% of the size of the disk being scanned.
Unless you are working on an older, slower machine, there's no need to change the default Scan view option. Selecting Simple or None may speed up the scan on older machines, but for most computers, it won't make enough of a difference to be beneficial.
When you're done with the options, click the Scan button. R-Studio will start scanning the disk and showing its progress.
Click image to enlarge
Note: Scanning large disks, especially connected via relatively slow interfaces like USB 2.0, may take a long time, so be patient.
Runtime Software has teamed up with Knoppix. the Linux-based bootable live system. Already used by Millions around the world, the Knoppix Live CD features automatic hardware detection and support for many network adapters, graphic cards, hard disk controllers, SCSI and USB devices, and other peripherals.
Ready-To-Use Recovery EnvironmentThe Runtime Live CD is ready-to-use and preinstalled with all our data recovery tools. The Live CD is an ideal recovery environment as it is Linux-based, and therefore less prone to a Windows tendency to manipulate and change Windows-formatted disks. This reduces the risk of overwriting data that you want to recover, especially on Windows boot disks (C:). The Runtime Live CD is an alternative to our WinPE boot CD. The Live CD provides access to network resources and the Internet.
We provide the Runtime Live CD free of charge for users of our data recovery software.
Creating the Runtime Live CDTo create the Runtime Live CD,
Once you have booted the Runtime Live CD you can start using our data recovery software. Simply double-click the appropriate icon.
Other than with Windows, in Linux you have to declare disks you want to use for copying. If you have provided a disk to hold all the data you want to recover later, you should double-click "Target drive for data (backup)". Select this drive and it will automatically be mapped to drive letter R. Later, in GetDataBack, for example, you would copy the recovered files to drive R.
You can administer all mapped drives with "Assign drives".
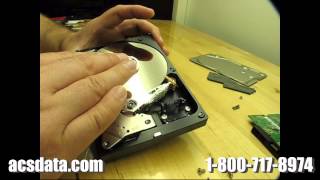
Imagine this: you're busy working on your computer and need to access documents saved on your external hard drive. You connect it, get ready to find your data, and. nothing happens. Your hard drive isn't working. Uh oh. Before you panic, there are several things you can try on your own before calling in the pros.
Data loss can be due to a number of factors, but two are the most common. The first (and easiest to resolve) is software related. You've accidentally deleted an important folder and emptied the recycle bin, or gone and formatted the wrong drive by mistake. The second—and probably most common—cause of data loss is a fault with the hard drive itself. Given the complexity of modern drives it's no wonder that somewhere along the line something will go wrong. When the drive suffers from some form of failure there's often little that you can do yourself to get the data back—professional data recovery services are usually required. However, there are certain failures that you can attempt to resolve yourself .
Recover Your Data with SoftwareWhen dealing with a software data loss, the first and most important thing to keep in mind is not to work with the drive in question. Every second that the drive is connected to a running system is a second that you lose your chances at recovery. Your operating system is reading and writing to your drive constantly, whether you're actively doing something or not. Now that your system is seeing the deleted data as ‘free space' it will happily overwrite this area—along with your chances of recovery.
As USB thumb drives and memory cards get larger and cheaper, it's getting easier to trust much more of your data to them. It's also much easier to mistakenly erase data or have them hiccup on you. And if you're in the habit of holding on to that data for too long -- for example, not transferring photos from your camera's memory card -- disaster is almost guaranteed to strike at some point. What happens then?
While there's no end of data recovery software packages out there, most of them are primarily designed to reclaim data from system drives. In this roundup, I look at the following six packages in terms of how well they recover data from mobile storage such as flash drives and memory cards: CardRecovery, PhotoRec, Recover My Files, Recuva, Remo Recover and Undelete 360.
Mobile storage devices can pose their own challenges for data recovery tools. A damaged device with no proper partition data might not mount correctly, making it impossible to use with tools that require a drive letter. Memory cards used in cameras can have data stored on them in oddball formats, such as Canon's CR2 raw-image format. a custom variant of the TIF format.
How we testedFor testing, I used two storage devices: a Transcend 8GB SDHC card (Class 6) and an 8GB Kingston DataTraveler flash drive. Both were formatted as FAT32 and loaded with 5.8GB of files, a mixture of image files in multiple formats (JPG, GIF, PNG, Photoshop), audio files (variable bit-rate MP3), Microsoft Office documents, ZIP archives and PDF files.
I tested them using the Windows versions of these recovery apps. (Some of these products also offer versions for other platforms, which I didn't test; these are noted at the top of each review.) Tests involved selectively erasing and recovering files, and attempting to recover all files after a quick format (one where only the directory information is erased, not each block on the disk).
[[Note: Because this article was written in 2012, some of the information may be outdated. However, as of February 2015, all prices are current and all reviewed software is still available.]]
CardRecoveryWinRecovery Software
Price: $39.95
OS: Windows 98 and later. (CardRescue available for Mac OS X)
CardRecovery is the most focused of the applications reviewed here: It exists mainly to recover files from memory cards used in cameras. The only file types it works with are JPG and RAW-format image files, and video and audio files (e.g. AVI, MPG, MOV, MP3, WAV). It will not search for documents, archive formats, some image formats (such as Photoshop or PNG) and other day-to-day file types.
CardRecovery
On the plus side, CardRecovery offered the best detection of CR2 files I found. In addition, its wizard interface made the recovery process quite easy. To begin a scan, just enter a drive letter, a camera brand (optional) and/or a file type (also optional), and a destination folder in which to save the recovered files.
The results of the scan are shown incrementally, although there's no preview mode during the scan, which makes it harder to tell if a given file is in fact what you're looking for without stopping the scan. A full scan of each of my 8GB devices took just under 10 minutes.
Once the scan's complete, you can preview JPGs (but only JPGs) and the program window can't be resized, so you can't ever see more than six thumbnails on the screen at once. This makes it a little harder to deal with RAW-format files, especially since file names aren't recovered: It might be easier to just recover everything and sort it out later.
Because CardRecovery can only work with devices that have a drive letter, it may not be of much use if you're dealing with a card whose partition information is damaged and therefore can't be assigned a drive letter. (PhotoRec, in contrast, can work with any device even if there's no partition data.)
CardRecovery offers a free trial version that will scan media and find lost files, but you must buy the full version to recover them.
Bottom lineIf quickly recovering data from cameras is a priority, CardRecovery might be well worth the $40. Since the trial version allows you to preview recovered files, you can try that first to see if it suits your needs.
Best practices for recovering data from mobile drivesRestoring data from USB drives and memory sticks comes with some of the same caveats as any other data-restoration effort. Here are a few useful tips:
Use write protection. To prevent further accidental destruction of data, mobile storage devices should be mounted as read-only whenever possible before you attempt any recovery operations. SD cards typically have a write-protect switch, which makes it easier to protect them before attempting a recovery operation. Removable USB drives are a stickier wicket, since Windows does not have a way to manually mount their file systems as read-only. There is a Registry setting that works with Windows XP SP2 and higher; it forces all USB mass-storage devices into read-only mode. (Note that any program that expects the device being recovered to be writable, such as Remo Recover, may balk at this.)
Be patient. If you're using a program that supports deep scanning at the cost of a slower recovery process, use it. The speed of this type of scan depends on your system's CPU rather than its I/O, as most of the work involves matching file signatures and checking for false positives. If you're in a hurry, run a deep scan using the fastest machine you have access to.
Remember to use the "Safely Unplug Hardware" option. Memory cards and sticks generally tolerate immediate removal, but do yourself a favor and remember to safely eject these devices before removing them, just to be sure. This cuts down on the possibility that data will be lost in the first place.
Learn R for beginners with our PDF
The complete data recovery pack from Hetman Software. eight data recovery tools for the price of one!
Hetman Partition RecoveryHetman’s flagship data recovery tool. An all-in-one solution for recovering data from formatted drives, damaged and unreadable disks, corrupted flash media and disks with no drive letter assigned.
Hetman NTFS RecoveryA specialized tool to recover information from disks and partitions formatted with the NTFS file system. This tool shares its data recovery engine with our flagship product, yet specializes in NTFS systems.
Hetman FAT Recovery Hetman Photo Recovery Hetman Office Recovery Hetman Excel Recovery Hetman Word Recovery Pack ContentThe total cost of tools included in this bundle and one year of priority customer support is close to $540 if purchased separately. By ordering a package deal, you will be getting all eight great data recovery tools for only $147.95 – a 73% savings compared to the total cost of individual licenses!
Eight Tools for the Price of One