


 Рейтинг: 4.9/5.0 (1881 проголосовавших)
Категория: Windows: Ping, trace, whois
Junior Member
Редактировать | Профиль | Сообщение | Цитировать | Сообщить модератору Я думаю, ни для кого не новость, что вышел и доступен к загрузке Windows 7 SP1. Многие пользователи уже установили его и используют его. Однако уже начали появляться первые глюки и недовольства. В частности, я столкнулся с проблемой установки RSAT (Remote Server Administration Tools) на Windows 7 Service Pack 1. RSAT – это важный набор инструментов для любого системного администратора Windows, без которого достаточно сложно выполнять свои повседневные обязанности.
Как оказалось, текущую версию RSAT нельзя установить на Windows 7 SP1.
При попытке установки RSAT на ПК, куда только что был установлен SP1, появляется следующая ошибка:
The update is not applicable to your computer
Установка RSAT на Windows 7 SP1
Как оказалось, такое поведение является нормальным, так как в первоначальную версию RTM RSAT для Windows 7, включена процедура проверки, которая должна предотвратить установку устаревших компонентов на новые версии операционной системы. Т.е. невозможна установка текущей версии RSAT на систему с установленным или интегрированным SP1.
Что же можно предпринять?
Самое просто решение: нужно установить RSAT до установки Windows 7 SP1. Если вы уже установили SP1, его нужно удалить, потом установить RSAT, а затем накатить Service Pack 1. В этом случае RSAT будет работать нормально. Очевидно, что такое решение поможет только в случае, если вы установили Windows 7 SP1 при помощи Window Update или скачали пакет обновления SP1. Если вы обновились с DVD, удаление SP1 будет невозможно. sесли вы установили.
На сайтах Microsoft, я нашел информацию о том, что выход новой версии пакета RSAT (RSAT SP1) планируется на апрель 2011 года. Поэтому – следим за обновлениями.
UPD: На просторах интернета нашел инструкцию по установке RSAT на Windows 7 SP1. На боевой системе я сам его не пробовал, однако если кому-то поможет – просьба отписатся.
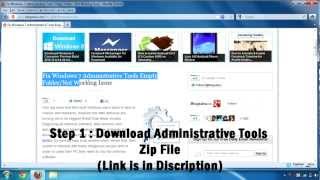
Скачайте RSAT (amd64fre_GRMRSATX_MSU.msu для х64 и x86fre_GRMRSAT_MSU.msu для х86)поместите его в папку c:\tmp1
1. Откройте командную строку с правами администратора
2. Выполните следующие команды:
md c:\rsat
expand -f:* c:\ tmp1\ rsat-windows-7-x86fre_GRMRSAT_MSU c:\rsat
cd c:\rsat
pkgmgr /n:Windows6.1-KB958830-x86.xml /l:log.txt
3. Дождитесь появления в файле лога c:\log.txt строки: DISM Provider Store: PID=1120 Releasing the local reference to DISMLogger. Stop logging….
4. Перезагрузитесь.
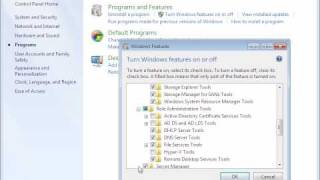
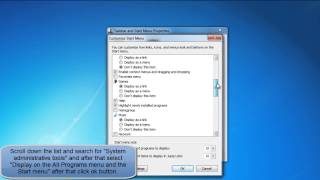
5. Перейдите в панель управления и в разделе Programs запустите апплет “Turn Windows Feature on or off” и активируйте необходимые Remote Server Administration Tools


Remote Server Administration Tools для Windows 7 – это набор инструментальных средств удаленного управления, которые можно скачать и установить на компьютер с системой Windows 7. После того, как вы скачали пакет, установите Administration Tools на свой компьютер двойным щелчком по скачанному пакету и завершите с помощью мастера установки.
ТребованияУстановить Administration Tools pack можно только на компьютер с системой Windows 7.
Устанавливать Administration Tools pack можно только для административной работы с компьютерами, работающими под системами Windows Server 2008 R2, Windows Server 2008 или Windows Server 2003.
Вы должны быть либо членом группы Администраторы на компьютере, на который хотите установить Administration Tools pack, или вы должны войти в компьютер используя встроенную учетную запись администратора.
Как установить Administration Tools pack в Windows 7 В Windows 7 очень не хватает оснасток: Active Directory Users and Computers, Active Directory Site and Services, DNS, DHCP и т.д. для администрирования домена Windows. Чтобы исправить этот недостаток компания Microsoft выпустила набор утилит под названием Remote Server Administration Tools for Windows 7. Этот пакет позволяет управлять ролями и функциями на удаленных серверах под управлением Windows Server 2008 R2, Windows Server 2008 или Windows Server 2003.
Для его установки требуется…
Скачать Remote Server Administration Tools for Windows 7 отсюда: microsoft.com (примерно 215 МБ). После запуска установщика система предложит установить обновление KB958830.
После удачного завершения установки, нужно добавить необходимые инструменты в систему. Для этого идем в «Панель управления (Control Panel)» – «Программы и компоненты (Programs and Features)» – «Включение и отключение компонентов Windows (Turn Windows features on or off)» – «Средства удаленного администрирования сервера(Remote Server Administration Tools)». Ставим галки напротив нужных инструментов.
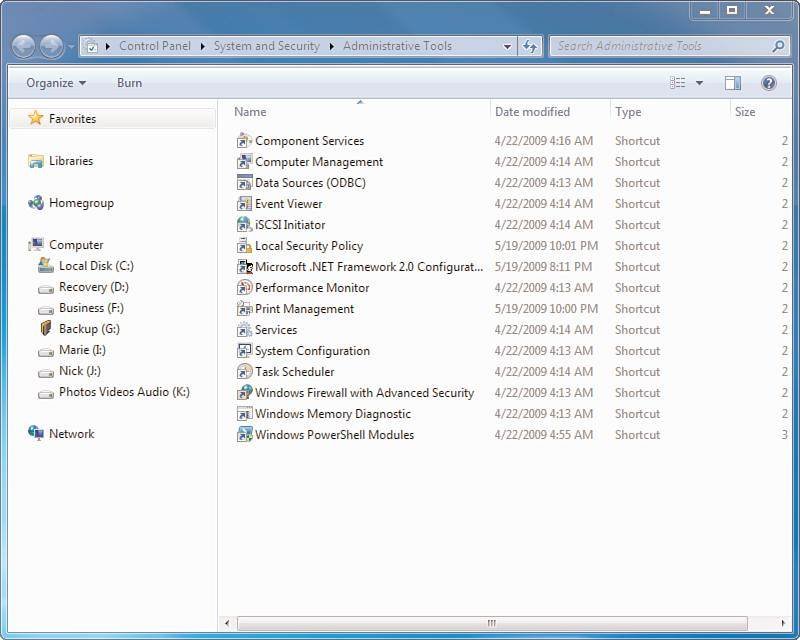
ОК. Теперь в «Панель управления\Администрирование» появились инструменты, которые мы выбрали.
До этого был только стандартный набор инструментов:
Набор утилит Microsoft Remote Server Administration Tools (RSAT) позволяет администраторам удаленно управлять ролями и функциями сервера Windows Server 2008 R2 с компьютера под управлением Windows 7.
Он включает в себя поддержку удаленного управления компьютерами под управлением Server Core или полноценного сервера Windows Server 2008 R2.
Шаг 1. Установка RSATwusa Windows6.1-KB958830-x86.msu /quiet (x86)
wusa Windows6.1-KB958830-x64.msu /quiet (x64)
После установки пакета RSAT, который содержит большинство необходимых администратору утилит и оснасток, они будут доступны в панели управления (Programs & Features — Windows Features).
Шаг 2. Включаем оснастки и функции RSATРазличные функции пакета RSAT можно активировать с помощью утилиты командной строки (CLI), которая называется DISM (Deployment Image Servicing and Management), ее использование полностью аналогично процедуре включения/выключения функций и ролей в Windows Server 2008 R2 Server Core .
DISM позволяет перечислить, установить, удалить, настроить или обновить функции и пакеты в образе системы Windows. Список доступных команд зависит от того, в каком режиме работы находится система: offline или online.
Чтобы получить список всех доступных функций, наберите в командной строке:
 Все чаще и чаще приходится видеть Windows 7 на рабочих станциях, несмотря на то, что официального релиза этой операционной системы ещё не было, да что там говорить, не было даже релиз кандидата (RC), только Beta версия. Тем не менее продукт весьма успешный, рабочий и достоин внимания.
Виндовые администраторы, которые на свой дэсктоп установили Windows 7, будут искать там такие оснастки, как: Active Directory Users and Computers, Active Directory Site and Services, оснастки удаленного управления DNS, DHCP и т.д. Где же их взять?
Разработчики компании Microsoft изготовили некий Remote Server Administration Tools for Windows 7. Remote Server Administration Tools for Windows 7 — это пакет, который позволяет управлять ролями и функциями на удаленных серверах под управлением Windows Server 2008 R2, Windows Server 2008 или Windows Server 2003 с компьютера, на котором установлена операционная система Windows 7.
Скачать Remote Server Administration Tools for Windows 7 можно отсюда: microsoft.com
После скачивания, устанавливаем Remote Server Administration Tools for Windows 7. Пользователи русскоязычной версии Windows 7 могут столкнуться с проблемой при установке, в этом случае возможно поможет изменение языка интерфейса с русского на english в панели управления, раздел «Язык и региональные стандарты».
После установки Remote Server Administration Tools for Windows 7, отправляемся в «Панель управления (Control Panel)» — «Программы и компоненты (Programs and Features)» — «Включение и отключение компонентов Windows (Turn Windows features on or off)».
Находим в списке » Remote Server Administration Tools» и выбираем необходимые нам инструменты для использования.
Нажимаем кнопку Ок. После, мы увидим отображение выбранных инструментов в разделе «Администрирование».
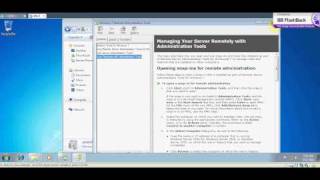
Exchange Server 2010 provides administrators with three primary administrative tools: The first two, the Exchange Management Shell and the Exchange Management Console, were both introduced with Exchange Server 2007. The third, the Exchange Control Panel, is new to Exchange Server 2010 and provides some exciting possibilities.
The Exchange Management Shell is a command-line interface, allowing administrators to run single commands or complex scripts to simplify redundant tasks. The Exchange Management Shell can be utilized to configure every aspect of an Exchange Server environment.
The Exchange Management Console has a graphical user interface (GUI). Nearly as powerful as the Shell, the Console can be used to configure most of the aspects of an Exchange Server environment.
New to Exchange Server 2010 is the Exchange Control Panel, which enables personnel to administer some aspects of the Exchange Server environment through a web interface. Unlike the Management Console or the Management Shell, which are designed and intended to be used only by Exchange Server administrators, the Exchange Control Panel is designed to also enable end users to self-manage certain aspects of their accounts.
Exchange Management ShellThe Exchange Management Shell (EMS) is the engine that powers all Exchange Administrative tools. A powerful management tool in its own right; the EMS is also utilized by both the Exchange Management Console and the Exchange Control Panel to process actions initiated in their interfaces.
Introduced in Exchange Server 2007, the Exchange Management Shell is a command-line management interface. Administrators had been screaming for years for a command-line tool that was powerful enough to enable scripted changes of Exchange Server objects, and the Exchange Management Shell was well received.
Tasks that had to be done manually within the confines of the GUI management application in pre-2007 versions could now be scripted, allowing administrators increased flexibility for repetitive tasks. The Exchange Management Shell looks similar to the DOS command prompt (cmd.exe), in that it opens a window with a black background and a text interface. However, you notice immediately that certain commands and errors are highlighted in yellow or red text rather than the traditional monochromatic command prompt.
With the Exchange Management Shell, administrators can manage every aspect of Exchange Server including the creation and management of new email accounts, the configuration of Simple Mail Transfer Protocol (SMTP) connectors and transport agents, or properties of database stores. In fact, every task that can be accomplished with the Exchange Management Console can be accomplished from the command line in the EMS, but the opposite is not true.
NOTE: When the EMS was first released, there were many commands that had to be performed in the shell because many configuration options were not available in the EMC. As much as administrators enjoyed the new capabilities of the command-line interface, they did not like being told "you have to use it all the time." Over time, more and more functionality was added back into the Exchange Management Console.
With the EMS, administrators have a powerful yet flexible scripting platform that is much easier to take advantage of than using Microsoft Visual Basic scripts-previously the only way to script changes in the Exchange Server environment. As described by Microsoft, "What once took hundreds of lines in Visual Basic scripts can now be accomplished easily with as little as one line of code."
The EMS uses an object model that is based on the Microsoft .NET platform. This enables the shell commands to apply the output from one command to subsequent commands when they are run.
Whereas Exchange Server 2007 used PowerShell v1, Exchange Server 2010 is built on PowerShell v2, which has several enhancements that distinguish it from the previous version.
Exchange Server 2010 also utilizes Windows Remote Management (WinRM) 2.0. Whether an administrator is connecting to a local server or one halfway around the world, EMS always connects to the desired Exchange Server 2010 server via a remote connection utilizing an Internet Information Server (IIS) virtual directory. This holds true even when administrators are running the PowerShell command against the server they are currently logged on to. Due to this capability, the ability to perform PowerShell-based Exchange Server management does not require Exchange Server binaries to be installed on the requesting client, so 32-bit clients that have PowerShell v2 with WinRM 2.0 installed can be used for remote PowerShell administration.
The supported client OS platforms include the x86 and x64 versions of Windows Vista, Windows Server 2008, Windows Server 2008 R2, Windows 7, Windows Server 2003, Windows Server 2003 R2, and Windows XP.
Exchange Management Shell Basic ConceptsThe Exchange Management Shell has a number of command functions, support options, and customization features. The following is a list of some of the basic concepts administrators should be aware of:
Далее устанавливаем скачанную версию, не забываем, что для установки необходимо обладать правами Администратора на компьютере. Сама по себе установка интуитивно понятна -Соглашаетесь с лицензионным соглашение, затем выбираете путь установки (рекомендую ставить по умолчанию).
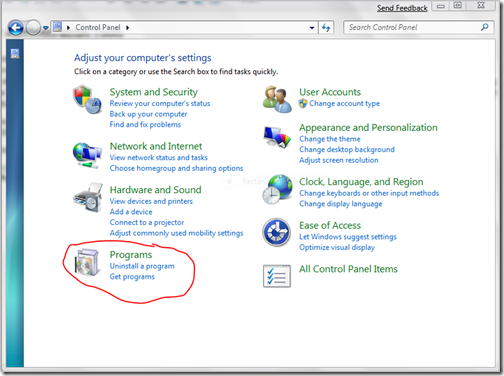
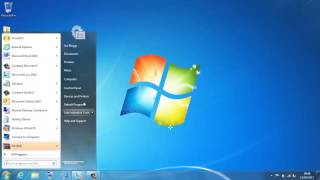
После установки приступаем к настройке Admin pack (в этом примере установка будет происходить на Windows 7), для этого заходим «Пуск-Панель управления-Программы и компоненты (или Программы в зависимости от того как отображаются значки в Панели управления)- Включение или отключение компонентов» .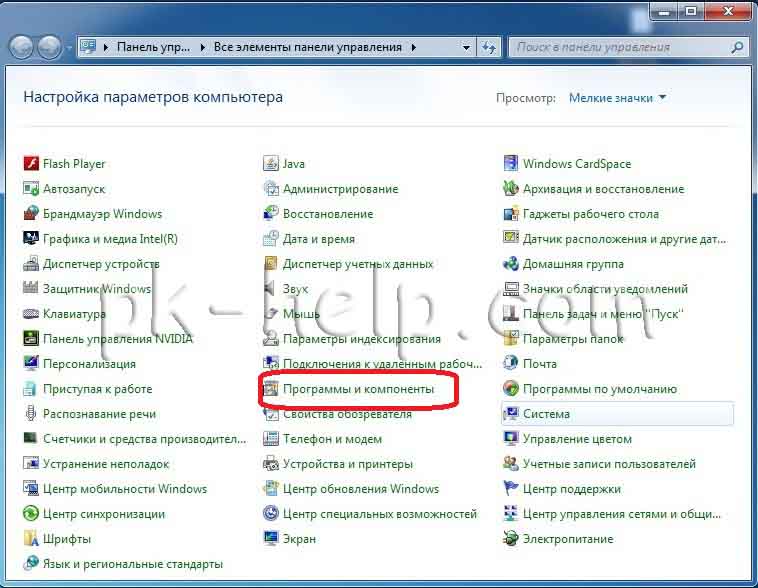
В открывшемя окне Компоненты Windows. заходим в «Средства удаленого администрирования сервера» и выбираем необходимые средства.
Когда выберите нужные вам инструменты, щелкните « OK ». Теперь если вы зайдете в «Пуск –Администрирование». вы увидите все необходимые вам компоненты Средства удаленного администрирования.
This article explains how to install admin pack for Windows 7 computer and start using. Even if you don’t have high end Windows 2008 servers but to manage small network from your windows 7 computer these admin pack tools help lot. Administration pack tools do not come with Windows 7. You have to download it from Microsoft site and install.
This administration tools pack allows doing most of the Windows 2003, Windows 2008 and Windows 2008 R2 server tasks from your Windows 7 computer.
Remote Desktop manager is one of the admin pack tool to manage multiple remote desktop connections in one screen and it allows saving user name password for each connection profile. So next time you do not need to type user name and password to connect specific computer or server. Installing Admin or administrators pack on windows 7 is slightly different than earlier versions of Windows.
Here are the steps to install Admin pack for Windows 7You can install the Administration Tools pack on a computer that is running the Professional, Enterprise, or Ultimate editions of Windows 7.
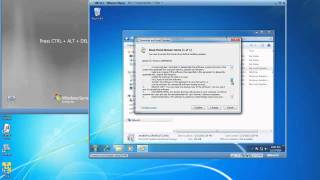
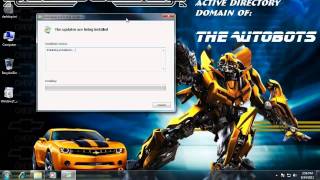
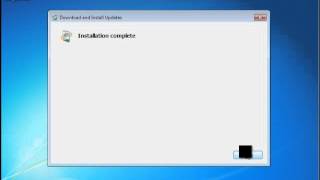
2) Start the installation. Yes for Install update.
3) Once successfully installed, next screen shows how to install each feature of admin pack tool. Without doing following steps you can’t find any of the administration tools in program files or control panel. Close the screen and go to control panel.
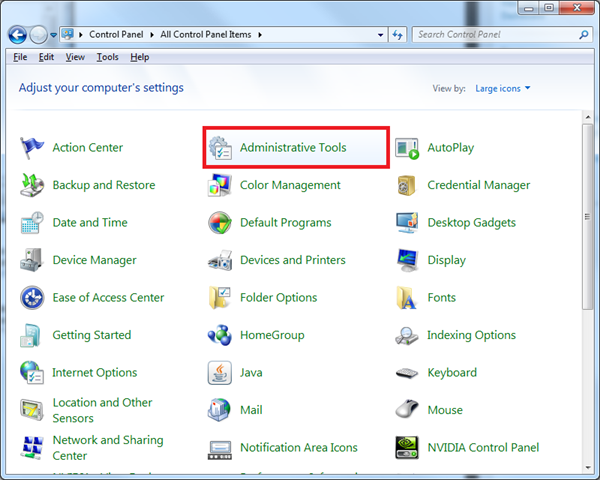
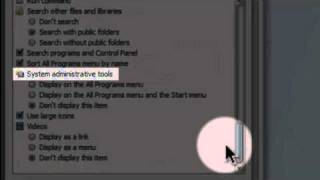
4) Go to Programs and features. Select Turn Windows features on or off then select Remote Server Administration Tools as shown below.
5) Depends on the requirement of network you can select each option. As I mentioned earlier, you can manage Windows 2003,2008 and 2008 R2 Servers from Windows 7 client computer by this administration tools pack. You must be in administrator group or administration tasks privilege should have been given to perform some of server tasks. In this example I select Remote Desktop Services Tools which help to manage multiple remote desktop connections in Windows 7 computer.
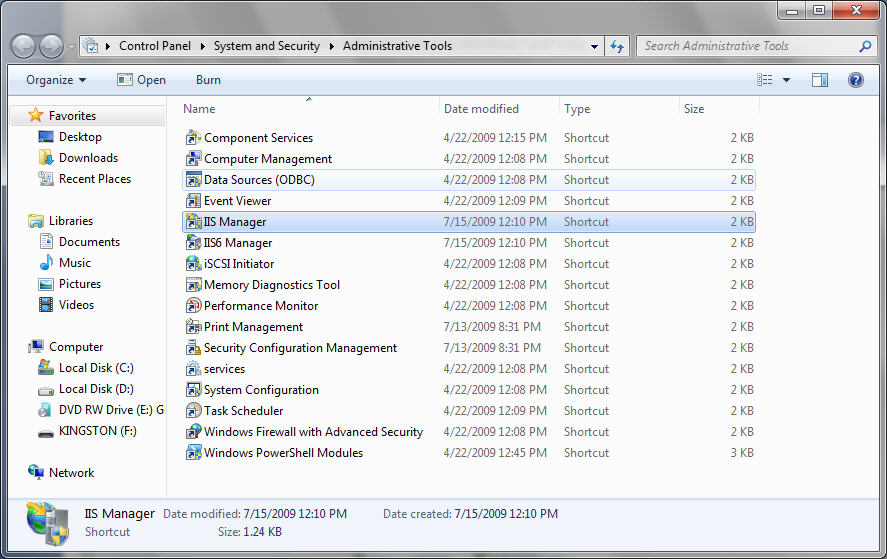
6) So newly added administrations pack tool feature can be found under Administrative Tools in Windows 7.
The other administrative pack tools which you select also will be listed under Administrative Tools.
Even you can install Server Manager in Windows 7 and do the same all server tasks in Windows 2003,2008 and 2008 R2 from Windows 7 client.
I’m sure this article explained about how to install Admin Pack for Windows 7 to get remote desktop manager and to enable other administration tasks.