

 Рейтинг: 4.8/5.0 (1907 проголосовавших)
Категория: Windows: другое
 USBboot Installer++ 1.4.rar
Размер: 8.2 Мб
Описание: Автор программы: Joker-2013
Версия программы: 1.4
Язык интерфейса: Русский
Лечение: не требуется
Системные требования:
Microsoft Windows XP | Vista | 7 | 8 |8.1| 10
Описание: Программа предназначена для создания загрузочного флеш накопителя.
Позволяет распаковывать образы на загрузочный носитель.
Позволяет тестировать загрузку на разных этапах, в виртуальной машине: Qemu
Имеется дополнение, для редактирования файлов: BCD, Grldr и Menu.lst
Интуитивно понятный интерфейс и эргономичное окно программы.
Дополнительная информация:
Четыре разных способа запуска: Qemu
1) На главном меню: Запуск без дополнительных окон в режиме: Legacy 512Mb
2) При клике правой кнопки мыши, по QEMU Tester открывается дополнительное окно, для выбора режимов и запуска QEMU
3) Так же в этом окне можно запустить: QemuBootTester
4) При клике правой кнопки мыши по Установка, выполняются те же действия,
плюс запуск виртуальной машины по окончании подготовки флешки. (в режиме: Legacy 512Mb)
Виртуальная машина работает со всеми типами устройств, из меню: Устройства
В том числе и проводы CD/DVD
Функция перетаскивания образа, в окно программы.
Перетаскивание на:
Главное меню:
Распаковать образ и информационное окно - подключает образ для последующей распаковки.
Список устройств или кнопку QemuTester - запуск виртуальной машины Qemu, для тестирования проекта в образе (режим запуска: Legacy 512Mb)
Меню QemuTester: (правый клик по кнопке QemuTester)
В любое место - запуск виртуальной машины Qemu, для тестирования проекта в образе (режим запуска: зависит от настроек в окне)
При наличии подключенного образа для распаковки:
Правый клик по тексту: Распаковать образ; кнопке выбора образа; краям информационного окна - запуск виртуальной машины Qemu, для тестирования образа диска.
Левый клик по краям информационного окна - вывод полного пути к образу.
Использовании "тандема" Syslinux + Grub4dos или Syslinux + BOOTMGR NEW!
Режим включается, после нажатия на картинку, справа от надписи: Установка загрузчика.
Возможность считывать настройки из файла конфигурации:
Для того чтобы создать файл конфигурации, перейдите в окно: О программе, на картинке, кликните правой клавишей мышки.
В папке, с программой появится файл: USBboot_Installer++.ini
Откройте и отредактируйте его в блокноте.
Имеются функции:
Тестирования в виртуальной машине: USB; HDD; CDROM; ISO; VHD
Редактирования файлов BCD, GRLDR, Menu.lst


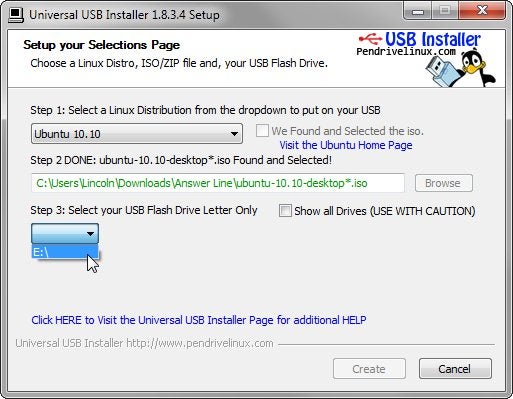
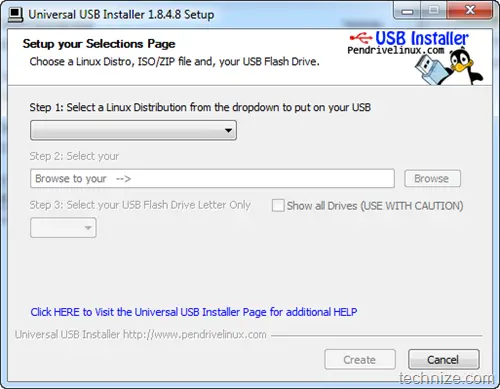
Universal USB Installer - небольшая бесплатная программа, которая позволяет создавать загрузочные флешки из различных дистрибутивов Linux (сборки на основе Ubuntu, Linux Mint, Debian, Fedora, OpenSUSE, Puppy Linux и другие). Universal USB Installer очень проста в использовании - необходимо выбрать сборку, которая будет записана на носитель и указать расположение образа на жестком диске (присутствует возможность загрузить образ с официального сайта). Также присутствует функция Persistence и возможность отформатировать флешку в FAT32.
Отзывы о Universal USB Installer 1.9.6.2 CheMax Rus
The Bat! Home
Virtual DJ
Pidgin (Gaim)
Process Explorer
Русская Рыбалка
FAR Manager
Adobe Flash Player
EASY Boot Installer Автор программы: antiwinlocker
Описание: Простая и интуитивно понятная утилита для создания загрузочных носителей ВСЕ в одном.by Chris Hoffman on July 28th, 2015
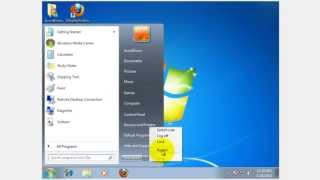
You probably shouldn’t install Windows 10 on your primary PC. But, if you are going to, you should at least install it in a dual-boot configuration. You can then reboot to switch between your installed versions of Windows.
Be sure you have backups of your important files before doing this. You shouldn’t lose your files if you follow this process, but a mistake or bug could cause you to lose them. Better safe than sorry!
UPDATE: if you haven’t installed Windows 10 on your PC before, you’ll probably have to perform an upgrade first before you can clean install. If this doesn’t make any sense, that’s because Microsoft never makes licensing easy, even when there’s a free version.
Resize Your Windows 7 or 8 Partition to Make SpaceFirst, you’ll need to make space for Windows 10 on your hard drive. If you have two different hard drives in your computer and one of them is empty, you can skip this part. But you’ll probably want to install Windows 10 alongside Windows 7 or 8 on the same hard drive.
Whether you’re using Windows 7 or 8, you can use the Disk Management utility to do this. Press Windows Key + R, type diskmgmt.msc into the Run dialog, and press Enter to launch it.
Locate your system partition — that’s probably the C: partition. Right-click it and select “Shrink Volume.” If you have multiple partitions on your hard drive, you could also choose to resize a different partition to free up space.
Shrink the volume to free up enough space for your Windows 10 system. Microsoft says Windows 10 has the same system requirements as Windows 8, and the 64-bit version of Windows 8.1 requires at least 20 GB of hard drive space. You’ll probably want more than that.
After shrinking the partition, you can continue the process.
Download Windows 10 and Boot the InstallerLeave the DVD or USB drive in your computer and reboot. It should automatically boot into the Windows 10 installer. If it doesn’t, you may need to change the boot order in your BIOS. If you have a Windows 8 computer that comes with the newer UEFI firmware, you’ll need to use Windows 8’s advanced boot menu to select your USB drive or DVD drive when you boot your computer.
Universal USB Installer aka UUI is a Live Linux USB Creator that allows you to choose from a selection of Linux Distributions to put on your USB Flash Drive. The Universal USB Installer is easy to use. Simply choose a Live Linux Distribution, the ISO file, your Flash Drive and, Click Install. Upon completion, you should have a ready to run bootable USB Flash Drive with your select operating system installed. Other features include; Persistence (if available) – note that casper persistence will only work with fat16 or fat32 formatted drives.
Universal-USB-Installer-1.9.6.3.exe – December 30, 2015 – Changes
MD5: 92EC01B3603FFB0971F51FAC98FDCBBB
IMPORTANT NOTE. Your USB drive must be Fat16/Fat32/NTFS formatted, otherwise Syslinux will fail and your drive will NOT Boot.
Bootable USB Flash Drive Creation Requirements :
Feel free to inform me of unlisted Live Linux distributions or version revisions, and I will do my best to update UUI to support them.
Universal USB Installer Recent Changelog :
12/30/15 – Version 1.9.6.3: Update to support Caine, Pentoo, Parrot Security OS, and Windows 10 Installer (untested).
10/28/15 – Version 1.9.6.2: Update Links, remove discontinued projects.
06/26/15 – Version 1.9.6.1: Update to support GRML 2014-11, CentOS 7, Runtime Live CD, and Clonezilla 2.4.2-10
05/05/15 – Version 1.9.6.0: Update to support Linux Mint 17.1 Rebecca. Update several broken links
01/14/15 – Version 1.9.5.9: Update Links
11/19/14 – Version 1.9.5.8: Update to support Linux Lite
10/30/14 – Version 1.9.5.7: Update to support Ubuntu Mate, CentOS 7, ESET SysRescue Live, Linpus Lite, and mintyMac
09/12/14 – Version 1.9.5.6: Update to support Ubuntu, Edubuntu, Kubuntu, Lubuntu, and Xubuntu 14.04.1 + 14.10, Linux Mint 17, and Debian Live 7.6
07/29/14 – Version 1.9.5.5: Update to support Peach OSI
06/29/14 – Version 1.9.5.4: Update to support newer syslinux version packed with Tails and Clonezilla.
05/29/14 – Version 1.9.5.3: Update Ubuntu, CentOS, Debian, and Linux Mint Download Links.
01/16/14 – Version 1.9.5.2: Update to support Desinfect, Antivirus Live CD, Fedora 20, LXLE Desktop, Kon-Boot Purchased, Sparky, SolydX, and Manjaro Linux.
11/24/13 – Version 1.9.5.1: Modify chain.c32 to address Insane Primary (MBR) partition error.
11/22/13 – Version 1.9.5.0: Add OpenSuse 32/64bit Entries.
11/20/13 – Version 1.9.4.9: Fix broken Ubuntu Server options.
11/12/13 – Version 1.9.4.8: Fix broken Kaspersky Rescue Disk 10 entry. Reconfigure to auto detect ISO size.
11/09/13 – Version 1.9.4.7: Re-Enable Ubuntu Persistence Features.
11/07/13 – Version 1.9.4.6: Fixed TAILS and Kon-Boot entries. Added Falcon 4 entry.
11/05/13 – Version 1.9.4.5: Wildcard selections to ease user choices, automate config append, and remove manually created config files.
10/17/13 – Version 1.9.4.4: Added Ubuntu, Edubuntu, Kubuntu, Lubuntu, and Xubuntu 13.10
09/16/13 – Version 1.9.4.3: Added AOMEI (Disk Cloning tool), and gNewSense.
09/12/13 – Version 1.9.4.2: Drop-down now displays Volume Label, and Capacity of each drive.
09/03/13 – Version 1.9.4.1: Update to support Ubuntu 12.04.3.
08/27/13 – Version 1.9.4.0: Update to support Fusion Linux 16, Peppermint 4. Add persistent option to Ubuntu 13.xx grub loopback.cfg file.
08/01/13 – Version 1.9.3.9: Update to support newer Avira Antivir Rescue Disk.
07/26/13 – Version 1.9.3.8: Update to support Deft Linux 8.
07/10/13 – Version 1.9.3.7: Update to support Knoppix 7.2, Sugar on a Stick 19, Fedora 19, Pear OS 7, Korora 19, and Antix 13.
06/26/13 – Version 1.9.3.6: Update to support Ophcrack 3.6.0, Fix broken Ubuntu Server 12.04.2 Installer/Alternate options.
06/04/13 – Version 1.9.3.5: Update to support Linux Mint 15, and Ubuntu Server 13.10/13.04 Installers.
05/14/13 – Version 1.9.3.4: Update to support Ubuntu 13.10, Ubuntu Gnome 13.04, and Debian Live 7.
04/25/13 – Version 1.9.3.3: Update to support final release of Ubuntu 13.04, Kubuntu 13.04, Lubuntu 13.04, Xubuntu 13.04, and Edubuntu 13.04.
04/17/13 – Version 1.9.3.2: Update to support REMnux, Linux Mint Debian 201303, Kubuntu 13.04, Lubuntu 13.04, Xubuntu 13.04, and Edubuntu 13.04. Fix some broken links.
03/21/13 – Version 1.9.3.1: Condense Code to make updates easier. Added support for Kali Linux and Tails 0.17.
03/14/13 – Version 1.9.3.0: Correct broken Ubuntu 13.04 i386 Desktop entry.
03/13/13 – Version 1.9.2.9: Update to support Mythbuntu 12.04.2 Desktop amd64, Debian Live 6.0.7. Implement another attempt to address "Insane primary (MBR) partition. Can’t find myself on the drive I booted from" error. Allow Spaces in Unlisted ISO Filenames.
03/12/13 – Version 1.9.2.8: Update to support Ubuntu 12.04.2 Desktop amd64, Ubuntu 12.04.2 DVD amd64, Edubuntu 12.04.2 amd64, and (G4L) Ghost for Linux.
03/08/13 – Version 1.9.2.7: Update to support Ultimate Boot CD 5.2.1, Comodo Rescue Disk 2.0.261647.1, and Elementry Luna. Switch back to Syslinux 4.06. See Additional Help Section for Insane Primary MBR messages.
02/25/13 – Version 1.9.2.6: Update to support Ubuntu 12.04.2. Temporary switch to Syslinux 4.06-pre7 to prevent "Insane primary (MBR) partition. Can’t find myself on the drive I booted from" errors.
02/15/13 – Version 1.9.2.5: Update to support Ubuntu 13.04, Archlinux 2013.02.01, XBMCbuntu 12, and Crunchbang 11.
01/18/13 – Version 1.9.2.4: Update to support Fedora 18. Fixed various broken links.
01/14/13 – Version 1.9.2.3: Update to support Tails 0.16 and Comodo Rescue Disk.
01/11/13 – Version 1.9.2.2: Update to support Debian 6.0.6. Correct several dead links. Fix broken LMDE 201204 Install options.
UUI can create a Bootable UFD containing any of the following :
— Ubuntu 32/64 Bit —
— Debian Live/Netinst 32/64 Bit —
— Backtrack/Kali Versions —
— Fedora 32/64 Bit —
— OpenSUSE 32/64 Bit —
— Puppy Linux Based —
— Linux Distros for Kids —
— Other Distros Alphabetical —
— Live Antivirus Rescue CDs —
— Other or Non Linux Based Software —
— Try to use an Unsupported ISO —
More Live Linux Distributions will be added as time permits. Feel free to contact me to submit recommendations.
UUI Troubleshooting, Known Issues, Bugs :
UUI Expects the Volume Label of your USB drive to be UUI in order for OpenSUSE, CentOS and several other distributions to boot. UUI attempts to automatically create this Volume Label, however it can sometimes fail. Please ensure that the Volume Label of your USB remains UUI if you expect distributions to boot!
If you're using Universal-USB-Installer-1.9.6.3.exe and you still receive Insane primary (MBR) partition notices,
Insane primary (MBR) partition. Can’t find myself on the drive I booted from
Your USB drive may be improperly formatted, contains more than one partition or MBR, or your BIOS is not properly detecting the USB drive and its firmware needs to be updated. You can try these methods to Format and Restore your USB Drive
My PC wont Boot from my Flash Drive, but supports USB boot!
Many Flash Drives ship USB-FDD formatted and some systems will not detect or even boot USB-FDD. I have found that most systems can however boot USB-ZIP, and or USB-HDD. If you are having a hard time getting your BIOS to detect your flash drive, you can try to format it as USB-HDD or USB-ZIP using BOOTICE (GET IT HERE ), and then proceed to use Universal USB Installer to put your chosen Distro on USB.
OTHER IMPORTANT NOTES :
Auto Detection. If you run Universal USB Installer from the same directory containing an installable ISO, the script should Auto Detect the ISO and bypass step 2.
* Although you can use an NTFS formatted USB, Ubuntu based "persistence" features will only work with a Fat16 or Fat32 formatted drive. Additionally some Linux Distributions will not boot from an NTFS formatted USB.
This tool does not support installing and booting from multiple Linux Distributions. Only One Distribution can be installed per USB drive. However, the YUMI Multiboot USB Creator can be used to create a Multi System USB Device.
To try an unlisted ISO, I.E. "Ubuntu 9.10", choose one of the the last two options in Step 1, "Try Unlisted Linux ISO". Please inform me of unlisted "Linux ISOs" you get to work via these options, and I'll add them.
NOTE: OpenSUSE DVD ISOs that exceed 4GB will not work due to the Fat32 limitation.
Ubuntu Server "Failed to copy file from CD-ROM" Error (should be resolved)?
UUI will run in WINE under Linux, once drives are mapped. However, syslinux must be run manually on the USB from Linux. A dedicated Linux based Universal USB Installer is in the works (and will be finished as I have time). You can also visit the "How to install Linux from a Linux CD " section for Live CD based USB Linux installation tutorials, or use another Linux USB Creator .
Ads by Google
We saw yesterday how you can install and test the latest Windows 8 build on your system as a virtual operating system using Oracle VirtualBox. For those who haven’t heard, the consumer preview of Windows 8 is now available for everyone to test. It’s like what Microsoft did during Windows 7 launch. They first released a preview build for free to get feedback from the users before shipping the final version of the product. And the big news that the Windows 8 consumer preview has already crossed 1 million downloads .
UPDATE: You would be happy to know that we recently compared the Top 5 Tools to Create Bootable ISO in Windows. Do check that out to know more about better tools to get this job done.
After few hours of testing I was convinced that the build is stable enough, and I can take it to next level by installing it parallel to Windows 7 via dual boot. If you too are looking forward to install Windows 8 on your computer, I would prefer you create a bootable USB drive instead of a bootable DVD.
Note: This is a consumer preview of Windows 8 and not the final stable version. So keep in mind that you are always on your own if you mess up your computer while installing or using this Windows 8 build.
A USB drive is always faster than DVDs and the chances of failed or corrupt installation are very low as compared to optical media. So lets see how you can create the bootable USB of Windows 8 in the easiest way possible .
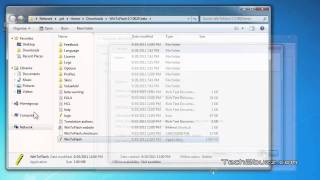
Necessary PrerequisitesStep 1: Download and extract WinUSB Maker on your computer. WinUSB maker is a portable application and thus does not require installation of any kind. You only need to run the .exe file.
Step 2: Run the WinUSB Maker tool with administrative privileges to start creating your bootable USB drive. (right-click on the file, and click Run as Administrator)
Ads by Google
Step 3: In the tool, select the option ISO image bootable disk under the Functions section. Select Normal Detection Mode and browse for the Windows 8 bootable ISO (Image file) you have already downloaded on your system.
Step 4: Finally, select the USB drive and drive MBR system (if you have a single one plugged in, it will be selected by default, if you have more than one, click on the dropdown menu and make a selection from the list) and click on the button Make it Bootable .
That’s all, the tool will now format the USB drive and copy all the Windows installation files to it and make it bootable.
You can now plug in the device into your system and select removable drive as your first boot selection preference in your BIOS and install Windows 8.
My VerdictAlthough there’s an official Microsoft tool to create bootable USB drive from an ISO image. WinUSB maker’s portable nature and ease of use drew my attention. Furthermore, WinUSB gives a bit of an extra control to the user than the official tool for the same.
Mavericks (OS X 10.9) doesn’t ship on a disc. Instead, it’s available only as an installer app downloadable from the Mac App Store, and that installer doesn’t require a bootable installation disc. But there are a good number of reasons you might want a bootable Mavericks installer on an external hard drive or a thumb drive (USB stick).
For example, if you want to install Mavericks on multiple Macs, using a bootable install drive can be more convenient than downloading or copying the entire installer to each computer. Also, if your Mac is experiencing problems, a bootable install drive makes a handy emergency disk. (The OS X Recovery feature is a big help here, but not all Macs have it—and if your Mac’s drive is itself having trouble, recovery mode may not even be available. Also, if you need to reinstall Mavericks, recovery mode requires you to download the entire 5.3GB installer again.) Finally, if you need to install Mavericks over Leopard —assuming you have the license to do so—a bootable install drive makes that process easier.
Thankfully, it’s not too difficult to create a bootable install drive from the Mavericks installer. I show you how, below.
If your Mac came preinstalled with MavericksIf you own Mavericks only because you bought a Mac that shipped with Mavericks preinstalled—in other words, you never purchased the OS from the Mac App Store—use our instructions for creating a bootable Mavericks install drive for newer Macs . instead of the instructions here.
Get the latest version of the Mavericks installerBefore you make a bootable install drive, you should make sure you have the latest version of the Mavericks installer. What? You didn’t even realize that there are different versions of the installer? It turns out that when you download an OS X installer from the Mac App Store, that copy of the installer contains whatever version of OS X was available at the time of download. For example, if you downloaded OS X 10.9 on the day Mavericks was released, you downloaded the 10.9.0 installer. A bootable install drive you create from that installer will install OS X 10.9.0.
However, Apple regularly updates the OS X installers it makes available for download from the Mac App Store. For example, when the inevitable 10.9.1 update is released, a few days later the Mac App Store will begin providing an updated Mavericks installer that installs 10.9.1 right off the bat. Using the latest installer for your bootable install drive is convenient, because it means that if you ever need to reinstall Mavericks, you won’t have to install 10.9.0 and then immediately install the latest big update.
Obviously, then, you want to create your bootable install drive using the latest version of the Mavericks installer. However, unlike with other Mac App Store-purchased software, the Mac App Store does not update the copy of the Mavericks installer app sitting on your hard drive. If you’ve got an older version of the installer and you want the latest version, you must delete your current copy of the installer and then redownload the Mavericks installer from the Mac App Store. (If the Mac App Store won’t let you redownload the installer, quit the Mac App Store app, relaunch it, and then Option+click the Purchases tab in the toolbar; that should show the Download button next to Mavericks in the Purchases list.)
Similarly, any bootable Mavericks install drive you create will not be updated to the latest installer version automatically. So if you create an install drive and later download an updated version of the Mavericks installer, you’ll want to erase that install drive and recreate it using the new installer.
The Mac App Store displays details about the current version of the Mavericks installer.
How do you know if you have the newest version of the Mavericks installer? The easiest approach is to look at the Information box on the Mavericks page on the Mac App Store—specifically, check the date next to Updated (or Released, as the case may be immediately after the initial release). Then locate your downloaded copy of the Mavericks installer in the Finder, choose File -> Get Info, and look at the date next to Modified. If the Mac App Store date is newer than the Modified date on your copy of the installer, you need to redownload the installer to get the latest version. (The version listed in the Mac App Store’s Information box is the version of OS X you’ll get if you download the latest installer.)
Note: As I explained in our main Mavericks-installation article. if you leave the Mavericks installer in its default location in the Applications folder when you install OS X 10.9, the installer will be deleted automatically after the installation finishes. So if you plan to use that installer on other Macs, or—in this case—to create a bootable drive, be sure to copy the installer to another drive, or at least move it out of the Applications folder, before you install. If you don't, you'll have to redownload the installer from the Mac App Store before you can create a bootable install drive.
A note on installer compatibilityThe initial Mac App Store version of Mavericks will boot only those Macs released prior to Mavericks’s debut; Macs released after Mavericks’s debut ship with a newer version of OS X 10.9 preinstalled. This means that if you made a bootable install drive immediately after Mavericks was released, and then later bought a new Mac, your install drive won’t boot that Mac (though it will boot any older Macs you own).
However, as explained above, Apple regularly updates the OS X installer on the Mac App Store so that it installs the latest version of OS X 10.9. If you create a new bootable installer using the first major update to Mavericks after your Mac was released, that drive should be able to boot all your Macs.
What about an optical disc? You may have noticed that I didn’t mention making a bootable install disc (DVD or CD). Though you can do it, I don’t recommend it. More and more Macs ship without a built-in optical drive; booting and installing from a DVD is very slow; and 8GB flash drives can be found for $10 or less. All of this means that there’s little reason to opt for a DVD anymore. In addition, whenever an update to OS X is released, you can easily erase your bootable USB stick or external hard drive and update it to contain the latest OS X installer; with a DVD, you have to toss the disc in the trash and start over, which is both a hassle and bad for the environment.
All that said, if you're absolutely convinced that you need an optical disc, Thomas Brand explains how to create a Mavericks recovery CD. The resulting disc won't contain the full installer; rather, it's a CD version of OS X Recovery. This means that when you install Mavericks using the disc, the installer needs to download roughly 5GB of installer data on the fly—which means that installation will be even slower.
Create the Mavericks install drive: The optionsThere are three ways you can create a bootable OS X install drive: using a new feature, called createinstallmedia, built into the Mavericks installer itself; using Disk Utility; or using the third-party utility DiskMaker X. which, despite its name, also works under Mavericks. (For OS X 10.7 and 10.8, you also had the option of using the third-party utility Carbon Copy Cloner. However, because of changes in Mavericks, the developer of Carbon Copy Cloner has removed this feature. I’ll update this article if Carbon Copy Cloner becomes an option again.)
Using the new Mavericks feature for creating a bootable drive, createinstallmedia, is the easiest method, and it’s the one that I recommend most people try first. However, it doesn’t work under Snow Leopard—just Lion or later. DiskMaker X is the next-easiest method, but I’ve experienced the occasional failure with it. (DiskMaker X also doesn’t work under Snow Leopard.) The Disk Utility method is very reliable, and it works under Snow Leopard, Lion, Mountain Lion, and Mavericks.
Note: There’s one significant difference between the three methods that you should be aware of. Based on my testing, if the drive onto which you’re installing Mavericks doesn’t already have a Recovery HD partition. a bootable installer drive made using createinstallmedia or DiskMaker X (which uses createinstallmedia under the hood) can create that partition during the 10.9-install process. A bootable Mavericks installer drive made using the Disk Utility procedure will not. You can determine whether or not your Mac has a Recovery HD partition using the instructions in our article on recovery mode .
Whichever method you use, you need a Mac-formatted drive (a hard drive, solid-state drive [SSD], thumb drive, or USB stick) that’s big enough to hold the installer and all its data—I recommend at least an 8GB flash drive, though anything larger than roughly 5.5GB should work. That drive must also be formatted with a GUID Partition Table. Follow this tutorial to properly format the drive.
Option 1: Use createinstallmediaHidden inside the Mavericks installer is a Unix program called createinstallmedia. provided by Apple for creating a bootable Mavericks installer. If you’re comfortable using Terminal, it’s a relatively simple tool to use. The program assumes your account has administrator privileges.
Note: This method does not work in Snow Leopard. It works only in Lion, Mountain Lion, or Mavericks. (The resulting installer drive will let you install Mavericks over Snow Leopard, but you can’t create the installer drive while booted into Snow Leopard.) If you need to create a Mavericks install drive while booted into Snow Leopard, you should use the Disk Utility instructions, below.
You now have a bootable Mavericks-install drive. If you’re curious about createinstallmedia, type or paste the following command in Terminal and press Return:
The resulting text output shows you the (brief) instructions for using createinstallmedia more generically. (Thanks to a developer on Apple’s Developer Forums for pointing out createinstallmedia a few months ago.)
Using the createinstallmedia command in Terminal
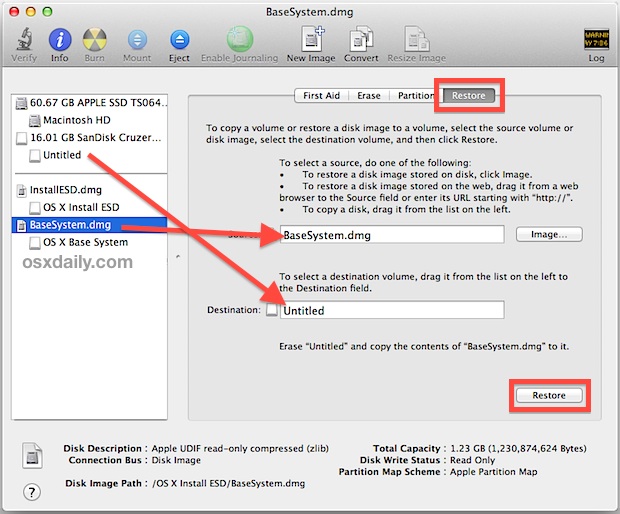
Option 2: Use Disk UtilityYou’ll find Disk Utility, a handy app built into OS X, in /Applications/Utilities. Here are the steps for using it to create your installer drive, which are a bit more involved with Mavericks than they were with Mountain Lion and Lion.
Note: As mentioned above, based on my testing, an installer drive created using Disk Utility will not create a Recovery HD partition if your Mac’s drive doesn’t already have one. You can determine whether or not your Mac has a Recovery HD partition using the instructions in our article on recovery mode. If your Mac’s drive is missing the Recovery HD partition, you should use the createinstallmedia instructions, above, as the resulting installer drive will create the missing partition when you install Mavericks.
Right-click (or Control+click) the Mavericks installer to view its contents.(Note that there is a way to perform this procedure that doesn't require Terminal. However, it adds other steps, and it requires making all invisible files visible in the Finder. Because seeing all the Finder’s normally invisible detritus can be a bit disconcerting, I’ve opted for using Terminal in Step 5.)
You can use Disk Utility's Restore screen to create a bootable installer drive.
Option 3: Use DiskMaker XDiskMaker X (previously called Lion DiskMaker) is a utility that makes it easy to create a bootable OS X install drive, and version 3 supports the Mavericks installer. In fact, under the hood, DiskMaker X 3 actually uses the new createinstallmedia program.
Notes: Because DiskMaker X 3 uses createinstallmedia, it does not work under Snow Leopard. (The resulting installer drive will let you install Mavericks over Snow Leopard, but you can’t create the installer drive while booted into Snow Leopard.) In addition, DiskMaker X 3 hasn’t worked perfectly for me. For example, I experienced an issue where the utility alerted me that it couldn’t properly name the drive it was creating; however, the installer drive appeared to function properly. If DiskMaker X doesn't work for you, you can use one of the other two methods, above.
Whichever of the three processes you've used, you can now boot any Mavericks-compatible Mac from the resulting drive: Just connect the drive to your Mac and either (if your Mac is already booted into OS X) choose the install drive in the Startup Disk pane of System Preferences or (if your Mac is currently shut down) hold down the Option key at startup and choose the install drive when OS X’s Startup Manager appears.
When your Mac is booted from your installer drive, you can, of course, install the OS, but you can also use any of the Mavericks installer’s special recovery and restore features. Depending on how you made your installer drive, when you boot from that drive, you may even see the same OS X Utilities screen you get when you boot into OS X Recovery (recovery mode). However, unlike with recovery mode, your bootable installer includes the entire installer.
Learn much more about Mavericks from our Total Mavericks Superguide ebook.
Updated 10/22/2013, 6:30p.m. to add the method for using OS X’s createinstallmedia command to create a bootable installer drive. Updated 10:45p.m. to indicate how long the createinstallmedia command can take. Updated 10/23/2013, 4:30p.m. to add note about createinstallmedia and Snow Leopard. Updated 10/24/2013 to reflect name change of Lion DiskMaker to DiskMaker X. Updated 10/27/2013 to note which methods will properly create the Recovery HD partition when necessary; to add link to instructions for creating a Mavericks-install CD; and to include minor edits for clarity. Updated 5/7/2014 to reference our article on creating a bootable Mavericks install drive for newer Macs .
Installing OS X 10.9 Mavericks: Our complete guide