


 Рейтинг: 4.5/5.0 (1838 проголосовавших)
Категория: Windows: Flash
Hello Everyone,
I just released a game called DivCircle today on the market and one of the people who is having Samsung Grand Duos, i9082 device downloaded the game but he always getting that error.
Context3D not Available! Possible Reason: Wrong renderMode or Missing device support.
The weird thing that his device is not a very cheap one I checked its specs and its not bad its better even in hardware specs than iPad 3 so whats the main reason behind that and how I can avoid it.
Joined: Sep '11
I'm getting fatal Starling errors at Starling initialization on several Android devices with my latest update.
"Context3D not available! Possible reasons: wrong renderMode or missing device support."
I'm passing "auto" for both renderMode and profile. Is it safer to choose "baselineConstrained" for Android? Starling is the latest from github and AIR 16 from the labs.
Most of the errors occur on Android 4.4.2, but a few 4.3 and 4.4.4 versions are there as well. Most of the time the error occurs at startup, but sometimes afterwards too.
I have not found these errors happening with my previous version from last summer (with then latest Starling and AIR version), but it could also be due to my error reporting not being as extensive before.
Any ideas what could be going wrong?


May 27, 2013
ATF textures are great at reducing texture memory usage but sometimes you can’t use them. If you’re dynamically generating the texture (e.g. from a snapshot of a DisplayObject ) or you’re loading the texture from a third party then you won’t have the (realistic) option of using compressed ATF textures. Today’s article shows how you can still save a bunch of memory, even without ATF.
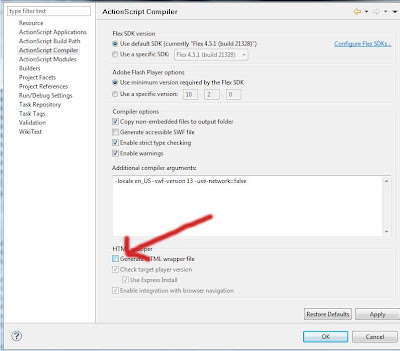
First, make sure your app is running under Flash Player 11.7 or AIR 3.7 with a quick check of Capabilities.version. You’ll also need to target Flash Player 11.7 when you compile with the -target-player=11.7.0 and -swf-version=20 arguments. Doing that will unlock two new types of texture, both of which use only 16 bits for each pixel rather than the usual 24 (for opaque images like JPEG) or 32 (for images with alpha like PNG).
All you have to do is pass Context3DTextureFormat.BGR_PACKED or Context3DTextureFormat.BGRA_PACKED to Context3D.createTexture and you’ll get a 16 bit-per-pixel texture.
In the Context3DTextureFormat.BGR_PACKED case the texture will have 5 bits for the red channel, 6 bits for the green, and 5 bits for the blue. This is because the human eye can see green better than blue or red. In shorthand, this texture format is called RGB565. If you need alpha you’ll use Context3DTextureFormat.BGRA_PACKED and get 4 bits each for red, green, blue, and alpha. It’s less precision for the colors, but that’s the price you pay for decent alpha support.
After you’ve set up the texture, just call Texture.uploadFromBitmapData like you normally would and the BitmapData will be automatically downsampled to 16 bits-per-pixel. This yields a 33% savings on texture memory usage for opaque images and a 50% savings for images with alpha.
To try this out, I’ve made a little (
Joined: 12/04/2012 13:10:26
Messages: 140
I just wanted to give you all a heads up as to what is happening on our end at this moment in time:
Currently we are rebuilding the way Vegas World uses your computer's resources to render the game. Ultimately, what should happen is the vast majority of players should see newer (and prettier) graphics that run at a higher frame-rate (FPS). This is the good news.
The bad news is there are so many different kinds of Graphics Processing Units (GPU) in existence, it would be impossible to test and check every single one to see if the game has issues or not.
As Mz Elsa said yesterday, everyone that does not have a compatible GPU can get into Vegas World now but they will not be able to play the newest versions of Puppy Poker and Swimsuit Poker. We are attempting to address the issue as best as we can. We may have a solution in mind but it will take us at least until the next release date to implement and test it thoroughly.
Thank you for your patience while we try and improve the experience for everyone!
Posted by Pierre Chamberlain On December 26th, 2011 / 4 Comments
If you’re like me, you may have been struggling to understand how to use AGAL to make your own GPU shaders in Flash Player 11. Many developers out there are like “Dude, why don’t you just use some of the existing libraries? Why reinvent the wheel? “. I’ve looked into some of the existing 3D and 2D libraries, and while most of them create impressive results, I would still like to grasp the voodoo magic that happens under the hood.
I’ve setup a small “scaffold” class to help me experiment with AGAL. As you may or may not have guessed, it still requires the Adobe AGALMiniAssembler class (available here ). Also, don’t forget to:
Here’s my Main3D.as class:
A little lengthy for just an abstract class, but it serves it’s purpose. To quickly summarize what this class does:
Now that we’re setup, we can extend Main3D and override main() and draw() .
Experiment #1: Simple 2D plane with Brightness Control.In this first experiment, I wanted to start from the root. To get a really clear understanding of the various registers available at our disposal, I think it is much better to skip 3D manipulation, and just see where vertices get plot in the GPU world.
Have a look at this code:
I wasn’t quite able to solve how to use the minimum amount of registers to achieve this, but it seems most of the opcodes operate on a “component-wise” fashion (ex: xyzw and rgba ).
Ideally, I could use only one component as my scalar value, and use it to control the brightness of my final rgb value. I wouldn’t want to control all four components rgba. because I want the alpha value to be fully opaque at all time anyways. However, you cannot write actual numbers in AGAL, such as: 1.0. To do this, you would have to write that constant value externally (in AS3, that is) to one component of a vertex-constant register (ex: vc0.r ). As I said… ideally, this is how I would like it to work, but after too many failed attempts, I gave it a shot using all components of the register which proved to be successful.
The vertex-data contains 6 values per vertices. This is why I pass 6 in the first argument. The data consists of: Coordinates (XYZ) and Colors (RGB). The index-data then dictates which of those vertices are meshed together to form the square surface.
The Context3D object must then be told how to interpret the order of the vertex-data. The first 3 numbers are all FLOAT_3 values allocated to the first vertex-input register “va0 “. The next 3 numbers are also FLOAT_3 values, except these ones are allocated to the second vertex-input register “va1 “.
So what does this mean in AGAL?
mov op, va0
mul v0, vc0, va1
The first line is quite simple. It’s really the bare minimum to tell where the final vertex location should be on the screen. In this case, all 4 components “xyzw ” are copied to the final vertex-output register.
On line 2, the mul opcode performs a multiplication between each components of the vertex-constant #0 (the constant used for brightness 0.0 to 1.0) and the vertex-input #1 (the color value defined in the second set of 3 values per vertices in the vertex-data). This mathematical product is then stored directly to a shared register, “v0”. This way, the FragmentShader can access it and use the interpolated value of “v0 ” when it draws the pixels in the triangles.
As for the FragmentShader code, it’s pretty self-explanatory (especially if you have seen the numerous existing examples out there for 3D rendering). Notice that I have mentioned the interpolated value is returned here for “v0”. it’s NOT the actual value stored by the VertexShader. This is what makes the GPU so great for fast calculations! For example, from vertex #1 to vertex #2, you get a whole gradual range of colors interpolated for you. The same is performed on Bitmap textures and other special types of shaders.
I’ll leave this to you to explore further! Have fun with this low-level language :)
Hi guys! This is my experimental article where I will explain the common principles of Stage3D API with small but very important details.
Stage3D API is a part of Flash API since Flash Player 11.2 and Adobe AIR 3.2 release. It is built on top of OpenGL and Direct3D APIs to give you a crossplatform access to the GPU. Stage3D API supports: OpenGL, Direct3D9, Direct3D11. It means that each gpu call is translated for the running device and shader bytecode is compiled into the native shader language for the current device. The name “Stage3D API” means the bunch of classes in Flash API for working with GPU. Stage3D class gives you an access to Context3D which represents a rendering surface.
How to get rendering surface?
You can’t create Context3D objects with the Context3D constructor. It is constructed and available as a property of a Stage3D instance.
The rendering pipeline is:
– a creation of Context3D object with Stage3D instance, by a calling of requestContext3D ()
– configuration of a backbuffer by calling configureBackBuffer ()
– a creation and uploading of resources with Context3D methods: createCubeTexture, createIndexBuffer, createProgram, createRectangleTexture, createTexture, createVertexBuffer
Each frame:
1) clear backbuffer by calling Context3D.clear
2) config GPU drawing state for the next drawTriangles calls(drawcall), for instance, setting up a blendMode, bind textures, bind shaders, bind constants data for shaders, depthbuffer compare and write mode, stencilbuffer actions, bind vertex buffers, index buffers and etc. *
3) Call drawTriangles() to draw the triangles defining the objects
4) Repeat until the scene is entirely rendered
5) Call the present() method to display the rendered scene on the stage. It copies the backbuffer to a framebuffer
* It would be great for perfomance if you will batch the drawcalls by similar states, but it depends on the scene type. I will write a separate post about optimizations, but as an addition you can read my previous article “How to debug Stage3D with Intel GPA”
Content drawn to the Stage3D viewport is composited with other visible Flash graphics objects in a predefined order. The most distant are all StageVideo surfaces. Stage3D comes next, with traditional Flash display object content being rendered last, on top of all others. StageVideo and Stage3D layers are rendered with no transparency; thus a viewport completely obscures any other Stage3D or StageVideo viewports positioned underneath it. Display list content is rendered with transparency.
Context3D.enableErrorChecking
Flash has two threads, the first is main thread and the second is for GPU rendering. drawTriangles call takes all state calls for the drawcall, copies it into a queue and then immediatly returns. Then the render thread pulls from the queue, validate states and then send them directly to the GPU. And if you want to get an error messages from a validation you need to set enableErrorChecking = true, it sets the rendering pipeline to the main thread and you can get the errors.
after present() method call, the main and rendering threads must be synchronized, and you must keep in mind that CPU(physics computation and etc.) and GPU can contain bottlenecks which can drop your FPS, because one thread will wait for the other.
Context3D Profiles
When you request Context3D you can specify the profile which help you specify a feature level support.
– Context3DProfile.BASELINE – Use the default feature support profile
– Context3DProfile.BASELINE_CONSTRAINED – Use a constrained feature support profile to target older GPUs. This profile is primarily targeted at devices that only support PS_2.0 level shaders like the Intel GMA 9xx series. Also the same shader and pipeline states can work faster with constrained profile because of low shader level and feature set
– Context3DProfile.BASELINE_EXTENDED – Use an extended feature support profile to target newer GPUs which support larger textures. This profile increases the maximum 2D Texture and RectangleTexture size to 4096×4096.
* Today we have Flash Player 14 Beta which enables the huge opportunities with GPU rendering on Flash Platform. Check out the latest online meeting with Adobe. It gives us an opportunity to create AAA-level graphics like Crysis 2, Starcraft II and etc
GPU memory is a very limited. So, you always must think about your texture sizes because it will help you to save memory and has low texture bandwidth while using in shaders. Stage3D has a few texture types and texture formats.
Texture Formats:
– Context3DTextureFormat.BGRA 8 bits per channel, commonly used for render targets = 32 bits per pixel
– Context3DTextureFormat.BGRA_PACKED 4 bits per channel = 16 bits per pixel
– Context3DTextureFormat.BGR_PACKED 565 = 16 bits per pixel
– Context3DTextureFormat.COMPRESSED 4 bits per pixel!
– Context3DTextureFormat.COMPRESSED_ALPHA 8 bits per pixel!
Stage3D supports realtime texture compression for desktop and web platforms. So you can just specify desired texture compression and upload raw image data with 8bits per channel from BitmapData or ByteArray objects.
WARNING! Be careful of premulted alpha values when uploading from BitmapData or BitmapData.getPixels() you must restore these values in fragment shader or use an appropriate BlendMode.
You will gain the best performance for your application if you will use COMPRESSED and COMPRESSED_ALPHA texture formats. The only limitatation is that textures must be a square because of block compression. All possible compressed 2d texture sizes 4×4, 8×8, 16×16, 32×32, 64×64,128×128, 256×256, 512×512, 1024×1024, 2048×2048. Please read “Adobe Texture Format ” by Thibault Imbert for more detailed info and how to create these textures for mobile platforms with ATF SDK.
Texture types:
– 2D
– Rectangle Textures are avalialble only with Adobe AIR and they can have any size. The one limitation is that you can’t use COMPRESSED and COMPRESSED_ALPHA texture formats with it
Render Targets
You can use each texture type as a render target to perform the redering in the texture, instead of backbuffer. For instance, if you want do some post effects for the whole scene image you will do the following render pipeline:
1) clear backbuffer
2) context3d.setRenderToTexture(texture)
4) do drawcalls
5) setRenderToBackBuffer
6) draw screen quad with binded RT texture from step 2, with special shader which reads a texel color and performs posteffect calculations
7) context3d.present();
WARNING! You can use only Context3DTextureFormat.BGRA texture format for RT textures. It means 1 byte per channel.
You need to specify optimizeForRenderToTexture=true attribute inside one of the texture creation methods: createTexture, createCubeTexture, createRectangleTexture.
Backbuffer
Backbuffer is your drawing surface and it consists of two textures:
1) Color texture 8 bits per channel = 32 bits per pixel
2) Combined Depth Buffer & Stencil Buffer. 24bits for depth value and 8 bits for stencil value
Stage3D uses double buffering. It means that the main thread must wait until the finished drawing in backbuffer is copied or swapped to the frame buffer before starting the next drawing. This waiting period could be several milliseconds during which neither buffer can be touched. You can read more about it here .
This optimization helps to avoid image flickering .
Vsync is an optional GPU driver property, which solves the synchronization problem of frame rate with vertical blanking interval of monitor for smooth swapping from back to front(at first we draw to the back buffer and then it swaps to the front). Without Vsync you can get some artifacts, for instance, one part of the image is a previous frame and other part is the current frame. This produces a small penalty in latency, because the program has to wait until the video controller has finished transmitting the image to the display before continuing.
The GPU only draws frames on a vsync(1/60th of a second). When Flash asks it to draw, it waits for the next vsync. This can be long for two reasons:
(thanks to Adam Cath for the explanation)
Programs, VertexBuffer and IndexBuffer
Program3D is a gpu program that consist of vertex and fragment shader parts. The vertex shader operates on data defined in VertexBuffer3D objects and is responsible for projecting vertices into clip space and passing any required data to the fragment shader. Vertex shader runs per each vertex during the current drawcall and fragment shader runs for every rasterized fragment of a triangle in the drawcall. You can transfer data from vertex shader to fragment shader through varying variables. You can pass data to a shader through vertex buffers and shader constants. Constants can be passed directly to vertex or fragment program. If you want to interpolate constants per pixel just pass these values per vertex and transfer through varying variables to the fragment shader and It will be automatically interpolated per pixel. Also you can use these values for ddx and ddy opcodes(will be avaliable from Flash Player 14 release, now you can download it from labs )
You need to set a IndexBuffer3D for each drawcall. It defines the order of the vertex data rendering through triangles. Vertex consist of attributes, attributes is just a numbers. Vertex data can be binded to the vertex shader with a few vertex buffer instances. It really useful if you have a dynamic and static vertex data parts. So you can upload only particlar peace of data to the GPU and save uploading data bandwidth. For instance, you have vertices with position and uvs attributes and you need to change and upload only positions on enter frame. So you can hold two VertexBuffer3Ds for positions and uvs and upload only positions values. You don’t need to upload the whole vertex data each frame. Also please check Context3DBufferUsage flags. I plan to write a separate article about this, with my experince from Realaxy project with a huge amount of dynamic geometry.
Depth Buffer
By the default state, you always perform a depth testing during the rendering and you can specify a type of comparison used for depth testing. The depth of the source pixel output from the fragment shader program is compared to the current value in the depth buffer. If the comparison evaluates as false, then the source pixel is discarded. If true, then the source pixel is processed by the next step in the rendering pipeline, the stencil test. In addition, the depth buffer is updated with the depth of the source pixel, as long as the depthMask parameter is set to true.
Stencil Buffer
You can also perform a stencil test for a discarding of source pixel. You need to specify an 8-bit stencil reference value that can be associated with each draw call. During rendering, the stencil reference value can be tested against values stored previously in stencil buffer. The result of the test can control the draw action and whether or how the stored stencil value is updated. In addition, depth testing controls whether stencil testing is performed. A failed depth test can also be used to control the action taken on the stencil buffer.
In the pixel processing pipeline, depth testing is performed first. If the depth test fails, a stencil buffer update action can be taken, but no further evaluation of the stencil buffer value can be made. If the depth test passes, then the stencil test is performed. Alternate actions can be taken depending on the outcome of the stencil test. The stencil reference value is set using setStencilReferenceValue(). Stencil Buffer is very useful for masking, also you can implement shadows with it, so called “Stencil Shadows”
Also you can use scissorRect if you want to mask the drawing region by a rectangle.
Mobile Rendering
PowerVR SGX is the graphics processor in the iPhone 3GS, iPhone 4, third-generation iPod touch, and the iPad, and is designed to support OpenGL ES 2.0. The PowerVR SGX uses a technique known as tile based deferred rendering (TBDR). When you call OpenGL ES functions to submit rendering commands to the hardware, those commands are buffered until a large list of commands are accumulated. These commands are rendered by the hardware as a single operation. To render the image, the framebuffer is divided into tiles, and the commands are drawn once for each tile, with each tile rendering only the primitives that are visible within it. The key advantage to a deferred renderer is that it accesses memory very efficiently. Partitioning rendering into tiles allows the GPU to more effectively cache the pixel values from the framebuffer, making depth testing and blending more efficient.
Another advantage of deferred rendering is that it allows the GPU to perform hidden surface removal before fragments are processed. Pixels that are not visible are discarded without sampling textures or performing fragment processing, significantly reducing the calculations that the GPU must perform to render the tile. To gain the most benefit from this feature, draw as much of the frame with opaque content as possible and minimize use of blending and the kil instruction in AGAL shaders. Because the hardware performs hidden surface removal, it is not necessary for your application to sort primitives from front to back.
If your application uses the kil opcode in the fragment shader, this hardware depth-buffer optimizations must be disabled. An alternative to using alpha test or kil is to use alpha blending with alpha forced to zero. This effectively eliminates any contribution to the framebuffer color while retaining the Z-buffer optimizations. This does change the value stored in the depth buffer and so may require back-to-front sorting of the transparent primitives.
Additional part: Setting Upif you are new to flash and came from other platform please check out the brief info and useful links about Flash Platform in one place
Supported Platforms: Web(Windows, Mac, Linux in Google Chrome browser), Desktop, iOS, Android
Беспринципная пародия на популярные фильм и книгу «Пятьдесят оттенков серого».
Опасаясь, что действия богоподобного супергероя так и останутся бесконтрольными, грозный и могущественный страж Готэм Сити бросает вызов самому почитаемому в наши дни спасителю Метрополиса, в то время как весь остальной мир решает, какой герой ему по-настоящему нужен. И пока Бэтмен и Супермен пребывают в состоянии войны друг с другом, возникает новая угроза, которая ставит человечество под самую большую опасность, с которой оно когда-либо сталкивалось.
Первая волна оставила за собой мглу. От второй успели убежать только самые везучие. Но едва ли можно назвать везучими тех, кто уцелел после третьей. А четвертая волна стерла все человеческие законы, взамен же установила свой, один-единственный: хочешь жить — не верь никому. И вот уже накатывает пятая волна
История талантливого молодого летчика Алексея Гущина. Он не признает авторитетов, предпочитая поступать в соответствии с личным кодексом чести. За невыполнение абсурдного приказа его выгоняют из военной авиации, и только чудом он получает шанс летать на гражданских самолетах.
Гущин начинает свою летную жизнь сначала. Его наставник — командир воздушного судна — суровый и принципиальный Леонид Зинченко. Его коллега — второй пилот, неприступная красавица Александра. Отношения складываются непросто. Но на грани жизни и смерти, когда земля уходит из-под ног, вокруг — огонь и пепел и только в небе есть спасение, Гущин показывает все, на что он способен. Только вместе экипаж сможет совершить подвиг и спасти сотни жизней.
Никита и Афина — идеальная пара… Как палочки Твикс. Как Бред Питт и Анджелина Джоли. Но… только по мнению Никиты. Внезапно Афина сообщает, что уходит от него. Причем — к 40-летнему стоматологу. Никита не согласен с таким поворотом судьбы и обещает Афине, что вернет ее за неделю. Что готов сделать отчаянный стэндапер, чтобы вернуть свою любовь?
Трис и Фор впервые покидают город и своих близких и оказываются в опасном мире за стеной, отделяющей Чикаго, где им открывается шокирующая правда.
Они должны быстро разобраться, кому можно доверять, так как битва, разгорающаяся за стенами города, угрожает всему человечеству. Чтобы выжить, Трис придется сделать непростой выбор между мужеством, верностью, любовью и необходимостью идти на жертвы.
Некогда мирное и процветающее египетское царство погружается в хаос: беспощадный бог тьмы Сет убивает своего брата Осириса и узурпирует трон. Вызов ему неожиданно бросает простой смертный, находчивый молодой вор. Чтобы вернуть к жизни свою прекрасную возлюбленную, ему приходится заручиться поддержкой могущественного и мстительного бога Гора. Лишь выдержав испытание на прочность и принеся в жертву все самое дорогое, им удастся противостоять Сету и его приспешникам в мире живых и мире мертвых.
Уэйд Уилсон — наёмник. Будучи побочным продуктом программы вооружённых сил под названием «Оружие X», Уилсон приобрёл невероятную силу, проворство и способность к исцелению. Но страшной ценой: его клеточная структура постоянно меняется, а здравомыслие сомнительно. Всё, чего Уилсон хочет, — это держаться на плаву в социальной выгребной яме. Но течение в ней слишком быстрое.
Воссоединившись со своим давно потерянным отцом, По отправляется в тайный рай для панд, где его ожидает встреча с множеством веселых сородичей. Однако вскоре злодей Кай начинает зачистку — он уничтожает кунг-фу мастеров по всему Китаю.
По предстоит сделать невозможное — обучить боевому искусству деревню, полную его веселых, неуклюжих собратьев, и тем самым превратить их в отряд кунг-фу панд.
Холодные поля Шотландии, военный лагерь, всегда готовый переместиться в другое место. Макбет всегда на войне, его жена, недавно потерявшая ребенка, боится потерять еще и мужа. Чтобы удержать его рядом, она начинает свой проект по устранению конкурентов в борьбе за королевскую корону.
Недавно Opera опубликовала экспериментальные данные построенные в Opera Labs. с поддержкой элементов видео и видео в SVG. Новая версия Opera 11.10 ,также включает в себя экспериментальный элемент холста 3D Canvas. Для просмотра демо представленных в этой статье вы должны будете скачать новый релиз Opera 11.10 . Новый релиз в настоящее время доступен только для Windows. Версии для Mac и Linux должны быть доступны в ближайшее время.
Новое дополнение к HTML5 является холстом. Холст более или менее точечный рисунок, который можно сделать на использовании JavaScript. Само рисование выполняется в контексте. Спецификация включает 2D контекст который должен быть реализован и он позволяет браузерам добавлять свои собственные контексты. В этой статье я опишу 3D контекст котрый я добавил, он имеется в недавно выпущенном релизе Opera Labs. Контекст называется Opera -3D и в основном реализован в версиях Opera 3D Canvas. Для тех, кто не знаком с тегом холста здесь ускоренный курс в его использовании.
1.Добавить <canvas></canvas> tag теги на вашу страницу
2.Получить элемент холста из JavaScript с использованием getElementById или нечто подобное.
3.Call canvas.getContext (<имя>); для получения подробной информации.
Вот и всё. Если у вас есть контекст в вашем скрипте, вы можете просто посмотерть функции визуализации.
Opera -3D контекст .
3D контекст Opera. в отличие от Mozilla, не прямо отображает OpenGL. Он находится на более абстрактном уровне. Основными причинами этого являются:
•Это делает его легче для реализации на не-OpenGL платформах (таких как D3D)
•У той или иной формы обнаруживались доступные столкновения.
Основная концепция является то, что вы работаете с 3D-моделями. Для создания 3D-моделей, добавте вершину треугольников и, наконец, сделайте для них холст. Это то, как выглядит интерфейс.
Пойдем через различные функции в порядке их появления выше:
•сохранять и восстанавливать функции сохранения и восстановления текущего состояния рендеринга. Они очень похожи на сохранение и восстановление в 2D контексте.
•перевод,масштаб и поворот функции изменяет матрицу преобразования. Текущая матрица преобразования преобразует все вершины с 3D Canvas. Это включает в себя объекты Canvas3DModel.
•BeginScene и EndScene используются для разделения кадра. Холст обновляется только при EndScene. Если это так, то изображение копируется на холсте. На холсте рисуются только команды выпущенные между BeginScene и EndScene.
•drawTriangle обращает один треугольник. Этот метод, как правило, медленный и не должен использоваться для создания многих треугольников.
•draw3DModel делает модель ранее созданную с create3DModel на холсте. Эта функция гораздо лучше подходит для визуализации больших партий треугольников.
•CreateTexture создает текстуру объекта из изображения объекта. Этот метод не сработает, если размеры изображения объекта не в степени двойки (1, 2, 4, 8, 16, 32 и т.д.), с регулярным холстом можно создавать текстуры из изображения (в том числе SVG) или другие полотна.
•create3DModel создает объект 3DModel, которые могут быть построены (путем добавления вершины и треугольники) из оказываемых сценариев.
•checkIntersection просто сфера / модель столкновений функции обнаружения. Параметры сферы (центр и радиус) и модели для проверки столкновений с сфере. Функция возвращает точки столкновения, как струна, когда происходит столкновение (точки глубоко проникают в coosen как точки столкновения). Если столкновения не было найденная функция возвращает пустую строку наместо.
Обнаружение столкновений имеет некоторые ошибки в этой сборке, и я рекомендовал бы вам не использовать её. Мы будем писать больше об обнаружения столкновений, когда они неизменны.
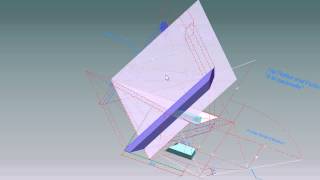
Пример – вращающийся куб .
Это первый пример когда-либо написанный для Opera 3D в контексте. Он создаёт модели, добавляет вершины треугольников для куба, а затем делает её с различными преобразованиями. Если вы используете Opera с включенным 3D Canvas. то вы также можете увидеть вращающийся куб в действии. Файлы, используемые для этого примера файл HTML,как показано ниже, и изображение для использования в качестве текстуры (в данном случае operalogo.png).
<canvas id=”canvas” width=”200″ height=”200″>
Более продвинутые методы.
В приведенном выше примере простой текстурированный куб. который был жёстко прописан в сценарии. Можно сделать гораздо больше, чем используя Opera -3D контекст. Ниже я опишу некоторые методы, которые могут быть использованы для создания более сложных примеров.
DOM3 загрузка и сохранение.
Жёсткое кодирование модели отлично подходит для небольших объектов, так как объекты растут они становится все более и более трудными и жёстко кодироваными в их сценарии. Можно обойти эту проблему путем преобразования модели в формате XML, а затем загружать их в сценарий с помощью DOM3 загружать и сохранять для разбора XML. Вот модифицированная версия вращающегося куба.
Lightmapping
Lightmapping является одним из самых известных способов освещения. Он используется во многих популярных играх, например из серии землетрясения. Принцип состоит в том, что нужно умножить каждый пиксель со светом на значение в этом пикселе. Значение света для каждого пикселя предварительно рассчитано и хранится в текстуре.
Opera 3d Canvas не имеет ещё мульти-текстурирования, так что не возможно сделать lightmapping в один шаг, но вы можете достичь этого эффекта, выполнив несколько проходов. В первый проход сцена отображается как обычно. Во втором проходе ZTEST устанавливается равным и множества размножаются. Сцена в настоящее время оказывают лайтмап вместо текстур и результат мы видим lightmapped сцены.
Вот и все! Эта статья дала вам введение в основы использования Opera 3d Canvas. После прочтения всего этого вы должны знать достаточно, чтобы создать какой-нибудь классный демо 3d-холст.
P.P.S. Если у Вас есть вопросы, желание прокомментировать или поделиться опытом, напишите, пожалуйста, в комментариях ниже.
Часы работы: 10:00 - 22:00
Кафе «На всех порах» – заведение в двух шагах от станции метро «Спортивная» для тех, кому необходимо просто и сытно пообедать в городе, без кулинарных изысков шеф-повара или лепнины старого дома на потолках.
На первый взгляд, кажется, что это фаст-фуд. Однако в кафе готовят не быстро, и вскоре становится ясно, что в названии заведения речь идет о еде, которую готовят в пароварке. Ресторан вмещает два зала: для курящих и некурящих. Оформление интерьеров простое, залы светлые, в пастельных тонах, имеются столики с мягкими диванами, а на плазменных панелях показывают ненавязчивую анимацию. И хотя внутри возникает ощущение пребывания в простом кафе, цены назвать демократичными едва ли можно.
В меню вы найдете: салат цезарь с курицей или лососем, греческий, из паровой говядины, лёгкий с лососем, витаминный, авокадо с креветками стоимостью от 130 до 240 рублей. Супы: уха со сливками, грибной суп-пюре, мясной бульон, куриный, солянка. Из горячего — рыба (лосось, судак), манты, мясные рулеты, котлеты, а также стейки, к которым можно дополнительно заказать соусы: клюквенный, шпинатный, грибной, из белого вина. Цены колеблются от 200 до 300 рублей.
На десерт вишнёвый штрудель, пудинги — манный или ореховый, чизкейк – и другие сладости в пределах 120-140 рублей. Из напитков - кофе, чай, домашний морс, свежевыжатые соки, несколько видов пива. Крепкий алкоголь не продается.
По утрам имеются предложения недорогих завтраков (от 99 рублей), в обед – бизнес-ланчи (от 199 рублей).
Итого, «На всех парах» - это одно из немногих мест в городе для любителей здорового питания. Но ожиданий тех, кто хочет поесть быстро и дешево, оно не оправдает.