

 Рейтинг: 4.0/5.0 (1865 проголосовавших)
Категория: Windows: Ping, trace, whois
Things to check:
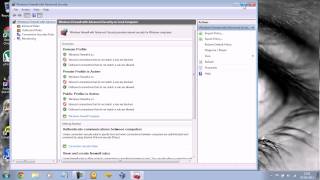
First, open up Resource Monitor and look under Networking. It will show you three things: 1) Services using ports 2) Open Connections 3) ports being listened on.
Therefore you should be able to see the request as Firefox is making it and see which ports (local and remote) are involved and see if the request is being allowed through in the listening port area. (there should be a firewall status).
Second, always double check with another system. I recommend starting up a virtual machine (something small like Knoppix or PuppyLinux) and setting it to bridged-mode first, then NAT. If the port is open in NAT and not bridged, you know it's Windows 7. You can, of course, also connect a second laptop to the same cable and see if the port is open that way.
Third, try turning off all security software, including Windows Firewall, Norton, etc, AND Windows Defender (or Security Essentials if it's installed). Assume any security software, native or third-party, are doing their job too well before assuming Windows 7 is slick enough to block ports on its own.


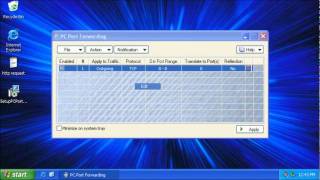

Port Forwarding
Well. I'm trying to host a Counter Strike: Source server, which uses port 27015. Now, here's some info. On my router/modem, I had the ports forwarded to my old laptop, which I have since gotten rid of -> the server worked fine on my old laptop. Now I just updated the router, it now forwards the ports to this laptop. So I know my router is doing everything fine, as I've triple checked it, and it had worked previously.
Next, just to test, I completely turned off Windows Firewall. But, I checked my ports here -> just checking 27015. It says it's closed. Hmm.
Now, I'm running a fresh install of Windows 7. I've only got Microsoft Security Essentials on this laptop right now, and I've made sure that no other AV is installed through the control panel. MSE doesn't come with any form of Firewall, so that's not the issue. Before, on my Vista laptop, I had simply allowed the program/ports through Windows Firewall, and it worked instantly.
Is there something I'm missing? I went through my installed programs again to check for anything that might have have a firewall, and nothing pops out. I just can't seem to get it to work. Is there something more that I need to do?
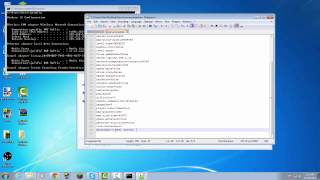
В ОС Windows, начиная с Windows XP, существует встроенная возможность установки перенаправления сетевых портов (порт форвардинга ). Благодаря этой возможности входящее TCP соединение на любой порт) можно перенаправить на другой порт или даже на другой компьютер. Причем не обязательно, чтобы в системе был сервис, слушающий данный порт.
Функционал настройки порт-форвардинга в Windows реализуется через режим Portproxy команды Netsh. Синтаксис команды следующий:
netsh interface portproxy add v4tov4 listenaddress=localaddress listenport=localport connectaddress=destaddress connectport=destport
Допустим наша задача, заставить службу RDP отвечать на нестандартном порту, например 3340 (этот порт, конечно, можно изменить в настройках самой службы, но мы используем именно RDP для упрощения демонстрации техники перенаправления).
С помощью netstat проверим, что на компьютере стал прослушиваться порт 3340:
Определить процесс, который слушает этот порт можно с помощью его PID (в нашем примере PID – 336):
Попытаемся подключиться к этому компьютеру с удаленной системы с помощью любого rdp клиента. В качестве rdp-порта нужно указать 3340 (порт указывается после двоеточия после адреса rdp-сервера): 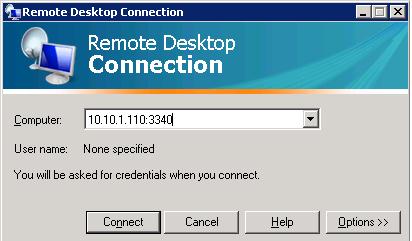
Подключение должно успешно установиться.
В нашем случае присутствует только одно правило форвардинга с порта 3340 на 3389:
Listen on ipv4: Connect to ipv4:
Чтобы в Windows пробрасывались порты - не слышал.
Каким образом вы хотите из интернета попадать на внутреннюю машину?
Можно это реализовать с помощью таких программ как TeamViewer и RAdmin.
Установка и настройка Radmin:
Если же удаленный компьютер находится в другой локальной сети или за роутером, то Вам нужно скачать программу Hamachi отсюда: Hamachi. Установите Hamachi на удаленный и локальный компьютер. Запустите Hamachi и нажмите на кнопку включения в левом нижнем углу окна программы.
В верхней части Hamachi появится виртуальный IP адрес, который Вы будете использовать для установки удаленного соединения по Radmin. Нажмите на кнопку Create or Join Networks в нижнем правом углу Hamachi и задайте имя и пароль для новой виртуальной сети.
Теперь, на другой машине, Вам нужно будет опять нажать кнопку Create or Join Networks, ввести название созданной Вами виртуальной сети и пароль, чтобы подключиться к созданной сети. Теперь, для подключения по Radmin, Вы можете использовать IP адрес, который показывает Hamachi на удаленной машине.
Таже, если Вы хотите иметь доступ к удаленным машинам, которые находятся в другой локальной сети, Вы можете использовать опцию порт-форвардинга на внешнем роутере, за которым находятся удаленные машины.
На шлюзовом оборудовании, за которым находится компьютер с установленной серверной частью, необходимо открыть порт, по которому подключается Radmin (4899 по умолчанию), и настроить перенаправление всего входящего на этот порт трафика на конкретный внутренний IP.
При подключении к удалённому компьютеру необходимо указывать внешний IP адрес шлюзового оборудования. На этом сайте есть практически все модели роутеров и пошаговые инструкции по настройке порт-форвардинга для работы Radmin: Руководства настройки порт-форвардинга для Радмин1. Для начала необходимо скачать данную программу и запустить установщик.
2. После того, как был запущен установочный файл программы TeamViewer появляется окно, в котором выделяем значение "Установить " и жмем "Далее ".
3. В открывшемся окне, выставляем значение "Некоммерческое использование" и вновь жмем "Далее ".
4. Принимаем условия соглашения путем установки галочек и опять жмем "Далее ".
После небольшой по времени установки программы, перед нами открывается рабочее окно. Интерфейс программы прост.Если ваше подключение к сети действует, в левой части окна отобразится набор цифр; ваш индивидуальный индификационный номер и временный пароль для связи (пароль изменяется при каждом запуске программы). Для того чтобы соединится с удаленным компьютером, вам необходимо ввести его Id в правую часть окна вашей программы, нажать "Подключиться к партнеру ", затем во вновь открывшимся окне ввести пароль удаленной машины.
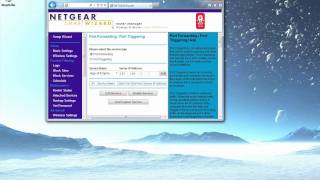
If your network uses a router, you need to configure it to forward data sent to the port specified in step 1 to the Remote Desktop host computer. This is port forwarding, and the steps you follow depend on the device.
Connecting Using the IP Address and New PortYou're now ready to make the connection to the Remote Desktop host via the Internet. Here are the steps to follow:
If you want to use Remote Desktop via the Internet regularly, constantly monitoring your dynamic IP address can be a pain, particularly if you forget to check it before heading out of the office. A useful solution is to sign up with a dynamic domain name system DNS (DDNS) service, which supplies you with a static domain name. The service also installs a program on your computer that monitors your IP address and updates the service's DDNS servers to point your domain name to your IP address. Here are some DDNS services to check out:
However, you may not want to rely on a program to keep your network external IP address and your domain name synchronized. For example, you may want to turn off the computer when you're away from home or the office. In that case, most routers offer a DDNS feature that will handle this for you. You specify your DDNS provider, your domain name, and your logon data, and the router does the rest.
In Microsoft Windows, starting from Windows XP, there is a built-in ability to set up network ports forwarding (port forwarding). Due to it, any connection coming to any port can be forwarded to another local port or even to port on remote computer. Not necessarily that the system has a service listens on this port.
Port forwarding in Windows can be configured using Portproxy mode of the command Netsh. The syntax of this command is as follows:
netsh interface portproxy add v4tov4 listenaddress=localaddress listenport=localport connectaddress=destaddress connectport=destport
Suppose, that our task is to make the RDP service to respond on a non-standard port, for example 3340 (the port can be changed in the settings of the service, but we will use RDP to make it easier to demonstrate forwarding).
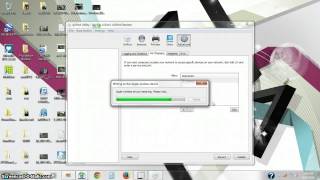
Start the command prompt as an administrator and perform the following command:
netsh interface portproxy add v4tov4 listenport=3340 listenaddress=10.1.1.110 connectport=3389 connectaddress=10.1.1.110
Using netstat make sure that port 3340 is listened now
netstat -ano | findstr :3340
You can find out what process is listening to this port use its PID (in our example, the PID is 336):
tasklist | findstr 336
Let’s try to connect to this computer from a remote system using any RDP client. Port 3340 should be specified as the RDP port. (It is specified after the column following the RDP server address):
The connection should be established successful.
Important. Make sure that your firewall (Windows Firewall or a third-party one that are often included into an antivirus software) allows incoming connections to the new port. If necessary, you can add a new Windows Firewall rule using this command:
netsh advfirewall firewall add rule name=”RDP_3340” protocol=TCP dir=in localip=10.1.1.110 localport=3340 action=allow
Display the list of forwarding rules in the system:
In our case there is only one forwarding rule from port 3340 to 3389:
Listen on ipv4: Connect to ipv4:
Address Port Address Port
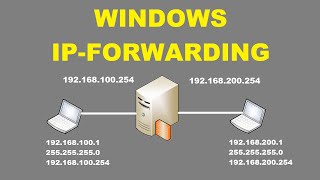
It is very important to setup a static ip address, if you are going to use port forwarding. When you have port forwarding setup, your router forwards ports to an ip address that you specify. This will probably work when you initially set it up, but after restarting your computer it may get a different ip address. When this happens the ports will no longer be forwarded to your computer's ip address. So the port forwarding configuration will not work.
What is an ip address?
IP addresses are four sets of numbers separated by periods that allow computers to identify each other. Every computer has at least one ip address, and two computers should never have the same ip address. If they do, neither of them will be able to connect to the internet. There is a lot of information at the following link. You don't need all of it. But if you want to know more about how networks work, you'll find it there. For more information on ip addresses, subnets, and gateways go here
Dynamic vs Static IPs Most routers assign dynamic IP addresses by default. They do this because dynamic ip address networks require no configuration. The end user can simply plug their computer in, and their network will work. When ip addresses are assigned dynamically, the router is the one that assigns them. Every time a computer reboots it asks the router for an ip address. The router then hands it an ip address that has not already been handed out to another computer. This is important to note. When you set your computer to a static ip address, the router does not know that a computer is using that ip address. So the very same ip address may be handed to another computer later, and that will prevent both computers from connecting to the internet. So when you asign a static IP addresses, it's important to assign an IP address that will not be handed out to other computers by the dynamic IP address server. The dynamic IP address server is generally refered to as the dhcp server.
Setting up a static ip for Windows 7.
If you have a printer, before you begin print out this page!
Open up the start menu, and look for the Search programs and files box. You should now see the following window.
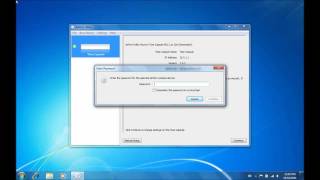
The command prompt may look different on your screen, but it doesn't really matter. Type ipconfig /all in that window, and then press the enter key. This will display a lot of information. If it scrolls off the top you may need to enlarge the window.
I want you to write down some of the information in this window. Take down the IP address, Subnet Mask, Default Gateway, and Name Servers. Make sure to note which is which. We are going to use this information a little bit later. We are only concerned with IPv4 entries, you can ignore the IPv6 stuff.
The name server entries are a bit complicated. Name Server is just another name for DNS(domain name server) server. Some router's act as a proxy between the actual name servers and your computer. You will know when this is the case, because the Default Gateway will list the same ip address as the Name Servers entry. We need to have the correct Name Server IP addresses. If we do not, you will not be able to browse the web. There are a couple ways to get these. The first way is to log into your router's web interface, and look at your router's status page. On that page you should see an entry for DNS Servers, or Name Servers. Write down the ip adresses of your Name Servers. Another way to get the correct Name Servers to use, is to give your ISP a call. They should know the ip addresses of your Name Servers right off. If they ask you why you need them, you can tell them you are trying to setup a static IP address on your computer. If they try to sell you a static external ip address, don't buy it. That's an entirely different thing that what you are trying to setup.
Type exit in this window, then press the enter key to close it.
Port forwarding generally means redirecting the computer signals to follow some specific path into your computer.Port forwarding is done to host online games and allow remote access to the computers.It intercepts the traffic bound for a certain IP and Port configuration and then redirects to some different IP or port.Port forwarding allows remote computers to directly connect to other computer within a private LAN.Port forwarding is oftenly required while trying to create your own Dedicated server to host multiplayer games on Internet.Port forwarding can be achieved by any application running on the host or directly through the hardware like router or firewall settings.Port forwarding helps in increasing your download speeds and game speeds.Every application in the computer is usually programmed to send its packet through some specific ports like in case of HTML Pages we have to open port 80 and for FTP file transfer we have to open port 21 But sometimes we need to do reconfigure the port settings for some of the applications and that’s the place where we need to do Port forwarding like in multiplayer games for example in Word of Warcraft we have to open 3724 ports and in Call of Duty:Modern Warfare we need to open 28960 ports.This is done because Windows firewall tends to block all the unwanted ports for safety reasons.Port forwarding provides an excellent way to preserver the public IP addresses and protects the servers from unauthorized access.For port forwarding you will require four basic things – a router,LAN,Internet Connection and Simple Port forwarding Software.Simple port forwarding is the best software to perform port forwarding in a very easy way.This program has a huge database of known ports for more than 700+ programs and games.So here is a simple procedure on Setting Up Port Forwarding in Windows 7
Setting Up Port Forwarding in Windows 7 Using Simple Port forwarding Software1) First of all you need to download Simple Port forwarding software and Install it.You can download it from here(Download Link ).
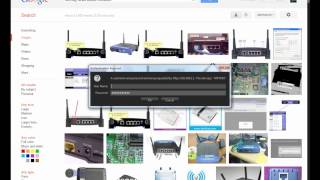
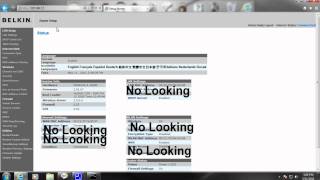
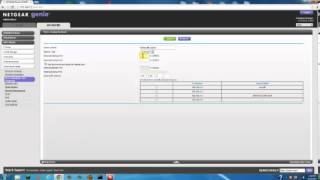
2) Then you need to select your router model from a given list of router info and then Login to your router settings.You can open your router settings by typing the IP as htttp://192.168.1.1 or htttp://192.168.0.1 in your Web Browser and then it asks for a username and Password.Generally the username is admin and password is also admin for most of the routers.You can find your router default username and password from here (Find )
3) Then set your IP to a static IP if needed by the application(optional).Not always required.If you have a dynamic IP then set it to static IP.
4) Then it asks for which ports you need to port forward where you will be provided with a database of applications where you can choose your application and select the number of ports you want to port forward for the application where you can enter the number of ports you want to port forward.If application in not included in the database then you can manually add it to the database.
8) Now you are successfully done
Setting Up Port Forwarding in Windows 7 Without Using Software*Alternatively you can manually Port forward the ports without using the software but it sometimes it becomes difficult to do
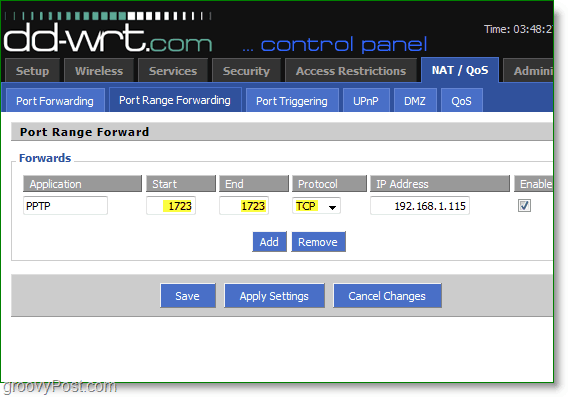
1) For this you need to first login to your router settings by typing the IP as htttp://192.168.1.1 or htttp://192.168.0.1 in your Web Browser and then it asks for a username and Password.Generally the username is admin and password is also admin for most of the routers.You can find your router default username and password from here (Find )
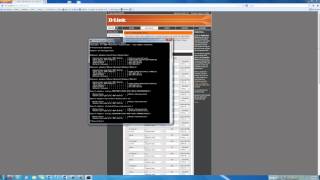
2) Look for Advance settings in the router configuration there you will find an option for Port forwarding.It differs for each router and so it becomes difficult to manually locate the Port forwarding Settings in the router.
3) Then Enter your application name and fill the desired ports that you want to port forward.If you want to open a single port then type the same port number in the start and end field entry.
4) Then Enter your IP address.You can check your IP address by manually typing ipconfig in the Command Prompt.
5) Save your router settings and you are done
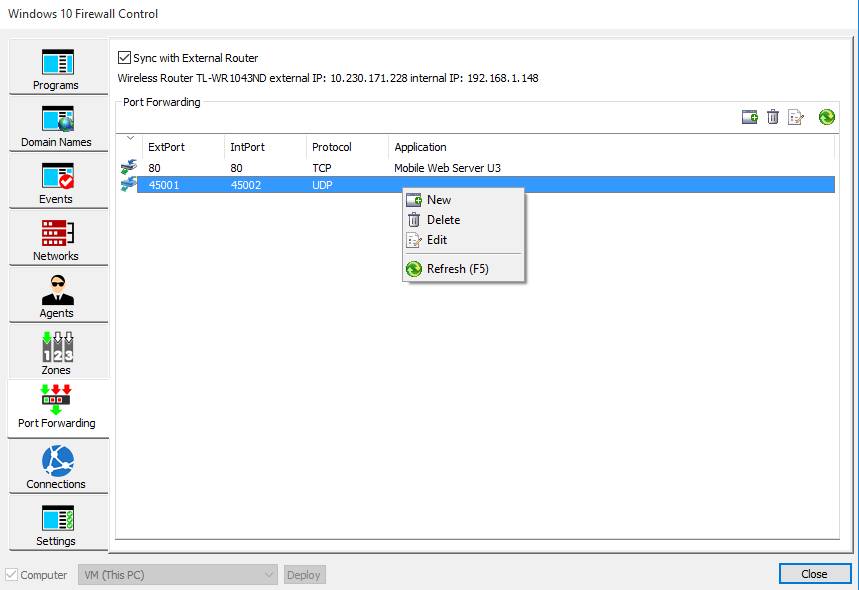
Note – Don’t Forget to add the ports to Windows Firewall else it will not work and please do not open all the ports because it will allow hackers access to your computer