

 Рейтинг: 4.0/5.0 (1839 проголосовавших)
Категория: Mac OS: Логические
"For the Mac OS program, see Bouncing Ball Simulation System. For the extinct computer virus, see Bouncing Ball (computer virus) ."
The bouncing ball is a device used in film s to visually indicate the rhythm of a song. helping audiences to sing along with live or prerecorded music. As the song's lyrics are displayed on the screen (usually one line at a time), an animated ball bounces across the top of the words, landing on each syllable when it is to be sung.
The bouncing ball was invented at Fleischer Studios for the " Song Car-Tunes " series of animated cartoon s (both Max and Dave Fleischer later claimed to have devised the idea). It was introduced in September 1925 with the film "My Bonnie Lies Over the Ocean ". [cite book | title = Masters of Animation | author = John Grant | publisher = Watson–Guptill | isbn = 0823030415 | year = 2001 | url = http://books.google.com/books?id=fILQxHvuEHYC&pg=PA82&dq=famous-bouncing-ball&ei=JjbaRrX2CJfopQLL4emSCw&sig=WZsFqAI28wS2Efi4u0G45aUA5kY ] In these earliest films using the device, the bouncing ball itself was not animated. The effect was created by filming a long stick with a luminescent ball on the tip, which was physically "bounced" across a screen of printed words by a studio employee. The movement was captured on high-contrast film that rendered the stick invisible. [Maltin, Leonard. "Of Mice and Magic: A History of American Animated Cartoons" (New York: Plume Books, 1980), 89. ] It would usually appear as white-on-black, though sometimes the ball and lyrics would be superimposed over (darkened) still drawings or photographs. Later versions of the bouncing ball have used cel animation or digital effects. Some modern video editing programs achieve the same effect as the bouncing ball by highlighting each displayed syllable as it is sung.
The "Follow the Bouncing Ball" sing-a-long cartoons continued to be popular theater short subjects into the 1940s. In the United States, younger generations of children continued to be familiar with them from television rebroadcast of the old cartoons into the 1970s.
The bouncing ball has been used in many films and television program s over the years. High-profile modern use of the bouncing ball include its most prominent and extensive use on television was in Mitch Miller 's "Sing Along with Mitch" program (1961–1964). It was revived in the " The Simpsons " episode " 22 Short Films About Springfield ", in which it accompanies Cletus the Slack-Jawed Yokel 's theme song .
References
Wikimedia Foundation. 2010 .
Look at other dictionaries:Bouncing Ball Simulation System — The Bouncing Ball Simulation System is a program for the Mac OS that provides a physically accurate rendering of the motions of a ball impacting with a sinusoidally vibrating table. The program adheres to all the Macintosh interface guidelines,… … Wikipedia
Ball back — is a piece of terminology in both codes of rugby football.In both codes of rugby, if the ball enters touch, then play is restarted (either by a line out in rugby union or a scrum in rugby league) level with the point where the ball left the field … Wikipedia
Bouncing Boy — Superherobox| caption= character name=Bouncing Boy real name=Charles Foster Taine publisher=DC Comics debut= Action Comics # 276 (May 1961) creators= Jerry Siegel Jim Mooney homeworld= species= alliances=Legion of Super Heroes aliases=… … Wikipedia
Ball of the Century — The Ball of the Century, also referred to as the Gatting Ball [cite web|url=http://www.news.com.au/dailytelegraph/story/0,22049,20796817 5001023,00.html|title=Warnie s Ball of the Century |publisher=Daily Telegraph (Australia)|date=2006 11 21] or … Wikipedia
Ball-up — A ball up (pl. ball ups, a.k.a. bounce) in Australian rules football describes a method of restarting play at a neutral contest after a stoppage within the field of play. It is not to be confused with a boundary throw in which occurs in most… … Wikipedia
Ball — Balls are objects typically used in games. They are usually spherical but can be ovoid. In most games using balls, the play of the game follows the state of the ball as it is hit, kicked or thrown by players. Balls can also be used for simpler… … Wikipedia
Ball sport (Battlestar Galactica) — Triad or Pyramid is a team sport first shown in the Battlestar Galactica (1978) two part episode War of the Gods. A variation, with a different name (Pyramid), is shown in the reimagined Battlestar Galactica (2003) series.Original ContinuityIt… … Wikipedia
Ball (rhythmic gymnastics) — The Ball is a piece of apparatus used in rhythmic gymnastics. It is made of either rubber or synthetic material (pliable plastic) provided it possesses the same elastivity as rubber. It is from 18 to 20cm in diameter and must have a minimum… … Wikipedia
ball-up — /?b?l ?p/ (say bawl up) noun 1. Also, WA, bounce down. Australian Rules the bouncing of the ball by the field umpire to restart play after the ball has been smothered in a pack. 2. > balls up … Australian English dictionary
The Bouncing Souls — Bouncing Souls The Bouncing Souls performing on February 16, 2009 in Buenos Aires, Argentina. Background information Origin New Brunswick, New Jersey, United States … Wikipedia


However, remember that you need to evolve this chart as a class to give them a sense of ownership. Be sure to get them time to think this through. Why should a drop height of 0 be considered? Why should we take an average measurement? Does it matter if we work in centimeters or meters?
Explain Together:
This phase of the learning cycle involves the students making sense from the data they collected. Let's start with the bounce itself. Why does the ball bounce? Where did the energy come from that allows the ball to bounce up from the floor? When a ball is lifted above the ground, it gains the ability to fall under the influence of gravity (the mutual attraction of the ball and the earth). We call this ability to fall gravitational potential energy. We know that energy is neither created or destroyed but just changes forms. So, where did this gravitational potential energy come from? Ultimately, we can trace this energy back to the sun. Let's imagine that the sun's energy was stored as chemical potential energy in the bonds between the atoms of starch molecules in corn; then, when a chicken ate some of this corn, it was stored in the energy in the bonds between the atoms in the molecules in the egg the chicken laid --the egg you ate for breakfast. Now, this energy can be released in your muscles as you lift the ball up, with the energy still around as the gravitational potential energy of the ball. When we drop the ball, the gravitational potential energy of the ball is transformed into kinetic energy (movement energy) on the way down. When the ball hits, this kinetic energy is transferred into elastic potential energy as the ball is momentarily "squished" out of shape; and then the ball springs back and begins moving up, slowing down as it rises -- that is, as its kinetic energy is transformed back into gravitational potential energy.
It should be clear from the data collected that the ping pong balls did not bounce as high as the height from which they were dropped. Why not? Though it is true that energy is not lost from the Universe, at each stage in the process outlined above, some of the energy that the ball starts with (before it is dropped) transferred to other forms of energy out of this system. Since the ball has less gravitational potential energy at it highest point after it bounced than before you let it go, where did this energy go? Try closing your eyes, bouncing a ball and trying to tell when it hit. How can you tell? What caused the sound? What is sound? What leads you to believe that sound is a form of energy? Was energy 'lost' from the ball in any way other than the sound? In what way? Try swinging a piece of paper through the air flat and then on edge. Which was easier? Why? Where did the energy you expended go in each situation? As things move through the air, they experience friction with the molecules in the air and heat energy is produced. Try rubbing your hand rapidly on the desk. Notice that it is hot. Where did the kinetic energy of your hand go?
Now that we understand the basic energy interactions involved in our exploration, let's look at some numbers. What would be a good way to get a sense of the basic trend that our data takes? Remember, the Bermuda Bouncing Ball Company wants us to be able to predict what height the ball will bounce given some drop height. What if the height they call for is not one of the ones we tested? The graph is a good way of visualizing a trend in data and using it to predict data points we have not collected. The first step is to put your data in a spreadsheet. (The following work was done in Microsoft Excel. For more details on working with this data in Excel, including how to use a formula to calculate the average bounce height, click here.)
Note that the Average Bounce Height column (which will be calculated from the three pieces of data taken) is placed next to the Drop Height for ease of graphing later.
Before graphing, you have to ask, what sort of graph suits this data? Should this be a line graph or a bar graph. How can one determine this? A line graph is appropriate for continuos data. that is, data which makes sense at all values on the X axis. In this case, we can use a line graph since we could have taken readings at any point. (For instance, we might have taken a reading when dropping the ball from 17.7 cm, though we didn't. Compare this to discontinuous data. such as the number of birds of each species at my feeder. Though there are such things as Robins or Chickadees, there are no Chobins or Rickadees. A line graph cannot be used for discontinuous data.)
If we select the appropriate data in the spreadsheet (Drop Height and Average Bounce Height) and choose to do an X-Y scatter plot, we will be on our way. Before we go any further, we should ascertain whether we have stuck to the graphing conventions, with the independent variable (the one we manipulate) on the X axis, and the dependent variable (how the world responds) on the Y axis.
Does the data in our exploration suggest a trend? When it does, we often use a line of best fit or "trend line" to show this trend.
Of what use is the line of best fit? What does it allow us to do? What sacrifices are we making? Why don't we just connect the dots? A line of best fit allows us to get a sense of a trend while ignoring small deviations that may not be significant; and with the line of best fit, we can predict the results of experiments we haven't performed yet. For instance, if the Bermuda Bouncing Ball Company calls and wants data for a drop of 62 centimeters, we might interpolate and report that the bounce is likely to be 46 cm. If they decided to make a large version of their robot and needed a prediction for a 250 cm drop, we could use the line of best fit and extrapolate to report that the bounce is likely to be 180 cm. Interpolating (making an educated guess between two data points) and extrapolating (making an educated guess beyond your last data point) are both best guesses. Which is likely to be more accurate? Why? Why would one ever have to extrapolate?
The phone rings and, wonder of wonders, it is the Bermuda Bouncing Ball Company. They need three numbers, quickly. One is the prediction for a 54 cm drop, and the others are the predictions for a 200 cm drop and a 250 cm drop. Each group should make their predictions based on their graph and hand these predictions in. Then, each group should go out and test each of these three drop heights (do three trials for each and use the spreadsheet to average them) and compare these with their predictions.
In most cases, the bounce heights at 200 cm and 250 cm will be less than the predictions. Why? If there is a place where students could test a drop height that is greater than 250 cm (e.g. a stairwell), this should be tested as well; alternately, the teacher can have the data for a drop height that was done outside of class. Students can put in the data for these new drop points and make a new graph to see the trend:
Looking at the graph, it becomes clear that the relationship between drop height and bounce height is linear only for small drop heights. As the drop height increases beyond a meter, the bounce height begins to level off, and at 3 meters drop height it is likely to be totally level. However, a ball dropped from 10 meters certainly starts with more gravitational potential energy than one dropped from 3 meters. How can it be that both bounce to the same height? Where did the extra energy go? Remember, the ball is expending some energy just pushing through the air -- that is, some of its potential energy is transferred to the air in the form of heat from friction. The faster the ball is going, the more air it goes through per second. At some point, the ball reaches its terminal velocity where all the gravitational potential energy is changed into heat and none is used to increase speed.
The teacher should be doing formative evaluation all along, asking questions, assessing data collection techniques, looking at graphing strategies, assessing interpolation and extrapolation results, and evaluating reasoning processes and inferences related to the phenomena studied. By slowly introducing vocabulary and then using it throughout the lesson, the teacher will not only be reinforcing the ideas in the lesson, but she will also be getting a sense whether students have internalized the terms.
A summative evaluation for this lesson might include students writing a report to the Bermuda Bouncing Balls Company summarizing the process by which they took data and sharing the data and graphs as well as their interpretations of the data. The teacher should look for:North Carolina Standard Course of Study Competency Goals met by this activity.
(Note: the content of the lesson should be adjusted to suit the age and skill level of the students.)
Grade 5: Science
Competency Goal 2 The learner will build an understanding of forms and sources of energy, especially
2.03 Analyze the interaction and transformation of the forms of energy.
Grade 6. Science
Competency Goal 4 The learner will investigate the characteristics of energy transfer, especially:
4.04 Evaluate data for qualitative and quantitative relationships associated with energy transfer and/or transformation.
4.06 Examine the law of conservation of energy.
Grade 8: Science
Competency Goal 4 The learner will build an understanding of motion and forces, especially:
4.01 Analyze gravity as a universal force.
4.06 Describe and measure quantities that characterize moving objects and their interactions within a system.
Secondary: Physical Science
Competency Goal 1 The learner will construct an understanding of mechanics.
Secondary: Physics
Competency Goal 5 The learner will develop an understanding of the nature of mechanical energy.
All Grades: Technology/Computer Skills
Competency Goal 3 The learner will use a variety of technologies to access, analyze, interpret, synthesize, apply, and communicate information.
 Presentation Lessons from Kung Fu Panda By: anujmalhotra123
 Guardian Photographer of the Year 2015. By: MagdaBlanco
Views: 95
Guardian Photographer of the Year 2015. By: MagdaBlanco
Views: 95 Tips for Effective Use of Visual Aids in. By: sketchbubble
Views: 164
Tips for Effective Use of Visual Aids in. By: sketchbubble
Views: 164 2015 The year in pictures (part 1) By: guimera
Views: 112
2015 The year in pictures (part 1) By: guimera
Views: 112 Paneer Malvani Curry By: ChefSanjeevKapoor
Views: 74
Paneer Malvani Curry By: ChefSanjeevKapoor
Views: 74 16 Email Subject lines to increase your. By: galaxyweblinks
Views: 38
16 Email Subject lines to increase your. By: galaxyweblinks
Views: 38 11 Image Hacks to Create Visually Breath. By: anujmalhotra123
Views: 78061
11 Image Hacks to Create Visually Breath. By: anujmalhotra123
Views: 78061 The 8 Basic Components of Every Great Sp. By: CasMatteo
Views: 27103
The 8 Basic Components of Every Great Sp. By: CasMatteo
Views: 27103 Happy Halloween! By: authorSTREAM
Views: 25086
Happy Halloween! By: authorSTREAM
Views: 25086 How Limiting Beliefs Affect Self-Esteem. By: GabrielaTaylor
So, you want to follow along some of my Flash lessons?
Get 7 days of free unlimited access to lynda.com.
Follow that link and get 1 week of access, see how you like it.
NOTE: I wrote this tutorial in 2000, and intended it for students learning traditional, hand-drawn animation. Nevertheless, the principles can be adapted to Flash or 3D animation. The main tutorial page is here (there’s a walk cycle tuturial, and I’ll be adding Flash lessons soon).
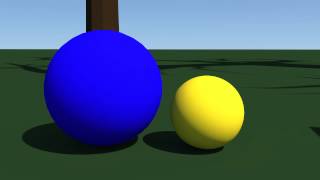
This exercise will teach you the most important priciples of animation, namely:
Timing/Spacing.
Squash and Stretch.
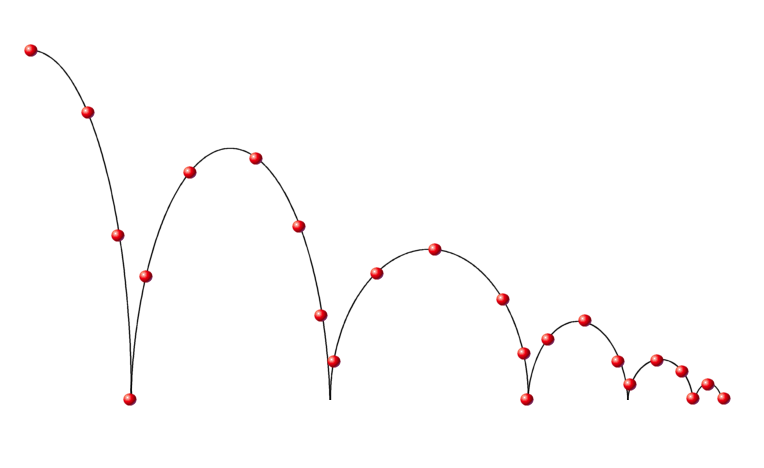
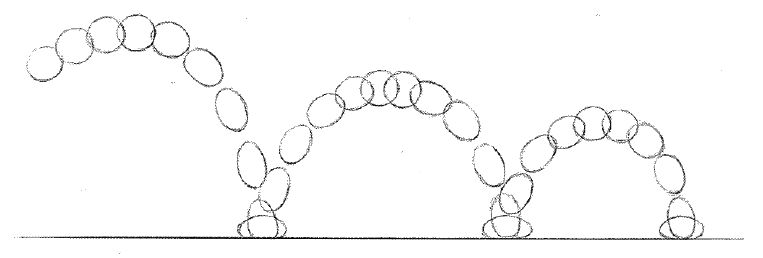
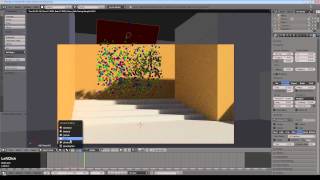
This is the first lesson taught to any animation student. It may seem boring, but by following it you will grasp most of the principals used in animation. Study the bouncing ball scene above: Look at it again with all the frames superimposed.
Now some of the techniques used become easier to see.
1. Arcs. The ball falls in an elliptical arc through space. Most things move in an arc of some kind. If the ball were to move in a straight line between the high and low points of the bounce, then the action would look very unnatural.
2. Timing. (or Spacing). As the ball falls it is accelerated by gravity, the gap between each frame growing all the time until the ball contacts the ground. As the ball bounces from the ground the opposite happens: as the ball hops up it moves very fast at first, then slows down by gravity into the high piont of its bounce. Note that at the high point of the bounce the ball is weightless…perfectly balanced between the force of gravity pulling it down, and its own momentum moving it forward.
3. Squash and Stretch. As the ball falls it stretches. When it impacts the ground it squashes. When it bounces off the ground it stretches again. Note how quickly the ball regains its circular shape. Too much squash and stretch can make an object look “mushy”.
4. Volume. The ball should remain the same mass as it squashes and stretches. If the ball were to squash too much it would seem to be growing physically bigger. This is very eye catching, and looks weird.
How to animate the ball. The process of animating the ball is straightforward. On a single sheet of paper, draw the arc path that the ball will follow.
On this drawing, tick off the position of each ball on the arc path with an X. Be sure to number them. In feature and tv animation, frames are usually numbered 1,3,5,7,9 and so on. To simplify things here, let’s number them 1,2,3,4, etc. For an explanation of why odd numbers are used in animation, see the appendix at the bottom of the page. It’s really boring, and should be a really nice cure for insomnia.
If you have a backlight, then switch it on. Put a clean sheet over the arc path drawing. Now you are ready to begin drawing the “Key” drawings of the animation: the points where the ball is at its most extreme. In this example, its highest and lowest points in the bounce.As you can see, frame 1 is the first and highest point in the sequence. It is therefore an extreme drawing. Frame 7 is the squash drawing where the ball hits the ground. It is also an extreme, as are drawings 12,17,21,25,28 and 31.
On seperate sheets of paper, you should draw the different key frames as named above. If done correctly you should have a series of drawing numbered 1,7,12,17,21,25,28 and 31.Be sure that you write the frame numbers on the top right and bottom right of each drawing. If your drawing is a key frame (as these are) then put a circle around the number.
Place them on the peg bar with the lower numbers on the bottom and the higher numbers on the top. Now you are ready to “roll” the drawings.
How to Roll the drawings: A lot of people working in animation seem to forget how tricky this is. It is a fairly easy skill, it just takes a little practice. Do it slowly at first, as you progress you’ll begin to do it instinctively. There are people working in the industry who aren’t smart enough to chew gum and fart at the same time, and they can do it. So don’t worry. It takes a little time, but you’ll get the hang of it.
Back to the ball: Now you must add the inbetween frames. These are the drawings that go between the keys in order to make the action look smooth. It’s common for these to be called “tweens”, thanks to digital animation programs – but traditional animators call them “inbetweens” (the correct term).
All frames are equal, but some frames are more equal than others. You must determine which is the most important frame to draw next. Which has the most important action?
In this case, the most important is frame 6. It is the most stretched frame in the falling sequence. Therefore I would consider this almost as much a key frame as 1 and 7. If you have a backlight, switch it on. Put the arc path drawing on the pegs first. Then put down 1. Put down 7. Then put down a blank sheet. You should see something like this:
Now you are going to draw frame 6. Begin to sketch in the stretched ball. When stretching the ball, keep the volume consistent. The overall mass of the ball must be the same. Position it around the x drawn on the arc path. When you have finished, you will have to flip the paper to see if it moves right:
How to flip the drawings:
Flipping is similar to rolling, but whereas with rolling you move through the pages sequentially, here you move from the bottom drawing, to the top one, then to the middle one. “WHY?” you ask….because this way you can see the inbetween in motion and make subtle corrections as you work. Incredible as it seems, this method is far more accurate than a lighttable.
Watch the paper closely. Notice that both index and middle fingers are wedged between the top two layers. You begin flipping by holding up both top sheets of paper towards you. You are now looking at the lowest frame, frame 1. Then you drop the two sheets down to the board, revealing the topmost drawing, i.e. the inbetween frame. Then you lift up the top drawing to reveal the one in the middle, i.e the final keyframe. It takes time to get the hang of this. It will be well worth the effort if you do.
Now you will need to add the remaining inbetween drawings between 1 and 5. The easiestway to do this is with a timing chart. Lets look at what we’ve got so far:
You could “eyeball” all the remaining frames, but the surest way to do them is by writing a timing chart. It will look something like this:
The timing chart will go on frame 1, beneath the frame number on the top right of the drawing. This chart tells you that the next most important drawing is 5. That’s why it’s underlined. Note how the spacing on the timing chart relates to the spacing on the arc path above. The chart can determine the position of all the inbetween frames, and also their weight, mass, speed, etc.
Now you have keyframe 1 with a timing chart, and keyframe 6. Simply follow the chart, place the arc path on your drawing board, then 1, Then 6, and proceed to follow the timing chart. Draw 5.
Note: see how quickly the ball regained its shape…if you were to inbetween the shape as well as the position of the ball then the ball would feel very mushy…by drawing 5 as circular, the scene will be much snappier. Repeat inbetweening until the first arc of the bounce is complete. Repeat the process for all frames of the scene.
I have included all the original frames for this scene as digital files. They should print out onto regular A4 printer paper. You can print them out and peg them up onto strips of punched paper, allowing you to roll through the scene. You line them up with the crosshairs on the corners of the page. Simply paste up frame 1 as you like it, then put it on your drawing board. Then put down a strip of punched paper, and position frame 2 with its crosshairs lined up with frame 1.
IMPORTANT: all frames should be positioned against frame 1, otherwise the scene will “drift”.
You can find the files here: Bouncing ball image files. You’ll need winrar to decompress them (most zip programs should work on them).
Appendix: Numbering drawings.
Most animation is still produced for film and tv. Film is projected at 24 frames per second (fps). Early cartoons were all drawn with 24 drawings for every second of film, i.e. onedrawing for every frame of film. Some clever chap finally realised that the animation looked just as good if only 12 drawings were drawn per second of film. Each drawing would be shot twice, to keep the overall timing the same. Nobody noticed the difference, and a lot of carpal tunnel doctors went out of business.
This discovery can be attributed entirely to prohibition. Animators of the twenties were notorious alcoholics. Not these days, glad to say. Today’s breed are wholesome family men, loyal to their wives, good fathers, upstanding members of society, clean living wackos.
The practice of animating 12 fps is called animating “on twos”, and the practice of animating 24 fps is called animating “on ones”. It was still occasionally necessary to animate scenes on ones if a fast action was required, or if the camera panned over the background, i.e. move from left to right to follow a character across the screen. Such shots would look jerky if shot on twos.
When working on twos the animators usually number their frames with odd numbers. 1,3,5 and so on. Frame one is shot twice, frame two is shot twice, ad nauseum. If a point in the scene demands a fast action such as a punch or a shake, then the scene can be switched to ones at thatpoint. The numbering can then include the even numbers that will make the action smoother.
If all this sounds like gibberish, don’t worry. It’s not relevant to anything in the next few lessons.
One last comment about timing: Today a lot of animation is made on computers, and can be projected at any frame rate desired. 10 fps looks fine. Most Japanese animation has been animated at 8 fps for years…a method known as animating “on threes”, as each drawing is shot 3 times, producing 8 frames per second.
That’s it for the ball…
Coming soon: Lesson 2: The Walk.
In this game there is a grid of balls that are slowly moving down. You need to shoot balls to destroy them by forming groups of 3 or more balls of the same colour. After you have destroyed some balls, the balls that are not attached the the rest of the balls will fall down and be destroyed. Sometimes you may need to shoot the balls to the wall so that they bounce off and destroy other balls. If you cannot destroy all the balls before they reach the bottom of the screen, you lose.
Bouncing Balls is a Shareware software in the category Miscellaneous developed by Novel Games Limited .
It was checked for updates 0 times by the users of our client application UpdateStar during the last month.
The latest version of Bouncing Balls is 1.5.2, released on 11/15/2014. It was initially added to our database on 10/29/2007.
Bouncing Balls requires any Windows operating system to be running on the computer it will be installed on.
Users of Bouncing Balls gave it a rating of 4 out of 5 stars.
This project is abandoned.
Whether this project is out of date or its author marked it as abandoned, this project is no longer maintained.
Create Bouncing Balls!Actually, it was just a fun plugin so I had not planned to add advanced features. Let's see how the number of downloads develop in the next days.
How does one go about removing a number of bouncing balls rather than all bouncing balls? Perhaps a "/bouncingball remove <radius>" command could work.
And time for a few suggestions:
Antarctic Special Operations, home of the buggiest (modded) server ever! With the most incompetent admin (me) also! Currently unplayable on survival due to construction accidents involving but not limited to a rebar in the face. I'll consider opening for Beta testing as soon as I overcome my incompetence. <3
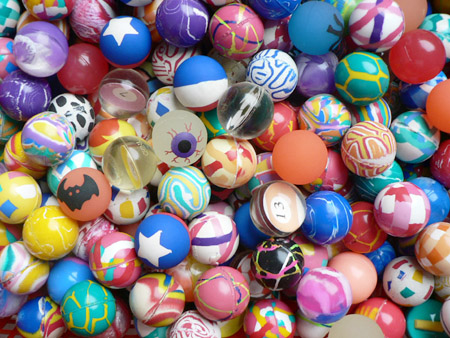
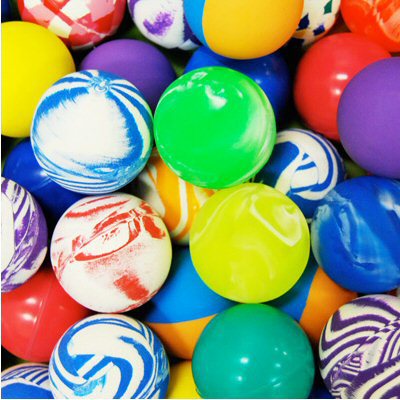
Bouncy balls and bulk Superballs for sale! We have the largest selection of bulk bouncy balls and Superballs in bulk at cheap prices with no sales tax! Whether you call them bouncy balls, superballs or high bounce balls, we offer dozens of colors and styles in various sizes.
 What size Bouncy Balls do I need?
The size of bouncy ball that you need depends on your vending machine and the type of dispensing wheel inside of it. If you have a smaller vending machine meant to dispense Gumballs or 1-inch toy capsules, you will need to purchase 27mm bouncy balls. If your machine is designed for larger 2-inch toy capsules you will need either 45mm or 49mm bouncy balls to vend those items.
If in doubt, you can measure the diameter of the circular holes in the dispensing wheel of your bouncy ball machine to determine what the correct size is. Measure directly across the circle from one edge to the other to find it's diameter. Bouncy balls are also measured by their diameter and the largest size bouncy ball that your machine can dispense will be just smaller than your measurement of the dispensing wheel.
Can I mix Bouncy Balls with other products in my vending machine?
If you would like to spice up your bouncy ball vending machine by mixing in other types of vending products, Read on to find out which vending products work well together.
One inch vending products and 27mm Bouncy Balls - A good rule of thumb is to avoid mixing edible and non-edible products, this is especially true with trying to mix bouncy balls with edible products like gumballs or jawbreakers. Many types of bouncy balls start come with a strong rubber smell from the manufacturing facility where they are sealed into bags and this can often times overpower the natural aroma of your edible products. 27mm Bouncy balls can be mixed with 1.1" acorn toy capsules with out any problems or concerns.
Two inch vending products and 45mm or 49mm Bouncy Balls - Similar to the smaller vending items, you will want to avoid mixing edible and non-edible items in the same machine. Due to the larger size and greater weight of both the 45mm and 49mm bouncy balls, it is best to exercise caution while filling your vending machines. The weight of the bouncy balls can cause the two inch toy capsules to pop open if dropped on top of the capsule. In our experience, it works best to layer the toy capsules and bouncy balls as you fill your vending machine, the contents will continue to shift and mix as more and more items are vended out of the machine.
How do I estimate Bouncy Ball shipping rates?
When you buy bouncy balls, the more you buy, the more you save, but the weight also increases as the quantity increases. Learn how to get your bouncy ball shipping quote before you place an order.
Because shipping costs are based on your location and the weight of the item that you are purchasing, to estimate the shipping of your bouncy balls, you will need to add the desired quantity of bouncy balls to your shopping cart and then use the estimate shipping box in the center of the shopping cart page to receive a shipping quote. The estimate shipping link on most product pages will give you a shipping quote for that product, but on the bouncy ball pages, the tool does not know how many bouncy balls you would like to order and does not know what weight to use to estimate shipping costs. When you add a specific quantity of bouncy balls to your shopping cart, the shipping estimation tool on that page has all of the information that it needs to tell you exactly what it will cost to ship your entire order to the selected zip code.
Watch Cool Bouncy Ball Videos
Watch a collection of videos showing bouncy balls doing incredible things like being dropped from a helicopter or bouncing their way through a city street. Watch the Videos.
20,000 Bouncy Balls Dropped from a Helicopter at Utah State University in Logan, UTIn order to promote science, a team of students at the University of Utah organized a community event to drop 20,000 super balls from a helecopter and filmed the results.
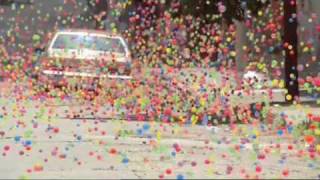
These bouncy balls were used in a commercial to show the high quality of Sony's Bravia line of TVs, They filmed 6 takes with a quarter of a million super balls per take for a total of 1.5 million super bouncy balls to be picked up at the end of the day. Sounds like fun to us.
Fun around the house with Bouncy BallsThis video shows how much fun you can have around the house with a few bouncy balls. It turns out that not all of us have a helicopter or a budget that will support 250,000 bouncy balls turned loose in the streets of San Francisco, but we can all have fun with bouncy balls!
Published January 29, 2013 by CSS Newbies.
Today we’re going to create a ball that bounces infinitely around its container.
I’ll admit it: the idea for this tutorial was based on two things: first, those corny bouncing ball/logo/whatever screensaver animations that are so popular on modern televisions, DVD players, or just about anything else that has — or outputs to — a screen. Second, a brief but passionate love affair I had with Jezzball in 2001.
So if bouncing balls are so old-school, what’s the big whoop? We’ll do ours entirely with CSS.
The HTML we need is pretty minimal: we need an element to be the ball, and we need a container for it to bounce around in. I’m keeping things short and sweet here:
Like in my sphere tutorial. I’m using the good ol’ <b> tag for the ball.
The Box CSSThere are three things we need to do here: style the box, style the ball, and animate the ball within the box. We’ll take them in that order.
First up, we’ll give our container some visual interest.
Some of these styles are arbitrary: you can give it any background-color, margin, box-shadow, border, and border-radius you wish. The rest are more important. Our box needs a defined width and height. You can define that in whatever units you want, but it’d be a good idea to define the ball using the same units. And the relative position is critical, because that’s what will allow the ball to move around in its container. The hidden overflow is necessary to prevent any “extras” we add to the ball from showing up outside of the box.
The Ball CSSNext, we’ll style the ball:
The absolute positioning is the most critical bit here: that’s what allows us to move the ball within its container. You’ll also notice a lot of similarities to how we created the sphere in the last tutorial. This is a slightly simplified version: I’ve rounded its corners and used an inset box-shadow to create a 3D effect, but at this small size I didn’t bother with any other tweaks. I did, however, add a second box-shadow, which you can see on this line:
Some CSS3 properties accept multiple values, separated with a comma, and box-shadow is one of them. The first box-shadow, before the comma, is our shading. The second is a faint shadow to the bottom-right of the ball, which further suggests a light source to the top-left. And by moving the shadow 15 pixels away from the ball, it also gives our box the illusion of depth.
After all that, we’re left with something like this:
It’s not much to look at without the animation, so let’s move on.
The Animation KeyframesTo animate our ball, we’re going to use CSS keyframes. Keyframes allow us to animate any number of CSS properties over time. We’ll use two very simple keyframes to manage our mischief.
First, let’s create a keyframe to move our ball along the x-axis:
As you can see, this is really just the same keyframe repeated for each of the major browsers. Keyframes are a newer addition to CSS, so we’re stuck using vendor prefixes for the short term.
All this keyframe does is move our ball from the left side of the box to the right. Because ‘left’ positioning uses the left corner of the element to determine placement, our leftmost position is calculated as the width of the box, minus the width of the ball: 500px – 20px = 480px.
We can apply the animation to our ball by adding the following rules to the ball:
Again, we have one rule for each of the major browser prefixes. I’m using animation shorthand here, so I’ll walk through it. We’re saying to animate the ball using the moveX keyframe rules, it should take 3 seconds to complete the animation, we want linear easing (that is, don’t slow down (ease) at the ends of the animation), we want a 0 second starting delay, we want the animation to repeat infinitely. and we want it to alternate from front to back, instead of looping around to the beginning when it repeats.
Of course, that only gives us an animation along the x-axis. Now, we could easily just change the “top” values in addition to the “left” values in our existing keyframe. But there’s a problem with that. If we define the both in the same spot, the ball will always bounce from the top-left corner, to the bottom-right, and back. If that’s what you want or need, perfect. But I want some variety.
So instead, we’ll create a second keyframe to control our movement on the y-axis:
This is basically the same as our moveX keyframes: we’re moving the ball from the top of the box, to the bottom (minus the width of the ball).
Bring It All TogetherAnd here’s where it gets interesting. Elements can have more than one keyframe animation applied to them at the same time, separated with a comma, just like box-shadow. And more interestingly, each animation can have a different timing value! So let’s change up our ball animation to look like this (I’m only showing one for brevity):
moveX is still there, though I’ve tweaked the animation to take 3.05 seconds to complete. Then, after a comma, we have our moveY animation, which takes 3.4 seconds to complete.
Why the different times? It means that the animations will finish their loops at slightly different points. This makes the ball appear to bounce randomly about the container, seemingly never hitting the same spot. It does, of course – after 207.4 seconds in this example, according to math – but you can modify that frequency by changing the number of seconds the animations take.
Here’s the whole thing in action:
Give it a try in the demo, and modify the animation values to see how it effects the movement of the ball.
Note: As with almost everything awesome and CSS3, you’ll need a modern browser to make this work. You should be fine with the latest versions of Chrome, Safari, Firefox, and Opera. IE10+ on this one, as IE9 and below doesn’t understand keyframes.