


 Рейтинг: 4.0/5.0 (1847 проголосовавших)
Категория: Windows: Инсталляторы
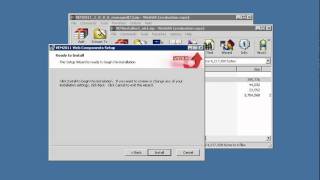
You can find below detailed information on how to remove Components Setup for Windows. It is written by Vimicro Corporation. You can read more on Vimicro Corporation or check for application updates here. Click on http://www.vimicro.com to get more details about Components Setup on Vimicro Corporation's website. The program frequently installs in the C:\Program Files\InstallShield Installation Information\<31187E06-E131-4709-9285-7D105D77AA89> folder (same installation drive as Windows). You can uninstall Components Setup by clicking on the Start menu of Windows and pasting the command line C:\Program Files\InstallShield Installation Information\<31187E06-E131-4709-9285-7D105D77AA89>\setup.exe -runfromtemp -l0x0009. Note that you might be prompted for admin rights. The application's main executable file has a size of 449.46 KB (460248 bytes) on disk and is named setup.exe.
The following executables are contained in Components Setup. They occupy 449.46 KB ( 460248 bytes) on disk.
This page is about Components Setup version 1.00.0000 only. Some files and registry entries are usually left behind when you uninstall Components Setup.
Directories that were left behind:
The files below remain on your disk by Components Setup when you uninstall it:
You will find in the Windows Registry that the following keys will not be removed; remove them one by one using regedit.exe:
Open regedit.exe to delete the registry values below from the Windows Registry:
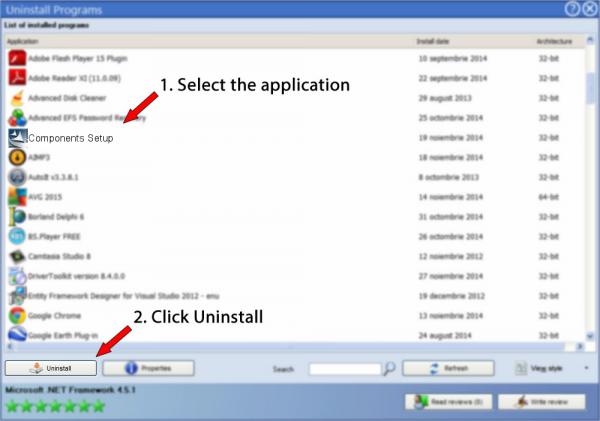
Components Setup is a program marketed by the software company Vimicro Corporation. Some users want to remove this program. This is difficult because uninstalling this by hand takes some experience related to removing Windows programs manually. One of the best EASY solution to remove Components Setup is to use Advanced Uninstaller PRO. Here is how to do this:
1. If you don't have Advanced Uninstaller PRO already installed on your Windows system, install it. This is good because Advanced Uninstaller PRO is one of the best uninstaller and general tool to optimize your Windows computer.
3. Press the General Tools category
4. Click on the Uninstall Programs tool
5. All the programs existing on the computer will be made available to you
6. Navigate the list of programs until you find Components Setup or simply activate the Search feature and type in "Components Setup". If it is installed on your PC the Components Setup application will be found very quickly. Notice that after you select Components Setup in the list of apps, the following information about the program is made available to you:
8. After uninstalling Components Setup, Advanced Uninstaller PRO will ask you to run an additional cleanup. Press Next to perform the cleanup. All the items of Components Setup that have been left behind will be found and you will be able to delete them. By removing Components Setup using Advanced Uninstaller PRO you are assured that no Windows registry entries, files or folders are left behind on your computer.
Your Windows computer will remain clean, speedy and ready to take on new tasks.
Geographical user distribution


SETUP TUTORIAL COMPONENTS.MSI представляет собой разновидность файла MSI. связанного с MSDN BackOffice Server Test Platform, который разработан Microsoft для ОС Windows. Последняя известная версия SETUP TUTORIAL COMPONENTS.MSI: 1.0.0.0, разработана для Windows. Данный файл MSI имеет рейтинг популярности 1 звезд и рейтинг безопасности "Неизвестно".
Почему у меня наблюдаются ошибки в файлах типа MSI?Если Windows не может нормально загрузить файл SETUP TUTORIAL COMPONENTS.MSI. или файл MSI заражен вирусом или вредоносным ПО, вы увидите сообщение об ошибке. Для получения дополнительной информации см. "Причины ошибок SETUP TUTORIAL COMPONENTS.MSI" ниже.
В каких случаях появляются ошибки в файлах типа MSI?Ошибки MSI, например, связанные с SETUP TUTORIAL COMPONENTS.MSI, чаще всего появляются во время запуска компьютера, запуска программы или при попытке использования специфических функций в вашей программе (например, печать).
Распространенные сообщения об ошибках в SETUP TUTORIAL COMPONENTS.MSIНаиболее распространенные ошибки SETUP TUTORIAL COMPONENTS.MSI, которые могут возникнуть на компьютере под управлением Windows, перечислены ниже:
Такие сообщения об ошибках MSI могут появляться в процессе установки программы, когда запущена программа, связанная с SETUP TUTORIAL COMPONENTS.MSI (например, MSDN BackOffice Server Test Platform), при запуске или завершении работы Windows, или даже при установке операционной системы Windows. Отслеживание момента появления ошибки SETUP TUTORIAL COMPONENTS.MSI является важной информацией при устранении проблемы.
This chapter describes how to configure the setup components that are required to create a product offering in Oracle Communications Pricing Design Center (PDC).
To configure setup components, you must also understand the following:
Extensible markup language (XML) programming
XML schema definition (XSD)
About Setup ComponentsSetup components are the prerequisite data that you configure before creating a product offering. For example, before creating a product offering, you must configure the services that your customers can purchase.
Some setup components are defined in PDC and some components are mastered in Oracle Communications Billing and Revenue Management (BRM) and the rating system and need to be loaded into PDC.
The following setup components are defined in PDC. Any modifications to these components are also handled by PDC and are transformed to BRM and rating system.
Ratable Usage Metrics (RUMs). A RUM specifies the units to measure events and how to calculate the measurement. You can base a measurement on any data captured in an event, such as how long a session lasted or the number of bytes downloaded during a session.
Service-event maps. The service-event map lists all the services to which charge offers and discount offers can apply. For each service, the map specifies which events can have charges configured for that service. The map also specifies the RUMs to use for each service-event combination.
Balance elements. A balance element represents a currency or noncurrency asset of economic value, such as U.S. dollars. When you configure pricing in a charge offer, you specify the balance elements that are debited or credited when the charge offer is used to rate an event. For example, a charge of one dollar per minute for a phone call affects the US Dollars balance element.
Impact categories. Impact categories enable you to use the same charge to apply to different balance impacts based on various event attributes. For example, to configure different impacts for calls made to different countries, you create impact categories for each country. When a call occurs, the impact category determines which pricing to apply.
Zone models. A zone model is a set of zone rules that associate the origin and destination of a call to an impact category.
You can configure the following types of zone models:
Standard Zone Model: Associates the origin and destination area codes of a call to an impact category.
Geographical Zone Model: Associates the distance between the origin and destination area codes of a call to an impact category.
Value maps. A value map is a hierarchical structure of zones and corresponding values. Each zone contains a group of values that apply to a single event attribute, such as an area code, an IP address, or a broadband bit rate.
Special day calendars. A special day calendar is a set of dates, such as holidays, for which you want to charge special prices for your services. These dates are used in a time model to define a time period. A time period can be used in a charge offer to determine a price.
Custom rules. A custom rule is a named expression that is used in a generic selector rule to guide to a price.
Profile attribute specifications. A profile attribute specification specifies the name of a profile that is used to assign special rating attributes to a subscriber. A profile attribute specification can be associated to one or more services or to an account. Profile attribute specifications are referenced in custom rules.
Item type selector. An item type selector contains rules and item specifications for assigning balance impacts to bill items. These rules and specifications enable you to assign different bill items for balance impacts within the same event. For example, you can define separate bill items for international and national calls and apply a different tax to each bill item at billing time.
Item type selectors are designed to be used only with Oracle Communications Billing and Revenue Management (BRM) Elastic Charging Engine (ECE).
The following setup components are mastered in BRM and the rating system. Any modifications to these components are also handled by BRM and the rating system and must be synchronized with PDC.
Service definitions. A set of attributes pertaining to a type of service. Service definitions are used for provisioning a service or for determining a price. For example, the service definition can be used to hold the user identity or the quality of a service.
Event definitions. A set of attributes pertaining to a type of transaction. Event definitions are used in charging and billing. For example, you can use the time the call was made, the origin and destination of the call, or the duration of the call to determine how to charge for the event.
Account definition. A set of attributes that define the characteristic of a customer account, such as location, type, and age.
General ledger (G/L) IDs. A G/L ID is an ID assigned to the balance impact. The G/L ID ensures that the balance impact is reported to the correct account in your company's G/L. For example, you keep a record of revenue from usage fees by mapping usage balance impacts to G/L IDs.
Provisioning tag names. In BRM, provisioning tags implement extended rating attributes (ERAs), which provide special charges or discounts based on a specific attribute of a service or an account, such as a telephone number. For example, a provisioning tag could specify that a charge offer uses a discount for calls to friends and family on a subscriber's birthday.
Tax codes. A tax code is a code that identifies a type of charge offer, such as a subscription or a physical commodity. You map tax codes to taxation packages that calculate the tax on the charge offers or to custom tax rates that you define. A tax code indicates which tax to apply based on the PDC charge offer.
Tax suppliers. A tax supplier is a company or company division responsible for collecting taxes. Taxes can be calculated differently depending on the location of the tax supplier.
Business Profiles. A business profile defines the requirements and key-value pairs that are used by BRM to determine how the bill units are billed. This enables you to aggregate balance impacts in the bill items based on how the bill items are used. For example, business profiles can be used to classify bills as prepaid or postpaid to determine how bills and payments are handled.
See "About Creating Product Offerings" for a description of each of the setup components.
Configuring Setup ComponentsYou configure the setup components in PDC by using the following applications:
PDC UI. Use to create and modify setup components using a graphical user interface. See the PDC Help for more information.
ImportExportPricing utility. Use to import setup components defined in an XML file into PDC. See "Importing and Exporting Pricing and Setup Components" for more information.
SyncPDC utility. Use to synchronize setup components defined in BRM and the rating system with PDC. See "Synchronizing Setup Components" for more information.
Table 4-1 lists the setup components, the order in which you should configure the data, whether the setup component is required or optional, and the application that you use to configure them.
Some of the pricing setup data is optional. You must configure the optional pricing setup data only if you plan to use the related feature or perform certain business functions. For example, you configure a zone model only if you use zoning to determine a price in your charge offer.
Наверняка вы замечали, что самый первый вход пользователя в систему занимает несколько больше времени, чем все последующие. Это связано с тем, что при входе к пользователю применяются настройки различных программных продуктов, таких как Microsoft Office, Internet Explorer и т.п. Механизм, реализующий эти настройки, называется Active Setup.
Active Setup предназначается для однократного применения настроек ПО, поэтому для каждого пользователя он отрабатывает только один раз. При последующем входе в систему того же пользователя вы его уже не увидите, зато если в систему зайдет другой пользователь, для него весь процесс повторится.
Эту особенность Active Setup можно использовать в том случае, когда необходимо однократно выполнить какое либо действие, например произвести настройку пользовательского окружения для нового пользователя или установить\обновить ПО.
Настройки Active Setup находятся в реестре, в разделе HKLM\Software\Microsoft\Active Setup\Installed Components. Для каждого компонента есть отдельный раздел с именем, состоящим из уникального идентификационного номера (GUID). В разделе есть несколько параметров, из которых нас интересуют следующие:
(по умолчанию) — название компонента, которое отображается при выполнении;
StubPath — команда, которая должна быть выполнена. Здесь можно указать команду, скрипт (cmd, vbs или powershell) или исполняемый файл;
Version — версия компонента в текстовом формате, элементы разделены запятыми (напр. 1,0,00).
Принцип работы Active Setup прост. При входе пользователя система сравнивает содержимое разделов HKLM\Software\Microsoft\Active Setup\Installed Components и HKCU\Software\Microsoft\Active Setup\Installed Components. Для каждого раздела в HKLM должна быть копия с тем же GUID в HKCU. Дальше есть три варианта развития событий:
1. Если копии нет, то выполняется команда, указанная в StubPath, после чего в HKCU создается раздел с тем же GUID и прочими параметрами.
2. Если копия есть, то сравнивается значение параметра Version. Если версия в HKCU младше, чем в HKLM, то задание отрабатывает повторно, после чего номер версии в HKCU обновляется.
3. Если же раздел с одинаковым GUID есть и в HKLM и в HKCU и номер версии у них совпадает, то значит компонент уже отработал для данного пользователя и запускать его не требуется.
Создание нового компонентаПервое, что нужно для создания собственного компонента — это GUID. Сгенерировать его можно с помощью PowerShell, командой:
[System.Guid]::NewGuid()
Затем в разделе HKLM\Software\Microsoft\Active Setup\Installed Components создаем подраздел с новым GUID и добавляем в него необходимые параметры Version и StubPath, а также при желании указываем имя компонента. Для примера я добавил в StubPath простенький cmd-скрипт, который выводит строку текста и ждет нажатия клавиши.
И при следующем входе в систему наш скрипт отрабатывает вот таким образом.
Используя GPOДля централизованного управления Active Setup можно задействовать групповые политики. Для этого есть специальный инструмент «Предпочтения групповой политики» (Group Policies Preferences), который в числе прочего позволяет редактировать реестр. Порядок действий такой:
Сначала открываем редактор и создаем новый GPO. Открываем его на редактирование и переходим в раздел Computer Configuration\Preferences\Windows Settings\Registry. Кликаем правой клавишей и в контекстном меню переходим на New -> Registry Item.
Задаем все необходимые параметры ключа (путь, имя, тип), в качестве действия указываем создание (Create).
Таким же образом создаем все необходимые ключи. Затем полученную GPO привязываем к подразделению (OU). Теперь после применения политики задание отработает на всех компьютерах, находящихся в этом OU. А если потребуется перезапустить задачу, то достаточно отредактировать версию компонента (например с 1,0,0 на 1,0,1) и задача отработает повторно.
И в заключение одна особенность, которую нужно учитывать при использовании ActiveSetup. Дело в том, что ActiveSetup запускается перед загрузкой рабочего стола. Команды стартуют синхронно, при этом на время их выполнения вход в систему блокируется. И если созданное вами задание по какой либо причине не сможет отработать, то войти в систему не удастся. Поэтому перед применением скрипт\приложение стоит тщательно оттестировать.

Catalyst is a modern framework for making web applications without the pain usually associated with this process. This document is a reference to the main Catalyst application. If you are a new user, we suggest you start with Catalyst::Manual::Tutorial or Catalyst::Manual::Intro .
See Catalyst::Manual for more documentation.
Catalyst plugins can be loaded by naming them as arguments to the "use Catalyst" statement. Omit the Catalyst::Plugin. prefix from the plugin name, i.e. Catalyst::Plugin::My::Module becomes My::Module .
If your plugin starts with a name other than Catalyst::Plugin. you can fully qualify the name by using a unary plus:
Special flags like -Debug and -Engine can also be specified as arguments when Catalyst is loaded:
The position of plugins and flags in the chain is important, because they are loaded in the order in which they appear.
The following flags are supported:
Enables debug output. You can also force this setting from the system environment with CATALYST_DEBUG or <MYAPP>_DEBUG. The environment settings override the application, with <MYAPP>_DEBUG having the highest priority.
This sets the log level to 'debug' and enables full debug output on the error screen. If you only want the latter, see $c->debug .
Forces Catalyst to use a specific engine. Omit the Catalyst::Engine. prefix of the engine name, i.e.:
Forces Catalyst to use a specific home directory, e.g.:
This can also be done in the shell environment by setting either the CATALYST_HOME environment variable or MYAPP_HOME ; where MYAPP is replaced with the uppercased name of your application, any "::" in the name will be replaced with underscores, e.g. MyApp::Web should use MYAPP_WEB_HOME. If both variables are set, the MYAPP_HOME one will be used.
If none of these are set, Catalyst will attempt to automatically detect the home directory. If you are working in a development envirnoment, Catalyst will try and find the directory containing either Makefile.PL, Build.PL or dist.ini. If the application has been installed into the system (i.e. you have done make install ), then Catalyst will use the path to your application module, without the .pm extension (ie, /foo/MyApp if your application was installed at /foo/MyApp.pm)
Вы наверняка не раз замечали при первом входе в систему на компьютере с Windows XP или 2003, такие окошки?
На Windows Vista/2008 и выше, этот процесс выглядит иначе:
Это происходит только при первом входе, зайдя в систему во второй раз под этим же пользователем, вы их уже не увидите. Но зато если на этот компьютер зайдет другой пользователь, для него весь процесс повторится заново. Что же это такое, и как оно может быть полезно системным администраторам? 
Этот функционал называется Active Setup, и предназначен он как не сложно догадаться для разового применения пользовательских настроек различных продуктов. Например с помощью Active Setup настраиваются некоторые компоненты Microsoft Office, Internet Explorer Enhanced Security Configuration и т.п.
Как он может понадобиться не-разработчикам? Если вам придётся применять какие то параметры пользователей (отсутствующие в групповой политике) в большой сети, Active Setup – прекрасное решение. Кроме того он пригодится когда после установки системы надо выполнить какую либо команду один раз под каждым новым пользователем входящим на компьютер.
Добавить свой элемент Active Setup очень просто. По сути это просто ключ реестра в HKEY_LOCAL_MACHINE\SOFTWARE\Microsoft\Active Setup\Installed Components, желательно с GUID в качестве имени. Получить новый GUID для вашего элемента Active Setup можно например выполнив в PowerShell команду [guid]::NewGuid()
Внутри ключа могут находятся следующие параметры:
Есть еще несколько необязательных параметров, их можно подсмотреть у соседних элементов ActiveSetup.
После того как вы подготовили этот ключ – можете распостранить его по компьютерам любым удобным вам образом, например включить в образ операционной системы или выполнив с помощью ConfigMgr или стартап-скрипта команду reg import.
Теперь давайте рассмотрим как этот механизм работает. На самом деле всё очень просто.
При входе пользователя в систему, Windows сверяет содержимое ключей HKEY_LOCAL_MACHINE \SOFTWARE\Microsoft\Active Setup\Installed Components и HKEY_CURRENT_USER \SOFTWARE\Microsoft\Active Setup\Installed Components. Для каждого ключа из HKLM ищется копия с таким же GUID в HKCU и если не находится, то выполняется команда из StubPath, и по её завершению, в HKCU создается ключ с таким же GUID, версией, и т.п.
Если же ключ есть и в HKLM и в HKCU, то сравнивается версия, и если версия в HKCU младше чем в HKLM, то компонент запускается снова, а затем обновляется версия в HKCU.
Ну и разумеется если совпадает и GUID и версия, то это значит что компонент уже запускался для этого пользователя, и снова его выполнять не надо.
Ну и в качестве примера:
В этой статье хочу поговорить об интересной, и почему-то редко применяемой системными администраторами технологии Windows под названием Active Setup. Ниже показаны пара скриншотов, которые, вы, вероятно, не раз видели при первом входе в систему Windows. В Windows 7/2008/Vista окошко процесса выглядит так:
В Windows XP /2003 тоже самое окно такое:
Данное окно появляется лишь один раз при первом входе пользователя в систему, если зайти в систему второй раз под той же учетной записью, его вы уже не увидите. Если же на этот же компьютер попытается залогиниться новый пользователь, то для него процесс повторится заново.
Вышеописанная процедура это функционал технологии Active Setup, которая, как вы уже догадались, нужна для разового применения пользовательских настроек программ и различных компонентов Windows. С помощью Active Setup конфигурятся параметры Internet Explorer, часть компонентов Microsoft Office и т.д.
Чем же эта функция может быть полезна системным администраторам? На мой взгляд, Active Setup прекрасно подойдет для больших сетей и ситуации, когда необходимо применить некоторые параметры пользователей, отсутствующие в групповой политике. Или же в случаях, когда нужно выполнить какую-либо команду один раз под каждым новым пользователем, регистрирующимся на компьютере.
Чтобы добавить собственный элемент Active Setup, нужно создать новую ветку реестра вида HKLM\ SOFTWARE\ Microsoft\ Active Setup\ Installed Components\[Код_продукта] — где [Код_продукта ] — GUID кода продукта в MSI пакете. Однако, это может быть произвольная строка, главное чтобы она была уникальной для этой машины.
Внутри созданной ветки могут быть следующие параметры:
Есть еще ряд необязательных параметров реестра, но в данном случае они нам не интересны (если любопытно можете подсмотреть у соседних элементов ActiveSetup).
После формирования данной ветки и ключей, нужно распространить изменения в реестре на целевую группу компьютеров (это можно сделать с помощью SCCM, групповых политик или просто встроить в образ разворачиваемой ОС).
Что же происходит на компьютере при входе нового пользователя? На первом этапе при входе пользователя система сверяет содержимое веток HKEY_LOCAL_ MACHINE \SOFTWARE\Microsoft\Active Setup\Installed Components и HKEY_CURRENT_ USER \SOFTWARE\Microsoft\Active Setup\Installed Components. Для каждого ключа из HKLM в HKCU ищется копия с таким же GUID. Если ее нет, то выполняется команда StubPath, по завершению которой в HKCU создается дубликат ключа.
Если обнаружена одинаковая ветка с ключами в HKLM и в HKCU, то дальше сравниваются версии по полю Version, и если версия в HKLM старше, чем версия в HKCU, то команда выполняется снова, после чего вновь обновляется версия в HKCU.
Если же совпадают и номера версий, это означает, что данный компонент для данного юзера уже запускался и повторно выполнять его не нужно.
На мой взгляд такая технология это явно удобнее, чем возня с RunOnceEx.
Ситуация вокруг Windows 10 нагнеталась медленно, но уверенно. Все началось в октябре 2014 года, когда Microsoft как-то очень вдруг объявила о выходе Windows 10 вместо Windows 9. Сюрприз был.
Delcam ArtCAM 2012 SP2 build 359 Год/Дата Выпуска: 2013 Версия: 2012 Build 359 Разработчик: Delcam Сайт разработчика: Разрядность: 32bit, 64bit Язык интерфейса: Мультиязычный (русский.
Чтобы зайти в BIOS ноутбуков Acer Aspire, Acer Power, Acer Veriton, Acer Extensa, Acer Ferrari, Acer TravelMate, Acer Altos — нажмите F2 или DEL Чтобы зайти в BIOS Acer Altos 600 Server — жамкайте.
Помните те времена, когда BIOS был 16-битным с адресным пространством в 1 Мб, а вся информация о загрузчиках писалась в MBR? На смену уже давно пришли более гибкие технологии: UEFI (замена BIOS), и.
Страницы. 1, 2 След. Список форумов rutracker.org » Программы для работы с мультимедиа и 3D » Аудио- и видео-, CD- проигрыватели и каталогизаторы SONY SonicStage CP ver 4.3 Ultimate Edition Год/Дата.
Windows 7 была выпущена в свободную продажу осенью 2009 года и за прошедшее время успела стать самой популярной из всех операционных систем компании Microsoft. Попробуем разобраться, какие.
Как удалить WmiPrvSE WmiPrvSE.exe - это исполняемый файл (программа) для Windows. Расширение имени файла.Exe - это аббревиатура для исполняемых файлов. Необходимо запускать исполняемые файлы от.
Установка и применение программы PGP Настоящая глава посвящена основным приемам работы с криптографической программой PGP (Pretty Good Privacy). PGP – это криптографическая (шифровальная) программа с.
Указывать код ошибки (по возможности); Кратко указать аппаратную и конфигурацию вашего компьютера, какая операционная система, антивирус, на нем установлены и их происхождение? Описать кратко, что.