


 Рейтинг: 4.6/5.0 (1901 проголосовавших)
Категория: Windows: Мониторинг
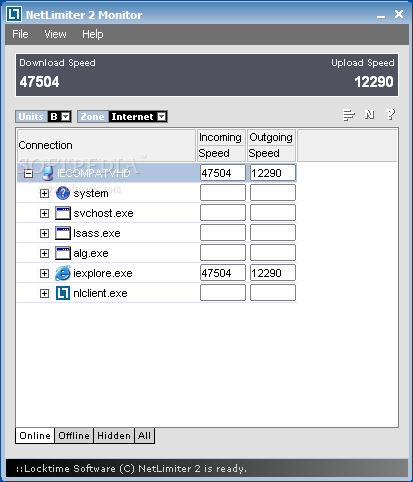
Easily monitor the status of your network
Monitoring network activity isn't such a difficult job because Windows already has a dedicated tool to show you some stats, but things can get a lot easier. Network Traffic Monitor is the living proof, because this tiny utility has been designed to serve a simple yet very important purpose: keep you up to date with what's happening with the Internet traffic.
The application is basically just a simple window that holds all the information, starting with the adapter description and ending with session duration. Of course, you'll also get more data, including the MAC address, the network speed, as well as detailed traffic figures.
There's nothing too complicated about Network Traffic Monitor and its settings menu allows you to configure some parameters like the reset point, the traffic limit or log files location.
The reset point can be scheduled for a specific date, set to occur daily or monthly and in case you activate the limits, you can also set the app to notify you when a certain threshold is reached.
A nice feature of this application is its ability to record the highest download and upload speed, as well as the average for both parameters. With Network Traffic Monitor you can also view the duration of he current session.
All in all, Network Traffic Monitor is just a simple application that can prove to be extremely useful for those who want to keep an eye on their network. The best thing is definitely that it's being delivered as an ultra light package that is also easy to use by anyone.
CURRENT VERSION: 1.0.5.3 FILE SIZE: 19 KB DEVELOPER: Marius Samoila RUNS ON: Windows All CATEGORY: C: \ Network Tools \ Network Monitoring


 Microsoft released a best network monitoring tool recently. Its an good idea to use this product with your MS Operating systems since both from same place. This post explains how to monitor network traffic in windows 7 with latest Microsoft Network Monitor 3.4.
Sometimes, it will be very useful at home user level to check your network activity. When Windows 7 network slow, internet browsing very slow, connection problems and high network activity when you do nothing then this tool is very helpful.
Here is the way of Monitor Network Traffic in Windows 71) Download MS Network Monitor 3.4 from official site. ( Download correct version for x86 or x64)
2) Install it. You have to log out and log in to detect network adapters of your computer.
3) Once network adapters listed under ‘ Select Networks’ at left bottom corner, click on New Capture.
4) Press Start to start the monitoring. This will start to capture all outgoing and incoming network packet details in Windows 7. All details will be shown under Frame Summary.
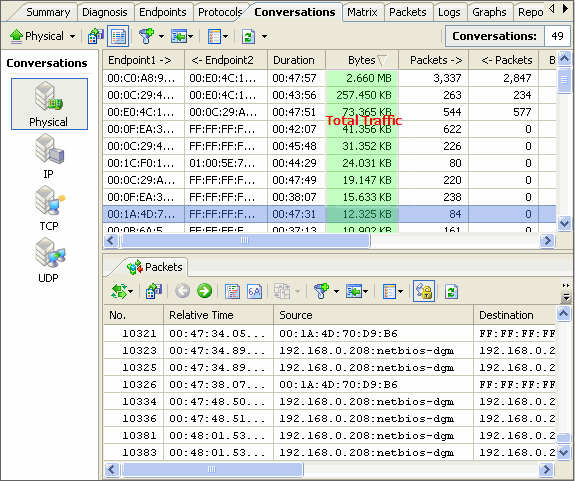
You can view the programs that using network traffic under Network conversions.
5) Click on the program you want to monitor separately. For example, if you click Yahoo messenger, you can view its network activity under Frame Summery.
6) Another best part is filtering. Just select the type of network traffic you want to monitor in Windows 7 computer.
To enable filtering in Microsoft network monitor 3.4, click on Load Filters drop down button under Display Filter. Pre defined filers available under Standard Filters. Select the required type and press Apply. You can edit them and save as in different name too.
7) Don’t forget to press ‘Autoscroll’ button under Frame Summary to view activity without scrolling.
8.) You are ready to start monitoring.
These are the very basic methods, there are lot of advanced functions available on Network Monitor 3.4, try them.
I would recommend to use Microsoft Network Monitor 3.4 with Windows 7 to monitor network traffic on home or office computers. This works with almost all MS OS products including Windows 2008 R2.
Share your experience with this tool and any new findings on this.
More advanced details are,Network Traffic Monitoring. Monitor traffic with ease!
"NetFlow Analyzer provides me with a near real time view of what is happening on our network and it greatly assists in diagnosing network issues"
Stuart Kett,
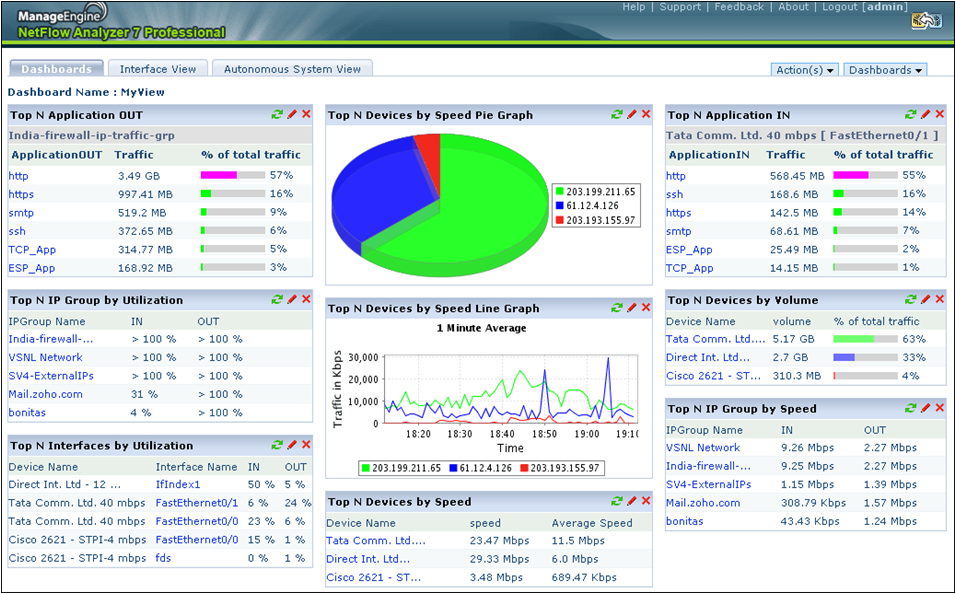
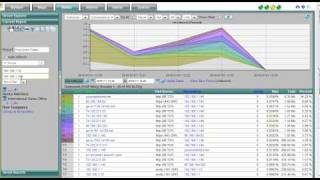
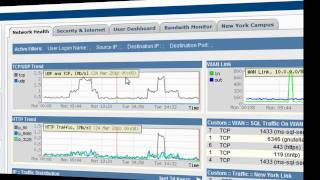
Network Bandwidth and traffic Monitoring Features in NetFlow AnalyzerManageEngine NetFlow Analyzer is a web-based tool, being used by more than 4000 enterprises. that analyzes NetFlow exports from Cisco routers to provide in-depth information about network traffic including, traffic volume, top talkers, bandwidth consumption, and high usage times. The information provided by NetFlow Analyzer helps IT in the following tasks:
" It was easy to install, has a very clean interface with good reporting features, and is a better value than other retail options. "
Michael Pringle,
Network Engineer, Washington University School of Medicine
Traditional Network traffic monitor tools analyze using hardware probes or packet analyzers to offer granular and detailed information on network traffic. However, hardware probes require complex deployment procedures, and typically do not account for IPsec traffic. And packet analyzers flood you with results that do not offer direct insight into application-specific traffic in the network. As a result, IT department is faced with an increased troubleshooting cycle, and an extended time to make critical decisions affecting the network.
Today with Cisco’s NetFlow innovation ( and other flows from other vendors), network traffic monitoring takes far less time and effort, and yields much bigger benefits to the enterprise. NetFlow makes traffic monitoring possible by collecting granular details on IP traffic continuously, without affecting device performance or increasing costs. Using this exported NetFlow data, ManageEngine NetFlow Analyzer gives network administrators/managers the visibility that they require to understand the WAN. Armed with powerful instant reports on top talkers, conversations, and more, NetFlow Analyzer tells IT exactly what they need to know in order to troubleshoot or make informed capacity planning decisions.
NetFlow Analyzer is a web-based tool that analyzes NetFlow exports from Cisco routers to monitor network traffic metrics including, traffic volume, traffic speed, packets, top talkers, bandwidth utilization. and high usage times. There are various reports that can be obtained from NetFlow Analyzer. It is very simple to deploy and start working with. You can install NetFlow Analyzer on a Windows or Linux machine, and use a web browser to access the client interface. After installing, set up your Cisco routers/switches to export NetFlow data to NetFlow Analyzer. Within minutes, traffic graphs are plotted and reports are automatically generated by NetFlow Analyzer, and you are all set to monitor traffic in your network.
Users can drill down in to the interfaces to view information on the traffic, application, source, destination, conversation, DSCP and QoS of the traffic.
With NetFlow Analyzer you can monitor traffic and do much more!
NetFlow Analyzer is a NetFlow, sFlow, JFLow (and more ) collector and analyzing engine integrated together. NetFlow analyzer does not require any hardware probes and can be downloaded, used in your network environment and can be evaluated for 30 days. Go through the following useful links for better understanding of how NetFlow Analyzer can help you to monitor network traffic and bandwidth utilization .
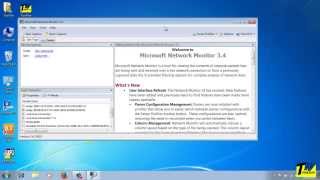
As an administrator, it’s important for you to keep tabs on the traffic that’s flowing across your network. I’m not saying that you need to be intimately familiar with every single packet that’s sent or received, but you need to know what types of protocols are flowing across your network. Monitoring the network allows you to have a better understanding of how bandwidth is being used. It also allows you to find out if users are running file sharing programs, or if some kind of evil Trojan is silently transmitting information in the background. What you might not realize is that Microsoft has given you a tool that you can use for monitoring network traffic. Appropriately, the tool is called Network Monitor. In this article, I will introduce you to this tool and show you how to use it.
Microsoft has given you a tool that you can use for monitoring network traffic. Appropriately, the tool is called Network Monitor. There are actually two different versions of Network Monitor that ship with Microsoft products. The version that comes with Windows Server 2003 is the watered down version. It is very similar to the full version, except that it only allows you to analyze traffic sent to or from the server that Network Monitor is running on. The full version of Network Monitor is included with SMS Server. It allows you to monitor any machine on your network and to determine which users are consuming the most bandwidth. You can also use the SMS version of Network Monitor to determine which protocols are using the most bandwidth on the network, locate network routers, and resolve device names into MAC addresses.
Another feature that is left out of the Windows version of Network Monitor is the ability to capture, edit, and retransmit a packet. This functionality is used by hackers when performing a replay attack. The idea behind a replay attack is that a hacker can capture some sensitive piece of information, such as an authentication packet. Later, if the hacker wants to log on as someone else, they can edit the packet to change the source address and then retransmit it. The actual process is a little more complicated than that, but not much.
Installing Network MonitorAs you may have already figured out, the Windows Setup program doesn’t install Network Monitor by default. To install the Windows version of Network Monitor, open the Control Panel and select the Add / Remove Programs option. Next, click the Add / Remove Windows Components button to launch the Windows Components wizard. Scroll through the list of components until you locate the Management and Monitoring Tools option. Select the Management and Monitoring Tools option and click the Details button. Select the Network Monitor Tools option and click Next. Windows will now begin the installation process. You may be prompted to insert your Windows installation CD. Click Finish to complete the installation process.
Running Network MonitorAfter the installation process completes, you can launch Network Monitor by selecting the Network Monitor command found on Window’s Administrative Tools menu. When Network Monitor initially loads, you will see a dialog box asking you to select a network that you can capture data from. Click OK and you will see the Select a Network dialog box. Simply expand the My Computer container and then select the network adapter that you want to monitor. Click OK to continue.
At this point, you will see the main Network Monitor screen, shown in Figure A. Right now, Network Monitor isn’t capturing any data. It’s up to you to initiate the data capture process. Before you do though, you might want to set up a capture filter.
Figure A: This is the main Network Monitor screen
The reason why filtering is so important is because there is a tremendous amount of traffic that flows into and out of most servers. You can easily capture so much traffic that analyzing it becomes next to impossible. To help cut down on the amount of traffic that you must analyze, Network Monitor allows you to use filters. There are two different types of filters that you can use; capture filters and display filters.
Capture filters allow you to specify which types of packets will be captured for analysis. For example, you may decide that you only want to capture HTTP packets. The main advantage to implementing a capture filter is that by filtering packets during the capture, you will use a lot less hard disk space than you would if you captured every packet.
Display filtering works similarly to capture filtering except that all network traffic is captured. You filter the data that you want to analyze at the time of analysis rather than at the time of capture. Display filtering uses a lot more hard disk space than capture filtering, but you will have the full dataset on hand just in case you decide to analyze something other than what you originally intended.
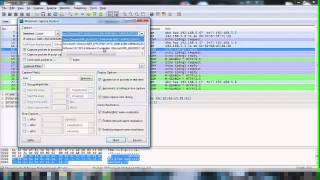
Capturing DataIf you have decided that you want to filter the data being captured, select the Filter option from the Capture menu, and configure your filter. Otherwise, you can start the capture process by selecting the Start command found on the Capture menu. You can see what the capture process looks like in Figure B. When you have captured the data that you want, then select the Stop command from the Capture menu.
Figure B: This is what the capture process looks like
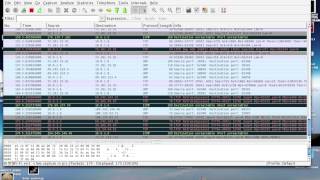
Analyzing the DataTo analyze the captured data, select the Display Captured Data command from the Capture menu. When you do, you will see the screen shown in Figure C.
Figure C: This is a summary of the captured data
The screen shown in Figure C shows a summary of all of the captured packets in the sequence that those packets were captured. The data that you are looking at is unfiltered. You could set up a display filter at this point by selecting the Filter option from the Display menu.
Once you have located a packet that you are interested in, double click on the packet to see it in greater detail. When you do, you will see the screen that’s shown in Figure D.
Figure D: This is the screen that you will use to analyze a packet
As you can see in the figure, the packet screen is divided into three sections. The top section is simply a condensed view of the summary screen. You can use this section to select a different packet to analyze without having to go back to the mail summary screen.
The second section contains the packet’s contents in a decoded, tree format. For example, in the screen capture, you can see that the top portion of the tree says FRAME: Base Frame Properties. If you expand this portion of the tree, you can see the date and time that the frame was captured, the frame number, and the frame length.
The third section contains the raw data that makes up the frame. In this section, the column to the far left shows the base address of the bytes on that line in hexadecimal format. The middle section shows the actual hexadecimal data that makes up the frame. The hexadecimal code is positions wide. To determine the address of any of the hex characters, start with the base address for that line, and then count the position of the character that you are interested in. For example, if the base address is 00000010, and the character that you are interested in is in the twelfth position, then the character’s address would be 0000001B.
The column to the far right contains a reprint of the data in decimal notation. This is probably the most useful part of the screen because anything that has been transmitted in clear text is clearly readable in this column. For example, if an E-mail were transmitted in an unencrypted format and the transmission were captured, you could read the contents of the message in this location (assuming that you could locate the correct packet). If you look closely at Figure D, you will notice that this is an LDAP packet that I have captured. The decimal portion of the packet clearly shows a call to the Active Directory (CN=Configuration,DC=production,DC=com).
ConclusionIn this article I have explained that Microsoft includes the Network Monitor tool with Windows so that you can monitor the types of traffic flowing in and out of a server. I then went on to demonstrate the installation and use of this tool.
NTM Is a network traffic monitor for Linux (ubuntu, kubuntu, ecc). Characteristics: Integrate with linux NetworkManager; Autodisconnect when a threshold is reached; Day report; Console and Gui interface (gtk); Not need root privilege;
Some characteristics:
* Choice of the interface to monitoring.
* Period to monitoring: Day, Week, Month, Year or Custom Days. With autoupdate.
* Threshold: Autodisconnection if a limit is reached (by NetworkManager).
* Traffic Monitoring: Inbound, outbount and total traffic; Show the traffic speed.
* Time Monitoring: Total time of connections in the period.
* Time Slot Monitoring: Number of sessions used.
* Reports: Show of average values and daily traffic of a configurable period.
* Online checking with NetworkManager or by "Ping Mode".
* The traffic is attributed to the day when the session began.
* Not need root privilege.
* Not invasive, use a system try icon.
NTM is useful for the people that have a internet plan with a limit, and moreover the exceed traffic is expensive.NTM is write in python and is a open source software, the license is the GNU GPL v2.
First you need to download .deb package from here once you have .deb package install by double clicking on it or run the following command from your terminal
sudo dpkg -i ntm-1.2.1.deb
Контроль трафика и управление сетевым соединением.
NTM (Network Traffic Monitor) — маленькое Python / GTK+ графическое приложение (имеется и консольная версия) для контроля сетевого трафика и автоматического отключения компьютера от сети по заданным параметрам.
Network Traffic Monitor будет полезен пользователям не имеющим безлимитного Интернета, при использовании мобильных USB -модемов, а так же если просто нужно следить за израсходованным трафиком и/или временем использования сети.
NTM для работы не требует прав администратора (root). интегрируется в область уведомлений (системный трей) и c NetworkManager. " по умолчанию " отслеживает сетевой интерфейс ppp0 (можно установить любой).
В настройках Network Traffic Monitor необходимо только установить нужный лимит трафика и/или временного промежутка (возможен выбор время мониторинга). при достижении установленного значения (времени и/или трафика) интернет соединение будет отключено.
Network Traffic Monitor позволяет просматривать актуальную информацию ( показывая входящий, исходящий, общий трафик и скорость). по отслеживаемому интерфейсу, а так же составляет отчёт с среднесуточным значением и за определённый период.
This post mentions some linux command line tools that can be used to monitor the network usage. These tools monitor the traffic flowing through network interfaces and measure the speed at which data is currently being transferred. Incoming and outgoing traffic is shown separately.
Some of the commands, show the bandwidth used by individual processes. This makes it easy to detect a process that is overusing network bandwidth.
The tools have different mechanisms of generating the traffic report. Some of the tools like nload read the "/proc/net/dev" file to get traffic stats, whereas some tools use the pcap library to capture all packets and then calculate the total size to estimate the traffic load.
Here is a list of the commands, sorted by their features.
Nload is a commandline tool that allows users to monitor the incoming and outgoing traffic separately. It also draws out a graph to indicate the same, the scale of which can be adjusted. Easy and simple to use, and does not support many options.
So if you just need to take a quick look at the total bandwidth usage without details of individual processes, then nload will be handy.
Installing Nload - Fedora and Ubuntu have got it in the default repos. CentOS users need to get nload from Epel repositories.
Iftop measures the data flowing through individual socket connections, and it works in a manner that is different from Nload. Iftop uses the pcap library to capture the packets moving in and out of the network adapter, and then sums up the size and count to find the total bandwidth under use.
Although iftop reports the bandwidth used by individual connections, it cannot report the process name/id involved in the particular socket connection. But being based on the pcap library, iftop is able to filter the traffic and report bandwidth usage over selected host connections as specified by the filter.
The n option prevents iftop from resolving ip addresses to hostname, which causes additional network traffic of its own.
Install iftop - Ubuntu/Debian/Fedora users get it from default repos. CentOS users get it from Epel.
Iptraf is an interactive and colorful IP Lan monitor. It shows individual connections and the amount of data flowing between the hosts. Here is a screenshot
Install iptraf
4. nethogsNethogs is a small 'net top' tool that shows the bandwidth used by individual processes and sorts the list putting the most intensive processes on top. In the event of a sudden bandwidth spike, quickly open nethogs and find the process responsible. Nethogs reports the PID, user and the path of the program.
Install Nethogs - Ubuntu, Debian, Fedora users get from default repos. CentOS users need Epel
Bmon (Bandwidth Monitor) is a tool similar to nload that shows the traffic load over all the network interfaces on the system. The output also consists of a graph and a section with packet level details.
Install Bmon - Ubuntu, Debian and Fedora users can install from default repos. CentOS users need to setup repoforge, since its not available in Epel.
Bmon supports many options and is capable of producing reports in html format. Check the man page for more information
Slurm is 'yet' another network load monitor that shows device statistics along with an ascii graph. It supports 3 different styles of graphs each of which can be activated using the c, s and l keys. Simple in features, slurm does not display any further details about the network load.
Install slurm
7. tcptrackTcptrack is similar to iftop, and uses the pcap library to capture packets and calculate various statistics like the bandwidth used in each connection. It also supports the standard pcap filters that can be used to monitor specific connections.
Install tcptrack - Ubuntu, Debian and Fedora have it in default repos. CentOS users need to get it from RepoForge as it is not available in Epel either.
Vnstat is bit different from most of the other tools. It actually runs a background service/daemon and keeps recording the size of data transfer all the time. Next it can be used to generate a report of the history of network usage.
Running vnstat without any options would simply show the total amount of data transfer that took place since the date the daemon is running.
To monitor the bandwidth usage in realtime, use the '-l' option (live mode). It would then show the total bandwidth used by incoming and outgoing data, but in a very precise manner without any internal details about host connections or processes.
Vnstat is more like a tool to get historic reports of how much bandwidth is used everyday or over the past month. It is not strictly a tool for monitoring the network in real time.
Vnstat supports many options, details about which can be found in the man page.
Install vnstat
Bwm-ng (Bandwidth Monitor Next Generation) is another very simple real time network load monitor that reports a summary of the speed at which data is being transferred in and out of all available network interfaces on the system.
If the console size is sufficiently large, bwm-ng can also draw bar graphs for the traffic using the curses2 output mode.
Install Bwm-NG - On CentOS bwm-ng can be installed from Epel.
10. cbm - Color Bandwidth MeterA tiny little simple bandwidth monitor that displays the traffic volume through network interfaces. No further options, just the traffic stats are display and updated in realtime.
11. speedometerAnother small and simple tool that just draws out good looking graphs of incoming and outgoing traffic through a given interface.
Install speedometer
12. PktstatPktstat displays all the active connections in real time, and the speed at which data is being transferred through them. It also displays the type of the connection, i.e. tcp or udp and also details about http requests if involved.
13. NetwatchNetwatch is part of the netdiag collection of tools, and it too displays the connections between local host and other remote hosts, and the speed at which data is transferring on each connection.
14. TrafshowLike netwatch and pktstat, trafshow reports the current active connections, their protocol and the data transfer speed on each connection. It can filter out connections using pcap type filters.
Monitor only tcp connections
15. NetloadThe netload command just displays a small report on the current traffic load, and the total number of bytes transferred since the program start. No more features are there. Its part of the netdiag.
16. ifstatThe ifstat reports the network bandwidth in a batch style mode. The output is in a format that is easy to log and parse using other programs or utilities.
Install ifstat - Ubuntu, Debian and Fedora users have it in the default repos. CentOS users need to get it from Repoforge, since its not there in Epel.
Dstat is a versatile tool (written in python) that can monitor different system statistics and report them in a batch style mode or log the data to a csv or similar file. This example shows how to use dstat to report network bandwidth
Install dstat
18. collectlCollectl reports system statistics in a style that is similar to dstat, and like dstat it is gathers statistics about various different system resources like cpu, memory, network etc. Over here is a simple example of how to use it to report network usage/bandwidth.
Ntop and Darkstat are some of the basic web based network monitoring tools available for Linux. Beyond these lie the enterprise level monitoring tools like Nagios that provide a host of features to not just monitor a server but entire infrastructure.
 This article is part of our on-going performance monitoring series of articles.
In this article, let us focus on how to monitor network traffic and log them for later analysis using vnstat utility.
vnstat is a command line utility that displays and logs network traffic of the interfaces on your systems. This depends on the network statistics provided by the kernel. So, vnstat doesn’t add any additional load to your system for monitoring and logging the network traffic.
1. Install vnStatInstall vnStat on your system from the repository that is specific to your Linux distributions.
For example, on Ubuntu use apt-get to install it as shown below.
If you prefer to install it from source, download vnStat source from here. or use the wget as shown below to download and install it.
Please note that you can also use Mergecap and Tshark to analyze network traffic.
Please note that you don’t need to do “./configure” that you typically do for other source based installations.
Since vnstat depends on the information provided by kernel, execute the following command to verify whether kernel is providing all the information that vnStat is expecting.
2. Pick a Interface to Monitor using vnStatvnStat doesn’t monitor any interfaces unless you specifically request it to do so.
To start monitoring eth0, do the following. This needs to be executed only once. As you see below, this creates a database file eth0 under /var/lib/vnstat directory that will contain all the network traffic log messages for this specific interface.
To view all the available interfaces on your system that vnStat can monitor, do the following.
Start the vnstatd (vnstat daemon), which will monitor and log these information in the background.
Note: You can add “vnstatd -d” to your /etc/rc.local file, so that it starts automatically anytime you reboot your system.
3. vnStat Basic Usagevnstat without any argument will give you a quick summary with the following info:
Note: If you just installed the vnStat, it will give the following message “eth0: Not enough data available yet.”. Wait for some time and try the command again.
4. vnStat hours, days, months, weeks Network DataUse “vnstat -h” (or) “vnstat –hours” for network statistic data breakdown by hour. This also displays a text based graph.
Use “vnstat -d” (or) “vnstat –days” for network statistic data breakdown by day.
Use “vnstat -m” (or) “vnstat –months” for network statistic data breakdown by month.
Similar to days and months, use “vnstat -m” (or) “vnstat –months” for network statistic data breakdown by week.
5. Export the data to Excel or other DBIf you like to export the network monitoring data to an excel or other database, you can dump the data in a text format delimited with semi-colon, which you can import to Excel or other db.
The 1st few lines of the –dumpdb output contains some header information. After the header lines, it has 30 lines that starts with “d;” (d;0;1318316406;1;0;386;698;1). This lines has the following information separated by semi-colon.
You can also use “vnstat –oneline”, which displays the traffic summary in a single line where the values are delimited with semi-colon.
6. Display Live Network StatisticsUse “vnstat -l” or “vnstat –live” to display the live network statistic information.
After you press Ctrl-C to stop it, vnstat will display a summary for the time period the live monitor was running.
7. Change the default vnstat output formatUse “vnstat -s” or “vnstat –short” which will display a short summary of the network statistics. This includes statistics for today, yesterday and for the current month.
You can also use “vnstat –style 0″, which will give a narrow column output, which is easier to read than the default wider column output.
Following are the available style number:
Use “vnstat -t” or “vnstat –top10″ to display all time top 10 traffic days.
Previous articles in the Linux performance monitoring and tuning series: