


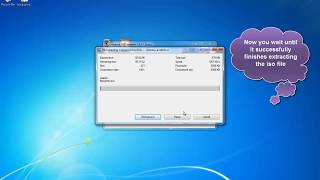
 Рейтинг: 4.2/5.0 (1891 проголосовавших)
Категория: Windows: Образы дисков
Windows Bootable ISO Creator скачать бесплатно [915,58 Kb]
Утилита Windows Bootable ISO Creator предназначена для создания образа загрузочного диска операционной системы Windows в формате ISO. Используя Windows Bootable ISO Creator, пользователь может с легкостью устанавливать операционную систему на неограниченное количество компьютеров.
Windows Bootable ISO Creator отличается необычайной простотой в использовании, большинство действий по созданию загрузочного образа производится в автоматическом режиме без участия пользователя. В результате программа WBI Creator отлично подойдет не только опытным системным администраторам, но и начинающим пользователям. Интерфейс приложения также максимально облегчен, хотя он и не имеет поддержки русского языка, освоить его можно на интуитивном уровне.
Сразу после запуска утилиты необходимо указать место на жестком диске, куда необходимо итоговый образ ISO, затем можно начинать процесс непосредственно создания загрузочного образа операционной системы. Windows Bootable ISO Creator отличается великолепной скоростью обработки данных и надежностью в работе.
Кроме того, бесплатная утилита Windows Bootable ISO Creator относится к числу портативных приложений и, следовательно, может прекрасно запускаться с любого внешнего носителя без предварительной установки в систему компьютера. Также такой принцип работы сказывается на минимальном потреблении ресурсов системы, приложение практически не оставляет следов в реестре. Разработчиком данного программного обеспечения является компания Shashi Kumar Sinha.
Скачать Windows Bootable ISO Creator бесплатно можно ниже по прямой ссылке.


Windows Bootable ISO/Image Creator 4.2.3.1 / WBI Creator
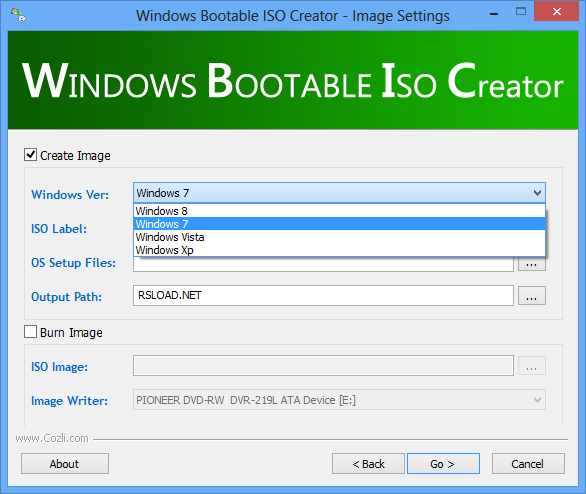
Небольшая и портативная утилита для Windows, которая максимально облегчит создание загрузочного ISO образа для Windows, который должен быть сохранен на компьютер, скачать Windows Bootable Image Creator можно ниже. Можно работать с образами Windows XP/Vista/7/8. Настроек почти никаких нет, на скриншотах все видно, более и добавить нечего.
собираюсь образ windows записать на диск. Эта программа сойдёт для этого?
Цитата: veohstan
программа удобна для создания резервной копии своей винды. поставил свежую ОС, всё настроил, поставил дрова и создал образ. если что со временем полетело - вставил диск и всё на месте, без заморочек с настройками
Господа, не путайте программу для создания УСТАНОВОЧНОГО образа windows с программой для создания образа УСТАНОВЛЕННОЙ windows !
Если последовать на хоум-сайт. то там есть мануал (в виде pdf-файла). Так вот в нем пошаговая инструкция создания образа и на 3-м шаге английским по-белому написано:
Select OS Setup files folder, i.e. the folder which contains the installation files of the
containing sources or sources64 folder etc. Don’t confuse with the installed windows
folder generally found in C:\ drive. This folder is not valid for OS Setup Files.
Т.е. этой проге вы скармливаете подготовленный дистрибутив Windows, а она на его основе создаст ISO для установки этой винды.
Никакого функционала по созданию образов разделов или всего диска с установленной и настроенной виндой в ней нет !
About Windows Bootable Image Creator
ГЌgy kГ©szГthetГјnk pГЎr kattintГЎssal bootolhatГі ISO fГЎjlt egy lementett Windows telepГtЕ‘bЕ‘l. Ha korГЎbban egy tetszЕ‘leges mappГЎba kГ©szГtettГјnk biztonsГЎgi How to Uninstall Windows Bootable Image Creator - Step by Step Guide to Remove Unwanted program Completely with the perfect Uninstaller. Download: Windows Bootable Image Creator 3.1 - Create bootable ISO image files - Free Download Software.Windows Bootable Image Creator is used by 1 users of Software Informer. The most popular version of this product among our users is 4.1. The product will soon
Windows Bootable Image Creator is used by 1 users of Software Informer. The most popular version of this product among our users is 4.1. The product will soon Windows Bootable Image Creator vous donne la possibilitГ© de crГ©er en quelques clics des fichiers images bootables de Windows XP et 7. Simple d'utilisation. 1 Mar 2012 Windows Bootable Image Creator This is a straight forward and ultra small tool that accomplishes its job as you expect. It has a super simple Windows Bootable Image Creator TГ©lГ©charger gratuitement - Windows Bootable Image Creator Windows Bootable Image Creator 1.0. Important part is making bootable image. So in case OS goes corrupt/ hdd fails - just running that bootable image can restore everything.free download windows bootable image creator - Windows Bootable Image Creator 1.0. and much more programs.
free download windows bootable image creator - Windows Bootable Image Creator 1.0. and much more programs. Windows Bootable Image Creator, free download. Windows Bootable Image Creator:.Windows Bootable Image Creator is a free and portable utility which allows you to create bootable ISO image file of Windows XP, Vista, Windows 7 and
Windows Bootable Image Creator is a free and portable utility which allows you to create bootable ISO image file of Windows XP, Vista, Windows 7 andWindows Bootable Image Creator est un logiciel d'Г©dition d'images bootables compatibles Г Windows XP, Windows 7 et Vista. C'est un logiciel portable, vous.
We often save a backup copy of our Windows installer disc on a local or external drive, in case the original disc is damaged, lost or unavailable. Burning these files directly to a disc does not create a bootable CD/DVD for installing Windows. Many people do not know how to create a bootable disc and some software which allow doing so easily are paid (such as Nero). For long there has been a freeware used by system administrators to create bootable disc images for Windows Vista and XP, known as nLite, but it does not support Windows 7.
A solution for creating bootable images of Windows 7, Vista or even XP can be found in the form of the recenty released ASKVG tool, known as WBICreator or (Windows Bootable Image Creator). This portable utility creates a bootable ISO disc image from the Windows setup folder from your local, external drive (USB drive) or CD/DVD drive. The created ISO image can then be burned (to create a bootable disc) using any disc burning utility such as 7Burn. BurnAware. etc.
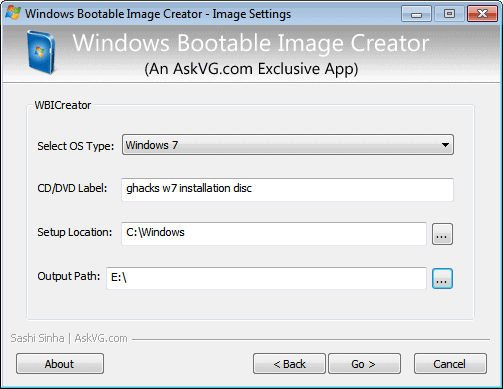
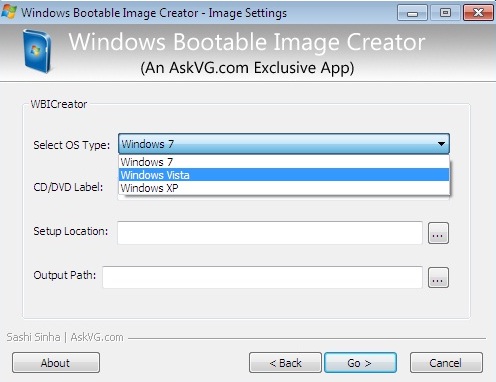
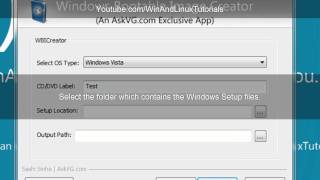
To create a disc image, launch WBICreator and select an operating system.
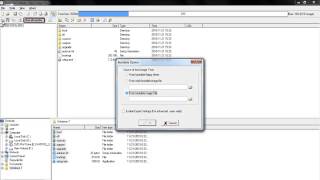
Once an operating system is selected, add a disc image label, setup location containing the Windows installer disc files and an output folder for saving the ISO image. Click Go to continue.
This will create an ISO image in the destination folder which will become bootable when you burn it onto an optical disc.
Hence, using WBICreator, you can create a bootable ISO image in three easy steps, without having to use complicated advanced disc burning tools. It should also be noted that this ISO image can also be used to create a bootable USB. If you don’t know how to create a bootable USB for installing Windows, then check out the guide here & here. It works on Windows XP, Windows Vista and Windows 7.
Many people mailed me questions about network booting a PC using my haneWIN DHCP Server. This short guide should give you starting point and an example.
You can not create a copy of your preferred OS in a file and hope that the BOOT-ROM in a client can download and understand it. As in the real world both parties must speak the same language (protocol) to understand each other.
But there is no common standard for remote booting a PC over a network. It exists a least a commercial proposal called PXE and a public proposal called Netboot.
The PXE specification was setup by Intel but is no longer supported by them. PXE implementations sometimes use non standard DHCP options and protocols (Some PXE BOOT ROMs seem to require a special PXE server, a DHCP server running on another port).
There are two projects based on the Netboot specification: Etherboot and Netboot itself.
Etherboot and Netboot differ only in the way a BOOT-ROM is created.
Because the remote boot solutions are targeted for creating diskless Unix clients, the solutions require an Unix OS for creating the boot images. This makes sense for remote booting Linux, FreeBSD. but not for remote booting a DOS client from Windows.
This step-by-step guide is an example of how to create a network bootable DOS image using the Etherboot solution. It does not require an unix system for creating the boot image. For details about the Etherboot/Netboot specification and the mknbi tools please read the documentation of the mknbi software and visit the Etherboot web site.
Remote booting Windows is NOT as easy because there is no network file system that can be easily used during the booting process for accessing and loading further files from a network file server.
Qualystem LiteNET PC offered a solution to boot a Windows 9x diskless client from a Windows server. It is based on loading a realmode NDIS2 driver, making networking available before Windows is loaded. The client needs a PXE BOOT ROM or floppy.
If you find some interesting links about remote booting solutions let me know.
If you have an ethernet card supporting PXE you can make use of Etherboot as well. With the Etherboot BOOT-ROM code available from ROM-O-MATIC as PXE download image, you can setup a two stage boot loader.Etherboot and Netboot use the same specification for remote booting. They differ only in the way a BOOT-ROM is created.
More or less all ethernet cards are delivered with a DOS PacketDriver.
Netboot uses this PacketDriver to give you a chance to create a BOOT-ROM even for an exotic network card. While it sounds fine in the first moment, at a closer look a problem shows up. PacketDrivers of modern network cards are really huge and even using data compression it is hard to get the size of the ROM code including the PacketDriver below the standard BOOT-ROM size of 32K.
Therefore I prefer Etherboot.
Etherboot:
Etherboot uses ethernet drivers available for Linux and because of ROM-O-MATIC it is very easy to get a BOOT-ROM for an ethernet card. Exotic networks cards may be not supported, but it is easier, faster and cheaper to replace the network card than to build your own BOOT-ROM.
Step 1. The BOOT-ROM code
For testing the ROM code with your network card ROM-O-MATIC provides a BOOT-ROM emulation on floppy disk. I recommend to use this feature for testing your configuration.
Go to the ROM-O-MATIC web site to generate and download the floppy disk emulation of a BOOT-ROM for your network card. (Extension: zdsk)
For the following DOS example you don't need to set any ROM options offered by ROM-O-MATIC. But if you want to boot e.g. FreeBSD later using the same BOOT-ROM goto the options page and set the appropriate option. Setting options will increase the size of the BOOT-ROM, therefore make sure the resulting ROM code fits in a supported ROM size of your ethernet card.
If you start with the floppy disk emulation copy the BOOT-ROM image to a floppy disk:
fdimage -f 1.44M xyz.zdsk a:
Test the ROM code with your network card. e.g. try to boot the floppy with the ROM code.
Loading ROM image. should appear on the top of screen and the PC should start sending out DHCP requests. If the computer fails to execute the ROM code, the ROM image is not appropriate for your network card.
Step 2. Create a bootable DOS image
fdimage -f 1.44M a: image.a
This requires my modified fdimage.exe or you can use the enhanced diskcopy.exe from FreeDOS.
Step 3. Create an Etherboot image
The perl script mknbi.pl converts the disk image into a bootable etherboot image. mknbi-1.4.1-win is a modified version of mknbi-1.4.1 to get it running under ActivePerl on Windows. There is no need to recompile the mknbi software. If you want to recompile the sources of the header files you must install the mknbi software under Linux or FreeBSD.
This step differs for MSDOS and FreeDOS:
for FreeDOS.
copy a:kernel.sys
cd mknbi-1.4.1-win
mknbi.pl --format=nbi --target=fdos. \kernel.sys. \image.a >..\dos.bin
for MSDOS.
cd mknbi-1.4.1-win
mknbi.pl --format=nbi --target=dos. \image.dos >..\dos.bin
I created mkimage.bat for the command sequence.
Step 4. Setup of DHCP Server
Step 5. Boot the client
The client should remote boot by downloading the image in a RAM disk and start DOS from the RAM disk.
Step 6. For PXE clients, get the PXE code
Go to the ROM-O-MATIC web site to generate and download a PXE image of the BOOT-ROM for your network card. (Extension: zpxe)
Step 7. For non PXE clients, create a BOOT-ROM:
Go to the ROM-O-MATIC web site to generate and download the binary BOOT-ROM code for your network card. Copy it on a EPROM or EEPROM for your network card.
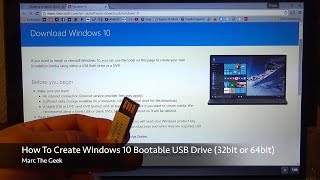
In How To Install Windows 8 From USB Key I looked at two different options to create a bootable Usb copy of Microsoft's upcoming operating system to install it from Usb devices. The easier of the two options was to use Microsoft’s Windows 7 USB/DVD Download Tool to create a bootable Usb installation disk.
Windows Bootable Image Creator is a third party tool that offers a slightly different functionality. You can use it to create bootable Iso images of the setup files of Windows XP, Windows Vista and Windows 7.
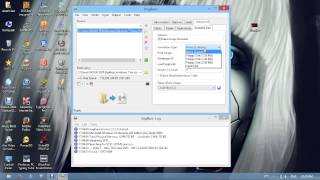
When you first start the program you are presented with a configuration menu after clicking next on the introductory screen. Here it is then possible to select the operating system type, CD or DVD label, the setup location and the output path.
The first two fields are more or less self-explanatory. You select the operating system that you want to create an Iso for in the first menu, and pick a custom label for it in the second.
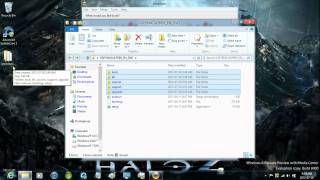
The setup location needs to point to the extracted Windows setup folder. You cannot pick the folder where Windows is installed, you need to pick a folder with all the installation files in it. This can be a Windows installation disc (for instance to make a copy of it) or a folder with all setup files of the disc in it.
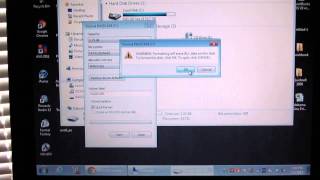
Make sure you pick an output path with enough storage space to hold the Iso image. Please note that the processing and writing of files may take a while. It largely depends on the overall performance of the computer and the write speed of the disk the Iso image is created on.
The portable program can be handy if you have Windows setup files on disc and want to create a bootable disc from them, or if you have a corrupted installation disc that is still readable. Most users will probably not need the tool though as they may be able to acquire the installation disc else where.
Windows Bootable Image Creator is a free portable software program for the Windows operating system. It is compatible with all versions of the operating system that it supports, which includes both 32-bit and 64-bit editions. The program can be downloaded from the Ask VG website.
Please share this article
If you need to install Windows or Linux and you don’t have access to a CD/DVD drive, a bootable USB drive is the solution. You can boot to the USB drive, using it to run the OS setup program, just like a CD or DVD.
We have collected some links to free programs that allow you to easily setup a USB drive to install Windows or Linux on a computer.
NOTE: If you have problems getting the BIOS on your computer to let you boot from a USB drive, see our article about booting from a USB drive even if your BIOS won’t let you .
Windows USB/DVD Download ToolEditor’s Note: if you want to create a bootable Windows install USB, this is the tool you should choose.
The Windows USB/DVD Download Tool is an official, freeware tool from Microsoft that allows you to install Windows 7 and Windows 8 and Windows 10 without having to first run an existing operating system on your computer. You can change the boot order of the drives in your computer’s BIOS so the Windows installation on your USB drive runs automatically when you turn on your computer. Please see the documentation for your computer for information about how to access BIOS and change the boot order of drives.
UNetbootinUNetbootin is a free program for both Windows, Linux, and Mac OS X that allows you to create bootable Live USB drives for Ubuntu, Fedora, and other Linux distributions instead of burning a CD. It runs on both Windows and Linux. Either use UNetbootin to download one of the many Linux distributions it supports or provide the location of your own Linux ISO file.
NOTE: The resulting USB drive is only bootable on PCs, not Macs.
Ubuntu Startup Disk CreatorThe Ubuntu Startup Disk Creator allows you to convert a USB flash drive or SD card into a drive from which you can run your Ubuntu system. You don’t have to dedicate the whole drive to the Ubuntu system. You can store other files in the remaining space.
The program also allows you to create a drive for Debian, or any other Debian-based OS for which you have a CD or .iso image.
Universal USB InstallerUniversal USB Installer is a program that allows you to choose from several Linux distributions to install on a USB flash drive. Select the Linux distribution, provide a location for the appropriate ISO file, select your USB flash drive, and click Create.
NOTE: The USB flash drive must be formatted as a Fat16, Fat32, or NTFS drive.
Rufus is a small, portable program that allows you to create bootable USB drives for Windows and Linux. It also allows you to check the USB device for bad blocks, using up to four passes. Rufus runs in both 32-bit and 64-bit versions of Windows XP, Windows Vista, Windows 7, and Windows 8. You can create bootable USB drives for the listed versions of Windows, as well as almost all popular Linux distributions, such as Ubuntu, Kubuntu, Fedora, and OpenSUSE.
Rufus is very easy to use and the program looks like the default format window shown in Windows when you format a hard disk partition, USB drive, or other external drive.
In addition to Windows and Linux systems, you can also use Rufus to put utilities on USB drives, such as Parted Magic. Ultimate Boot CD. and BartPE .
WiNToBooticWiNToBootic is another free tool that allows you to create a bootable USB flash drive for installing Windows 7 or Windows 8. It supports an ISO file, a DVD, or a folder as the boot disk source. It’s a standalone tool that doesn’t require installation and it operates very fast.
Note: this tool doesn’t appear to be developed anymore.
Windows Bootable Image (WBI) CreatorUpdate: this tool doesn’t seem to exist anymore.
WBI Creator is a free program that allows you to create a bootable ISO image from Windows XP, Vista, and Windows 7 setup files. It’s a portable tool that’s easy to use. Simply tell the tool where the Windows setup files are and select a target folder for the new ISO file that will get created. Then, you can use one of the other tools mentioned in this article to setup a bootable USB flash drive or CD/DVD for use in setting up a Windows system.
WinToFlashUpdate: we’ve been told by our readers that this application has a lot of adware so we’re removing the link.
WinToFlash is a free, portable tool that allows you to create a bootable USB flash drive from a Windows XP, Vista, Windows 7, Server 2003, or Server 2008 installation CD or DVD. It will also transfer a Windows pre-install environments (WinPE), which are handy for troubleshooting and repairs, to a USB flash drive. You can even use WinToFlash to create a MSDOS bootable USB drive.
Update: this tool hasn’t been updated in a very long time.
XBoot is a free utility for creating multiboot USB flash drives or ISO image files. This allows you to combine multiple ISO files (Linux, utilities, and antivirus rescue CDs) onto one USB drive or ISO file, allowing you to create a handy utility drive. Simply drag and drop the ISO files onto the XBoot window and click Create ISO or Create USB.
NOTE: XBoot requires .NET Framework 4.0 (Standalone installer or Web installer ) to be installed on your system to run.
If there are any other free tools you’ve found useful for creating bootable USB flash drives, let us know.
Few times when we decide to take a backup of our Windows setup CD/DVD on our hard disk, we just copy all the files and folders present in the disk to our hard disk partition. In future if we don't have the disk with us, we try to create a new setup disk by burning the backup files and folders on the new disk. But the new disk doesn't work and you can't boot using it to run the setup.
This is because the setup is not bootable.
WBICreator " (Windows Bootable Image Creator) is a portable utility created by AskVG reader "Shashi Kumar Sinha " which allows you to create bootable ISO image file of Windows XP/Vista/7 setup.
You just need to give any desired name to ISO image file, select the folder containing Windows setup files and select the target folder which will store the new ISO file and you are done. Just sit back and the bootable ISO image file will be created automatically within a few minutes which can be burned on a disk using any CD/DVD burning software.
Just download and extract ZIP file and run the exe file