


 Рейтинг: 4.6/5.0 (1848 проголосовавших)
Категория: Android: Головоломки
Здравствуй Хабр!
Сегодня я хочу рассказать о генерации деревьев на HTML5 Canvas с помощью JavaScript. Сразу поясню, что речь идет не о деревьях ссылок или B-дереьях, а о тех деревья, которые мы каждый день видим у себя за окном, тех, которые делают наш воздух чище и богаче кислородом, тех, что желтеют осенью и теряют листья зимой, вообщем о тех самых живых, лесных, настоящих деревьях, только нарисованных на Canvas и пойдет речь.
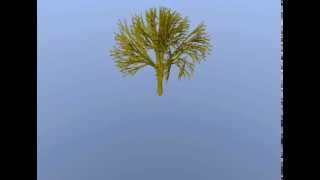
Такие вот деревья получаются
Генерация деревьев нужна была мне для моей игры. Но некаких адекватных алгоритмов мне найти так и не удалось. Поэтому я написал свой генератор…
И так, что под копотом?Все работает пресловутых кривых Безье, благодаря им ствол и ветви получаются округленными и кажутся жывыми. Я перепробовал множество способов, на самым производительным и простым оказалось именно использование кривых. Их легко строить, легко добиться от них нужного направления, а также можно рассчитать их траекторию программно.
Структура генератора такова:
Класс TreeGenerator(на схеме Generator) использует объект класса Branch для генерации ветвей и ствола, для генерации листьев TreeGenerator вызывает метод из Drawer. Branch — это абстракция предоставляющая каждую ветку, как объект. Он тоже использует Drawer для отрисовки.
Шаг 1. Генерация ветвиКласс Drawer — это прослойка между canvas API и Branch. Этот класс выполняет отрисовку листьев и ветвей по заданным параметрам.
А вот и функция по рисованию ветви из Drawer:
Из кода, вы наверное не поняли как задаются верхние точки ветви. Как известно, ветвь дерева в конце немного уже, чем в начале. Насколько уже, задается константой BRANCH_CONSTRICTION. По умолчанию она равна 1.5. BRANCH_COLOR — задает цвет. Значение выбирается рандомом из массива цветов.
Результатом этой функции станет примерно такая ветка:
Скажу честно, пока это не очень похоже на то, что нам нужно. Поэтому, поехали дальше!
Шаг 2. Генерация дерева из ветокЕсли вы когда нибудь присматривались к маленьким, только проросшим из семени деревцам, то могли заметить, что они представляют собой одну единственную ветку с листиками, затем из этой ветки прорастают другие, а она сама тоже растет и расширяется. К чему это я? А к тому, что ствол — это по сути дела и есть одна большая ветка из которой врастают другие ветки, а из этих веток еще веки, и так далее…
Исходя из этого, нам будет удобнее представлять каждую ветку, ввиде объекта, который будет хранить параметры и методы и информацию об отростках и ответвлениях. Для этого, как я уже говорил, класс Branch:
Испробуем новый класс. Вызавем:
Результат будет таким:
Ну что-ж, отдаленно напоминает ветку, правда? Однако деревья всё время разветвляются и тянутся к солнцу. Для создания нам понадобится своебразная надстройка на createChild, функция createDivarication. В природе, чаще всего встречаются разделения ветви на 2 отростка, один из которых основной, он следовательно толще, а второй тоньше. В результате некоторых тестов и подборов, я понял, что лучшее отношенее 1.9:1.4. Вы можете использовать другое отношение для своих деревьев.
А вот и код функции createDivarication:
Вот что у нас получилось:
Ну вручную нарисовать и так можно, а нужны то нам случайные деревья. Именно для этого и предназначен класс TreeGenerator. Вот и он собственной персоной:
Читая код вы наверное заметили новые константы BRANCH_DEFORMATION — деформация(кривизна) веток (не ствола), BRANCH_MAXLENGTH — максимальная длинна ствола и BRANCH_MAXWIDTH — ширина ствола. В деформации веток также играет роль их толщина по отношению к ширине, чем тоньше ветка тем меньше в итоге девормация, ведь она изначально задается в пикселях. Что касается длинны, то ветвь не может быть длинее той, от которой отросла. Я не стал показывать код функции DrawHill так как она состоит всего из шести строк, и рисует полукруг в точке x и y.
Ну что-ж, самое время опробовать генератор. Вызвав функцию genT с нужными параметрами, получим примерно такой результат:
Согласитесь, дерево то, растёт! На этом можно было бы поставить точку и радоваться тёмным силуэтам деревьев, тем более, если учитывать, что сейчас зима и за окном деревья ничуть не лучше, а порой и намного хуже, однако, я не остановится и продолжил совершенствовать генератор, чтобы сделать деревья ещё более живыми и интересными. Если вы со мной, то нам пора к следующему пункту.
Шаг 3. Генерация отростков от ветокКогда деревья стоят без листвы можно заметить что они состоят не только из лаконичных, толстых ветвей, вырастающих из вершин таких же ветвей, но и из тех маленьких и не очень веточек которые отрастают от основных в произвольных местах. Делают они это для того для того, чтобы у дерева стало больше листвы, ведь листва выполняет очень важные для нашей планеты вещи — испаряет влагу и преобразует углекислый газ в кислород. Эти веточки в данном посте будут называться отростками. По сути они тоже ветви(branch), как я и говорил растут из произвольных мест, а не только из верхушки. А ветки у нас на кривых Безье! Как же рассчитать, где будет находится отросток? В этом нам поможет сама формула кривых Безье:
На js — это будет вот так:
Кривая будет проходить по центру ветви. Визуально это будет вот так:
Опробуем? Вот такое стало дерево:
Шаг 4. Генерация листьевЛистья неотъемлемая часть любого дерева(иголки тоже являются листьями, только девормированными для защиты от холода) и они слишком разные, чтобы генерировать их программно, поэтому мы будем брать один из пяти видов листьев, созданных в ручную. Листья рисовать тоже лучше всего на кривых Безье и хранить в массивах с конечными точками и точкой деформации кривой. Лист — сущность семеричная и нам стоит только нарисовать левый бок, а правы дополнится автоматически.
Для примера возьмем код простейшего листа:
Также рассмотрим функцию отрисовки из Drawer:


This is an experimental technology
Because this technology's specification has not stabilized, check the compatibility table for the proper prefixes to use in various browsers. Also note that the syntax and behavior of an experimental technology is subject to change in future versions of browsers as the spec changes.
The CSS transform property lets you modify the coordinate space of the CSS visual formatting model. Using it, elements can be translated, rotated, scaled, and skewed.
Browser compatibility[1] Gecko 14.0 removed the experimental support for skew(). but it was reintroduced in Gecko 15.0 for compatibility reasons. As it is non-standard and will likely be removed in the future, do not use it.
[2] Before Firefox 16, the translation values of matrix() and matrix3d() could be <length>. in addition to the standard <number> .
[3] Internet Explorer 5.5 or later supports a proprietary Matrix Filter which can be used to achieve a similar effect.
Internet Explorer 9.0 or earlier has no support for 3D transforms. Mixing 3D and 2D transform functions, such as -ms-transform:rotate(10deg) translateZ(0);. will prevent the entire property from being applied.
[4] Android 2.3 has a bug where input forms will "jump" when typing, if any container element has a -webkit-transform .
For our purposes this refers to an ocfs2_extent_list structure, either within the ocfs2_dinode or within an ocfs2_extent_block. Empty extent record
Also known as a record whose e_clusters value is 0. Typically this means that the entire record is zero'd. ocfs2_add_branch() however will leave an empty extent with e_cpos filled in. Therefore we only key on e_clusters. Empty records do not signify the existence of a hole. They are simply a result of temporary tree changes, and should be ignored by everything except the insert code. Splitting record The extent record # within a leaf node which should be shifted right or left, leaving an empty extent record in it's place. Root node For a rotation which involves two leaf nodes, the "root node" is the lowest level tree node which contains a path to both leafs. This basically forms a subtree with that node at the root.
This is done when the allocation tree has reached its maximum size.
The act of adding a whole level to the tree. A new ocfs2_extent_block is allocated and fully prepared by filling in values. It is then inserted between the ocfs2_dinode and the rest of the tree.
See function: ocfs2_shift_tree_depth()
Adding a branchThis is done when all existing bottom most nodes are full but one or more of the upper tree nodes have space.
The new branch is 'empty' in the sense that every block will contain a single record with e_clusters == 0
In the case of failure after this update, truncate and extent_map code completely understand the concept of empty extent blocks.
See functions: ocfs2_add_branch(). ocfs2_find_branch_target()
Insert an extent recordThis is also done with new extents which are contiguous to an existing record as all but the last step of the operation is the same.
Expects the tree to already have room in the rightmost leaf for the extent. Travels down the tree to the new record location, updating one record in each extent block on the way.
The algorithm needs minimal changes to do the same thing for non tail extents - the hard work should already be done beforehand.
See function: ocfs2_do_insert_extent()
New Atomic Tree UpdatesNone of these operations are performed for extents which can be simply appended to a leaf node. So the appending allocation case only makes use of the existing tree code.
Both the rotation functions don't actually insert the new extent - they simply create an empty extent record in the place where the new one will be inserted.
Rotate branches rightWe only change up to two adjacent leaf nodes at a time. To do this, the function is given the path from a root node to the two leaf nodes. The root node is the lowest level tree node which contains a path to both leafs. You can consider this to be the root of the subtree which we will rotate nodes in. Nothing above the root node needs to change, and thus is not passed into this function.
The mechanism to determine which part of the tree needs update is actually very similar to how ocfs2_find_branch_target() and ocfs2_add_branch() function today.
Also passed to the function is the "splitting record" - the extent record # within the left leaf which will be shifted right, leaving an empty extent in it's place.
In the best-case scenario that the empty extent is to be created in a rightmost leaf block, the root node and left leaf values can be empty and we simply rotate within the right leaf using the "splitting record" value.
The right leaf node must have room for one additional record, or have an empty first record.
At right leaf node: If the leftmost record is not empty, shift records to the right and create an empty leftmost record.
At left leaf node: Call R the rightmost left leaf record. Copy R into the leftmost right leaf record position (aka, position 0). Shift the remaing left leaf records to the right, leaving an empty record at the splitting point.
Now we travel backwards, up the tree updating each pair of nodes between the leaves and the root node.
For the left node: Call A the rightmost record, then: A->e_clusters -= R->e_clusters;
For the right node: Call B the leftmost record, then: B->e_cpos -= R->e_clusters; B->e_clusters += R->e_clusters;
At the root node, we find the two adjacent records which begin our path to the leaves. If the record on the left is A, and the record on the right is B, then: A->e_clusters -= R->e_clusters; B->e_cpos -= R->e_clusters; B->e_clusters += R->e_clusters;
See function: ocfs2_rotate_subtree_right()
Rotate branches leftThis operates on a maximum of two branches simultaneously.
This is done when inserting a extent which is contiguous with two ajacent leaf node extent records (one on the left, one on the right). Ultimately, that particular record insert will result in the two records being "joined" into one, though it doesn't happen in the rotate code.
I think that for now this might be optional. It's interesting to note which case this helps though, which is why the operation is noted here.
High level `ocfs2_rotate_tree_right()` walkthroughThe purpose of this function is to prepare a series of subtrees, from right to left, to pass to ocfs2_rotate_subtree_right().
This section will also describe a series of support functions which ocfs2_rotate_tree_right() might call.
ocfs2_is_empty_extent(): Determine whether a given ocfs2_extent_rec can be considered empty.
ocfs2_find_split_rec(): Given a record to insert, and an extent list, return the array index where the next empty extent record should be created.
This function will simply skip past existing empty records, so any insert code that wishes to optimize by using those should check the records immediately before the returned index.
ocfs2_create_empty_extent(): Given an extent list and a position, create an empty extent at position in the list. Will also increment l_next_free_rec.
ocfs2_find_lowest_cpos(): Find the e_cpos value of the 1st non empty extent within the given extent list.
ocfs2_find_path(): Given an empty buffer_head array and a cpos value, this function will traverse the inode tree in search of the first record greater than or equal to cpos. The path traveled is recorded in the array.
ocfs2_find_subtree_root(): This function is passed the dinode buffer and two full paths from the dinode down to a pair of adjacent leaves. It's task is to figure out which buffer is the subtree root - this can be the dinode itself in a worst-case rotation.
To help the caller optimize which buffers to pass to the rotation function, we pass back the path array index which is the beginning of the unique path portions.
ocfs2_rotate_tree_right(): We know for sure when we get here that there's no way we're doing a simple record append.
If we have tree depth (a simple extent list), we handle this case up front by simply calling ocfs2_find_split_rec() to determine an index to directly pass to ocfs2_create_empty_extent().
Allocate two arrays of buffer head pointers, sized tree_depth - 1. Call these "right_path" and "left_path"
Set a root_bh variable to NULL.
Fill in the right_path array by calling ocfs2_find_path() with a search of i_clusters. The intent here is to get the rightmost tree path.
Now loop, until we have no more subtree roots:Modify the function prototype to take a cpos value:
Determine whether the extent list has room for another extent record:
Find insert point. Determine the kind of insertion we will be doing:
This code doesn't change. In a nutshell, we figure out if we need a tree shift and do it. In all cases, we'll have to add a branch so we do that too. We need to skip the tree rotate in some cases though, so add a goto for that.
The tree editor provides tools for moving branches, rerooting, polytomy formation, and rearranging the appearance of the tree. The tools available are displayed in the tool bar:
To select a tool click on the icon corresponding to the tool you want to use. Once you have selected a tool the cursor will change to the appropriate shape. To manipulate the tree click the cursor on a branch; the corresponding operation will be performed on that branch (unless the desired operation is invalid, in which case the tree editor gently "beeps" and ignores the command). The default tool is the arrow tool, which is used for moving branches.
Using the tools![]() Move branch
Move branch
A branch can be picked up and moved to another part of the tree by clicking on the branch and dragging it to the new position. The branch being moved will be highlighted with a different colour, and the cursor will change from an arrow to a small diamond:
Drag the diamond cursor to the position you want to move the branch, and release the mouse button. If the new placement is invalid (for example, moving a branch onto one of its descendants) the tree editor will gently "beep" and ignore your request.
 Collapse branch
Clicking with this tool on an internal branch deletes that branch produces a polytomy. The editor ignores attempts to delete terminal branches.
 Collapse clade
Clicking with this tool on an internal branch collapses the clade above that branch
Clicking on a branch with this tool reroots the tree on that branch.
The next four tools change the appearance of the tree in the window, but do not affect the cladistic topology. They cannot be undone.
 Rotate branches
This tool rotates the descendants of a binary node, so that the left descendant is now the right descendant, and visa-versa. You can only use this tool on binary internal nodes. If you want to rearrange the descendants of a polytomy you must use the next tool.
 Exchange branches
To rearrange the order of the descendants of a polytomy use this tool to interchange pairs of branches. Click on one descendant, drag the cursor onto the other descendant, and release the mouse button.
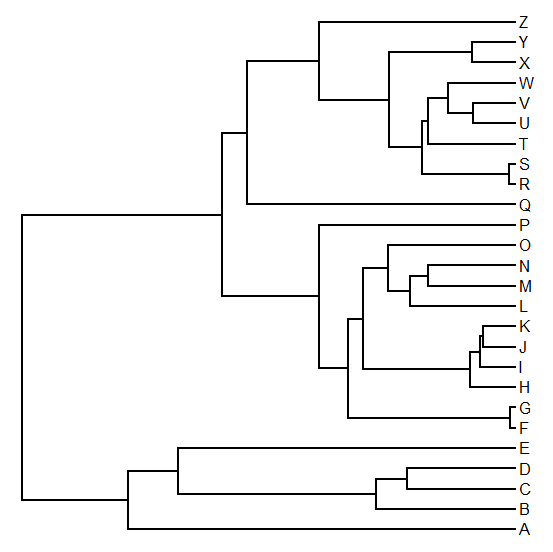
 Ladderize left
This tool orders the subtree rooted at the branch clicked on so that the "heavier" nodes (those nodes with the largest clusters) appear leftmost (uppermost on the screen).
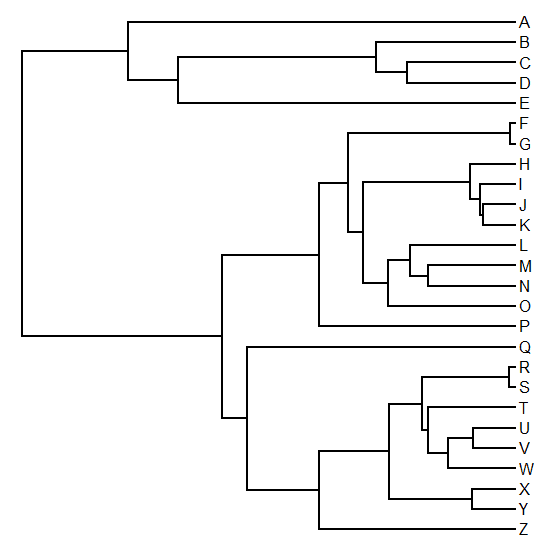
 Ladderize right
This tool orders the subtree rooted at the branch clicked on so that the "heavier" nodes (those nodes with the largest clusters) appear rightmost (lowermost on the screen).
Undoing a tree manipulationThe tree editor remembers the previous tree, so that you can undo a change and recover the old tree by choosing Undo from the Edit menu, or by using these keys:
 Z (MacOS)
Ctrl + Z (Windows)
Choosing the Undo command again restores the tree you just undid. Undo is only available for the operations that materially affect the tree topology: move branch. collapse branch. collapse clade. and reroot. Cosmetic changes (such as rotate branches ) cannot be undone.
The Undo menu item will reflect which type of move can be undone; for example the menu item will read "Undo move branch" if you are using the move branch tool.
To support the manufacture of wire and cable harnesses, the E3.Series suite offers E3.Formboard. This additional E3.Series module has been designed for the creation of nail board displays required in the production of wire and cable harnesses.
For the manufacturing of wire harnesses a scaled 1:1 drawing is usually necessary. The Formboard drawing is used to create the harness and to fix the individual branches.
E3.Formboard makes it possible for you to create connector tables automatically, graphically display manufacturing and displayed lengths, apply automatic stretching and compressing to cables, as well as rotate cable branches. As with all other modules in the E3.Series, the displayed view data of an object in a project with E3.Formboard is always consistent with the schematic and additional documents.
Features and BenefitsЗдравствуй Хабр!
Сегодня я хочу рассказать о генерации деревьев на HTML5 Canvas с помощью JavaScript. Сразу поясню, что речь идет не о деревьях ссылок или B-дереьях, а о тех деревья, которые мы каждый день видим у себя за окном, тех, которые делают наш воздух чище и богаче кислородом, тех, что желтеют осенью и теряют листья зимой, вообщем о тех самых живых, лесных, настоящих деревьях, только нарисованных на Canvas и пойдет речь.
Такие вот деревья получаются
Генерация деревьев нужна была мне для моей игры. Но некаких адекватных алгоритмов мне найти так и не удалось. Поэтому я написал свой генератор…
И так, что под копотом?
Все работает пресловутых кривых Безье, благодаря им ствол и ветви получаются округленными и кажутся живыми. Я перепробовал множество способов, на самым производительным и простым оказалось именно использование кривых. Их легко строить, легко добиться от них нужного направления, а также можно рассчитать их траекторию программно.
Структура генератора такова:
Класс TreeGenerator(на схеме Generator) использует объект класса Branch для генерации ветвей и ствола, для генерации листьев TreeGenerator вызывает метод из Drawer. Branch — это абстракция предоставляющая каждую ветку, как объект. Он тоже использует Drawer для отрисовки.
Шаг 1. Генерация ветви
Класс Drawer — это прослойка между canvas API и Branch. Этот класс выполняет отрисовку листьев и ветвей по заданным параметрам.
А вот и функция по рисованию ветви из Drawer:
//x и y - координаты начала ветви, leng - длинна ветви, w - ширина, deform - кривизна ветви, rotate - поворот
DrawStick = function(x, y, leng, w, deform, rotate) <
//Сохраняем canvas и применяем трансформацию.
this.c.save();
this.c.translate(x, y);
this.c.rotate(rotate.degree()); //Метод degree переводит градусы в радианы
//Обнуляем x и y точки поворота.
y = w / -2;
//Рисуем веку из кривых Безье и прямых
this.c.beginPath();
//перемещаемся в x и y
this.c.moveTo(x, y);
//Рисуем первую кривую со сгибом в середине от x y до начала верней линии(имеющей ширину w/BRANCH_CONSTRICTION)
this.c.bezierCurveTo(x, y, x + leng / 2, y + deform, x + leng, y + (w - (w / BRANCH_CONSTRICTION)) / 2);
//Рисуем линию до второй кривой
this.c.lineTo(x + leng, y + w / BRANCH_CONSTRICTION + (w - (w / BRANCH_CONSTRICTION)) / 2);
//Рисуем вторую кривую обратную первой
this.c.bezierCurveTo(x + leng, y + w / BRANCH_CONSTRICTION + (w - (w / BRANCH_CONSTRICTION)) / 2, x + leng / 2, y + w + deform, x, y + w);
//Линия в начало
this.c.lineTo(x, y);
this.c.closePath();
//Рисуем круг, чтобы сгладить ветку вверху
this.c.arc(x + leng, y + w / BRANCH_CONSTRICTION / 2 + (w - (w / BRANCH_CONSTRICTION)) / 2, w / BRANCH_CONSTRICTION / 2, 0 * Math.PI, 2 * Math.PI, false);
//Закрашиваем ветку
this.c.fillStyle = BRANCH_COLOR;
this.c.fill();
//Восстанавливаем canvas
this.c.restore();
Из кода, вы наверное не поняли как задаются верхние точки ветви. Как известно, ветвь дерева в конце немного уже, чем в начале. Насколько уже, задается константой BRANCH_CONSTRICTION. По умолчанию она равна 1.5. BRANCH_COLOR — задает цвет. Значение выбирается рандомом из массива цветов.
Результатом этой функции станет примерно такая ветка:
Скажу честно, пока это не очень похоже на то, что нам нужно. Поэтому, поехали дальше!
Шаг 2. Генерация дерева из веток
Если вы когда нибудь присматривались к маленьким, только проросшим из семени деревцам, то могли заметить, что они представляют собой одну единственную ветку с листиками, затем из этой ветки прорастают другие, а она сама тоже растет и расширяется. К чему это я? А к тому, что ствол — это по сути дела и есть одна большая ветка из которой врастают другие ветки, а из этих веток еще веки, и так далее…
Исходя из этого, нам будет удобнее представлять каждую ветку, ввиде объекта, который будет хранить параметры и методы и информацию об отростках и ответвлениях. Для этого, как я уже говорил, класс Branch:
var Branch = function(x, y, leng, width, deformation, rotate) <
this.params = <
leng: leng,
//Создание отростков, растущих из конца ветви
//Записываем в созданную ветку информацию
this.children[this.children.length - 1].parent = this;
return this.children[this.children.length - 1];
this.render(); //Вызываем функцию для рандиринга
Испробуем новый класс. Вызавем:
new Branch(100,300,200,20,-60,-50).createChild(100,20/1.5,30,-60);
Результат будет таким:
Ну что-ж, отдаленно напоминает ветку, правда? Однако деревья всё время разветвляются и тянутся к солнцу. Для создания нам понадобится своебразная надстройка на createChild, функция createDivarication. В природе, чаще всего встречаются разделения ветви на 2 отростка, один из которых основной, он следовательно толще, а второй тоньше. В результате некоторых тестов и подборов, я понял, что лучшее отношенее 1.9:1.4. Вы можете использовать другое отношение для своих деревьев.
А вот и код функции createDivarication:
// branches - массив c параметрами вида [
createDivarication = function(branches, main) <
//Считаем половину ширины
var wi = this.params.width / BRANCH_CONSTRICTION / 2;
for (var i = 0; i < 2; i++) <
bi = branches[i];
//Создаём ветвь с параметрами из branches и применяем отношение о котором я писал выше
this.createChild(bi.leng, (i == main). (1.9 * wi). wi * 1.4,
bi.deform,
this.params.rotate - bi.rotate //Находим поворот ветви относительно родительской
return this.children;
Вот что у нас получилось:
Ну вручную нарисовать и так можно, а нужны то нам случайные деревья. Именно для этого и предназначен класс TreeGenerator. Вот и он собственной персоной:
var TreeGenerator = function()<
//Генерация развилок из ветки - branch
this.genF=function(branch) <
if (branch.params.width > 1) < //ветви должны быть не тоньше еденицы
var divarications = [], //Массив для параметров веток
dfm = BRANCH_DEFORMATION * branch.params.width / branch.params.leng; //Рассчитываем максимальные пораметры для кривизны ветви
//Генерируем параметры для веток
for (var di = 0; di <= 2; di++) <
divarications.push(<
leng: rand(40, branch.params.leng), //Длинна не длжна привышать длинну родительской ветки
deform: rand(-dfm, dfm), //Генерация случайной деформации с учетом допустимой
rotate: (di == 0). (rand(-20, -10)). (rand(10, 20)) //генерация уклонав зависимости от стороны
//Здесь будет дополнительный код, о котором пойдет речь в следующих шагах
//Основная функция генератора, запускает генерацию всегодерева
this.genT=function(x,y)<
//Создание ствола дерева с учетом максимальной толщины и ширины
var mainTreeBranch = new Branch(x, y, rand(70, BRANCH_MAXLENGTH), rand(10, BRANCH_MAXWIDTH), rand(-40, 40), rand(-120, -70));
//Запускаем рекурсивный генератор развилок
this.genF(mainTreeBranch);
//Рисуем полукруг(землю) под деревом
drawer.DrawHill(x,y+20);
return mainTreeBranch;
Читая код вы наверное заметили новые константы BRANCH_DEFORMATION — деформация(кривизна) веток (не ствола), BRANCH_MAXLENGTH — максимальная длинна ствола и BRANCH_MAXWIDTH — ширина ствола. В деформации веток также играет роль их толщина по отношению к ширине, чем тоньше ветка тем меньше в итоге девормация, ведь она изначально задается в пикселях. Что касается длинны, то ветвь не может быть длинее той, от которой отросла. Я не стал показывать код функции DrawHill так как она состоит всего из шести строк, и рисует полукруг в точке x и y.
Ну что-ж, самое время опробовать генератор. Вызвав функцию genT с нужными параметрами, получим примерно такой результат:
Согласитесь, дерево то, растёт! На этом можно было бы поставить точку и радоваться тёмным силуэтам деревьев, тем более, если учитывать, что сейчас зима и за окном деревья ничуть не лучше, а порой и намного хуже, однако, я не остановится и продолжил совершенствовать генератор, чтобы сделать деревья ещё более живыми и интересными. Если вы со мной, то нам пора к следующему пункту.
Шаг 3. Генерация отростков от веток
Когда деревья стоят без листвы можно заметить что они состоят не только из лаконичных, толстых ветвей, вырастающих из вершин таких же ветвей, но и из тех маленьких и не очень веточек которые отрастают от основных в произвольных местах. Делают они это для того для того, чтобы у дерева стало больше листвы, ведь листва выполняет очень важные для нашей планеты вещи — испаряет влагу и преобразует углекислый газ в кислород. Эти веточки в данном посте будут называться отростками. По сути они тоже ветви(branch), как я и говорил растут из произвольных мест, а не только из верхушки. А ветки у нас на кривых Безье! Как же рассчитать, где будет находится отросток? В этом нам поможет сама формула кривых Безье:
На js — это будет вот так:
//Функция используется в классе Branch. pointPos позиция точки на кривой в процентах
getPointOnCurve = function(pointPos) <
//Получаем вершину кривой с учетом поворота ветви
var ex = this.params.x + this.params.leng / 2 * Math.cos((this.params.rotate + this.params.deformation).degree()),
ey = this.params.y + this.params.leng / 2 * Math.sin((this.params.rotate + this.params.deformation).degree());
//t - считаем t для формулы [0,1]
t = pointPos / 100;
//Находим координаты конца ветви
ep = this.getEndPoints();
//Начало и конец по x,y
x = [this.params.x, ep[0]];
y = [this.params.y, ep[1]];
Вершина по x,y
p1 = [ex, ey];
//Строим кривю
par1 = Math.pow((1 - t), 2) * x[0] + (1 - t) * 2 * t * p1[0] + Math.pow(t, 2) * x[1]; //по x
par2 = Math.pow((1 - t), 2) * y[0] + (1 - t) * 2 * t * p1[1] + Math.pow(t, 2) * y[1]; //по y
return [par1, par2];
Кривая будет проходить по центру ветви. Визуально это будет вот так:
А теперь пора и генерировать отростки: создадим в Branch новую функцию
//branches - массив объектов с параметрами в
this.createOutgrowth = function(leng, width, pos, deform, rotate) <
var startXY = this.getPointOnCurve(pos);
//Записываем в outgrowths(массив отростков) новый отросток с заданными параметрами
this.outgrowths.push(new Branch(startXY[0], startXY[1], leng, width, deform, this.params.rotate + rotate));
return this.outgrowths.reverse()[0];
Также расширяем генератор:
this.genO = function(branch) <
if (branch.params.width > 1) < //если ветвь шире 1
var outgrowthsCount = rand(0, BRANCH_OUTGROWTH); //число отростков BRANCH_OUTGROWTH - макс. число отростков
for (var io = 0; io < outgrowthsCount; io++) <
//Создаем отросток и тут же скармливаем его разветвителю
this.genF(branch.createOutgrowth(rand(10, branch.params.leng), rand(1, branch.params.width), rand(1, 100), rand(-10, 10), rand(-40, 40)));
И расширим функцию genF, заменив это:
//Создание ответвлений от новых веток
for (var ci = 0; ci < 2; ci++) <
//Создание ответвлений от новых веток и создание отростков
for (var ci = 0; ci < 2; ci++) <
if (OUTGROWTH_ISSHOWN) < //OUTGROWTH_ISSHOWN показывать ли отростки, по умолчанию true
if (chld[ci].params.width < OUTGROWTH_BRANCH_WIDTH) < //OUTGROWTH_BRANCH_WIDTH -максимальная ширина ветви от которой идут отроски
this.genO(chld[ci]); //Вызов генератора отростков
this.genF(chld[ci]);
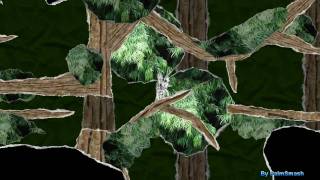
Опробуем? Вот такое стало дерево:
Смотрится не очень красиво, не хватает листьев. Следующий шаг как раз о них.
Шаг 4. Генерация листьев
Листья неотъемлемая часть любого дерева(иголки тоже являются листьями, только девормированными для защиты от холода) и они слишком разные, чтобы генерировать их программно, поэтому мы будем брать один из пяти видов листьев, созданных в ручную. Листья рисовать тоже лучше всего на кривых Безье и хранить в массивах с конечными точками и точкой деформации кривой. Лист — сущность семеричная и нам стоит только нарисовать левый бок, а правы дополнится автоматически.
Для примера возьмем код простейшего листа:
[100, 0], //Конечные точки( начало - вершина листа)
[70, 40] //Точка сгиба кривой
Также рассмотрим функцию отрисовки из Drawer:
//Создание двух половинок листа
for (var io = 0; io < 2; io++) <
this.c.moveTo(x, y);
var lastPair = [0, 0]; //Первая точка - на верхушке листа
for (var bi in leafPoints) <
var bp = leafPoints[bi];
iTOL uses Flash and Javascript to display trees. Any modern browser which supports Flash should work OK. Go to Adobe's page to download and install the latest Flash plugin for your browser.
We tested the following:Basic elements of iTOL 's user interface are shown in the image on the right.
Tree display modes Branch lenghts and bootstrap valuesX and below
highest bootstrap in the tree
For example, in a tree with maximum bootstrap value of 100, the following options are selected:
by Paul Badger
What you should have done so far.
Open the Processing Sketch "Examples -> Topics -> Fractals and L-Systems -> Tree
Run the code and try out the sketch - Very groovy, no? Look over the code and see where the mouse input gets into the sketch.
float a = (mouseX / (float) width) * 90f;
This might be a good place to intervene to hook the sketch up to outside input.
Here's the code for the whole sketch
Now use "Open. " to open the example in the Arduino library (in Processing).
Processing Folder -> libraries -> arduino -> examples -> arduino_input -> arduino_input.pde
Here's the code:
Without explaining the graphics in this sketch (I'll leave that to you, dear reader) Let's see what is necessary to get Processing talking to the Arduino via Firmata.
First there are some import lines to reference the arduino and serial libraries, and a data type definition, these three lines are necessary somewhere at the top of the sketch.
import processing.serial.*; // reference the serial library
import cc.arduino.*; // reference the arduino library
Arduino arduino; // create a variable arduino of the Arduino data type
Then in the setup function this line is required
arduino = new Arduino(this, Arduino.list()[0], 57600);
Let's paste them into the tree sketch. Look over the tree sketch below with the new lines in them. [Sorry this wiki formatting is going to be ugly].
Finally we add an Arduino library function, arduino.analogRead(0). to replace the input from the mouse.
Just hook up a potentiometer or some other variable voltage input to analog pin 0 on your Freeduino and you've got the sketch moving with Arduino power.
Here's the code, with red highlighting for lines that have been changed or added.
import processing.serial.*; // reference the serial library
import cc.arduino.*; // reference the arduino library
Arduino arduino; // create a variable arduino of the Arduino data type
println(Serial.list()); // List all the available serial ports:
arduino = new Arduino(this, Arduino.list()[0], 57600);
void draw() <
/* float a = (mouseX / (float) width) * 90f; // original line */
float a = (arduino.analogRead(0) / (float) width) * 90f;
Note that the math is not the same as the original mouse action, but I'll also leave this to the reader to work out - some very interesting things happen with the tree anyway.
Now try out the other Firmata examples and functions and you'll be up and running with Firmata in no time.
"*" Freeduino here is used to mean the entire set of Arduino and Arduino-compatible hardware.