


 Рейтинг: 4.0/5.0 (1863 проголосовавших)
Категория: Windows: Десктоп менеджеры
Microsoft has made available a hotfix that will resolve a problem where the taskbar customizations are lost and reset to defaults when automatic logon is enabled in Windows 7 and Windows Server 2008 R2. More details are available at FIX: The Taskbar is reset to the default settings when you use the "Automatically Log On" feature in Windows 7 and in Windows Server 2008 R2 .
If you still have the issue of where the pinned Quick Launch used in this tutorial disappears on you after logging off and on or restarting the computer, then a workaround for this issue is to either:
To use a Microsoft hotfix. It is intended to correct only the problem that is described in this article. Apply it only to systems that are experiencing this specific problem.
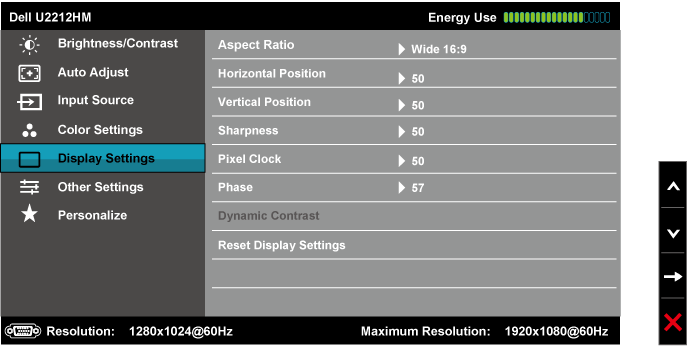
NOTE: Quick Launch is used to open a program quickly from a shortcut on the taskbar. In this case in a toolbar The Quick Launch folder is located at the hidden system folder location (step 2) of:
C:\Users\(user-name)\AppData\Roaming\Microsoft\Internet Explorer\Quick Launch


Когда я первый раз включил Windows 7, то с ужасом для себя заметил, что панели быстрого запуска на привычном месте нет, да что тут говорить, ее нет и в любом другом месте. А ведь я к ней очень прикипел душой, она здорово облегчает запуск самых любимых приложений.
После нескольких недель привыкания к новому положению дел, я понял: — «Нет, так не пойдет, или панель быстрого запуска, или катись ко всем чертам седьмая винда». После нескольких часов экспериментов, мне все таки удалось выполнить поставленную задачу. Итак, кому интересно, рассказываю как вам включить панель быстрого запуска в Windows 7.
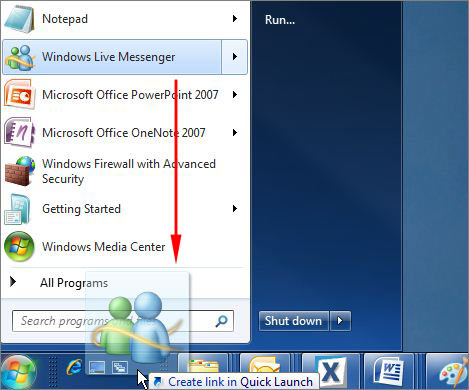
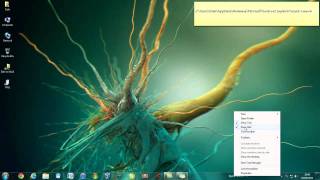
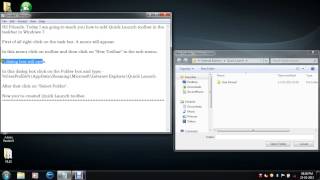
Шаг 1. Наводим мышкой на панель задачи и жмем правую кнопку мыши -> выбираем Панели -> Создать панель инструментов:
Шаг 2. Теперь нам нужно выбрать папку, содержащая ярлыки быстрого запуска, поверьте, она есть и никуда не девалась. В 7ке он проживает по адресу:
C:\Users\<Имя пользователя>\AppData\Roaming\Microsoft\Internet Explorer\Quick Launch
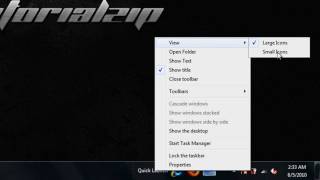
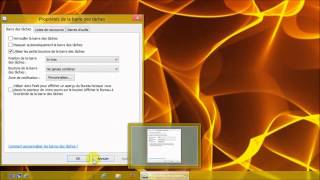
Шаг3. Все, дело сделано, теперь у вас есть панель быстрого запуска, однако имеет она не самый лучший вид. Дабы его улучшить снимаем галочку на «закрепить панель задач » и убираем «Показывать подписи» и «Показывать заголовки».
Теперь задаем ширину нашей панели и её расположение. После всех этих нехитрых манипуляций закрепляем панель задач и радуемся жизни, ведь теперь у нас есть, такая милая душе, панель быстрого запуска:
Пользуйтесь на здоровье!
Here is a tutorial on how to add quick launch bar to Windows 7 taskbar .
Those who have worked with Windows XP or Vista, might be aware of the Quick Launch Bar, which is a small section of the taskbar containing shortcuts to quickly launch applications.
Though Microsoft has provided many improvements in Windows 7, including the ability to pin shortcuts to the taskbar, the traditional Quick Launch Bar is missing. And if we have so many applications that we access frequently, pinning all of them to the taskbar isn’t always feasible. That’s why, most of the times we’d have to rely upon third party app launchers to quickly access applications that we need on regular basis. This also helps in making the desktop uncluttered. by keeping the shortcuts organized within a specific place without putting them here and there on the desktop screen.
Sponsored Links
But what if you don’t even need to install these additional app launchers to your system? What if you get that missing Quick Launch Bar back in your Windows 7 PC? Yes, it’s possible and is pretty simple, in fact. Let’s see how you can add Quick Launch Bar to your Windows 7 taskbar.


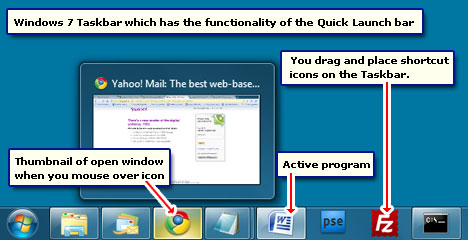
As soon as you do this, a Quick Launch Bar will be added to the right side of the taskbar, besides the tray area.
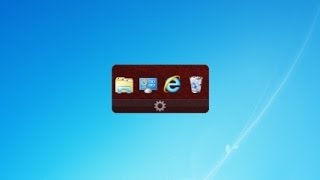
View the Hidden Apps in Quick Launch Bar:You might have noticed that many third party software offer an option to add themselves to the Quick Launch Bar during installation. You can see all those shortcuts right there, within this newly added Quick Launch Bar. Just double-click on it to stretch it over the taskbar and see the hidden apps. Or else click and drag the edge of the Quick Launch Bar (the dotted lines) towards the left side to view the content apps.
Add more Apps to the Quick Launch Bar:If you want to manually add more apps to this Quick Launch Bar, just click on its icon and drag it to the bar’s area.
Customize your Windows 7 Quick Launch Bar:You even have the option to customize the Quick Launch Bar if you want. Here you can do three things:
All these options are present in the context menu of the Quick Launch Bar .
Remove Quick Launch Bar from Windows 7 taskbar:If for any reason, you feel like removing this Quick Launch Bar from your Windows 7 taskbar, simply right-click on its name and choose Properties from the context menu. Now in the Properties window, uncheck the Quick Launch option under the Toolbars tab. The bar would instantly be disappeared from the taskbar, as well as from the Properties window.
В Windows 7 на смену панели быстрого запуска пришла новая функция, поддерживаемая панелью задач - закрепление приложений на панели задач. Для того, чтоб закрепить приложение на панели задач нажмите правую клавишу мыши на окне приложения в панели задач и выберите пункт "Pin this programm to taskbar "
Вы можете создать дополнительно панель инструментов и указать на папку Quick Launch: нажмите правую клавишу мыши на панели задач и выберите в контекстном меню пункт Toolbars и далее New toolbar. В открывшемся диалоговом окне укажите на следующую папку: C:\Users\<Имя пользователя>\AppData\Roaming\Microsoft\Internet Explorer\Quick Launch
После этого панель инструментов Quick Launch будет добавлена на панель задач. А для классического ее отображения нажмите правую клавишу мыши на панели и снимите отметку с параметров Show text и Show title
Удобство классической панели быстрого запуска состоит в том, что вам будут доступны иконки приложений, которые помещают свои ярлыки в эту панель.
Содержание:
Панель быстрого доступа можно вернуть на прежнее место Классическая панель быстрого доступа, такая, какой ее привыкли видеть в Windows XP, в «семерке» отсутствует. Точнее, в Windows 7 она слилась с панелью задач и стала с ней, по сути, единым целым. Больше нет выделенной области справа от кнопки Пуск, где можно было размещать ярлыки часто запускаемых программ — теперь их можно просто закреплять на панели задач, используя всю ее ширину.
Разработчики дизайна ОС Windows 7 явно не посчитались с пользователями, которые привыкли работать со старой панелью быстрого запуска и считали ее полезным и удобным инструментом. Однако лазейку все же оставили — теперь пользователь может создать ее сам, и панель задач примет свой прежний, привычный вид. Посмотрим, как это сделать.
Добавление панели быстрого доступа в Windows 7Оказывается, рабочую среду Windows 7 довольно несложно настроить на «старый лад», если он больше вам по вкусу. Также просто и вернуть ее к прежнему виду. Не бойтесь экспериментировать, и верьте, что у вас всё получится как надо.
I have a new laptop with Windows 7. In XP I have the quick launch area with about 10 icons that flow over 2 lines which is how I want it. In windows 7, I have dragged the bar 2 high bu the Quick Launch continues to put everything in one line so that the icons are hidden. i want to be able to see them all.
Quick Launch Toolbar, Icons And Windows 7 StyleBuilder?Feb 15, 2012
Quick Launch New Toolbar? Quick Launch Toolbar Stops Responding? Program Shortcuts On Quick Launch Toolbar Not Showing Relevant Icons Battery Icon Disappeared From Quick Launch Toolbar - Power Notification Grayed Out Quick Access Toolbar In Windows Live Mail? How To Activate Quick Launch Program Won't Add To Quick Launch?Jun 22, 2011
I want to add My Docs to the Quick Launch bar but it refuses to go. I only get the option to add to Windows Explorer which I don't want. I'd like to see my customised containing folder on the Quick Launch instead of the basic brown folder.
I've tried a few of the options suggested elsewhere in the Forum but they didn't work as I'd like.
HP Quick Launch ButtonsOct 28, 2009
The HP buttons on laptops above the keyboard, for me play, ffw, rewind, volume, and mute; do not work with Windows 7.
I went to HP and downloaded the Vista 32 bit drivers hoping they would work on Windows 7 but they dont, at least not by simply installing them.
Im running Windows 7 32bit.
Im not talking about the Quick Play buttons, I dont care about those.
Connecting To ISP Via Quick LaunchThis is my second day with Windows 7 and I'm very impressed with it. With Vista, I had the 'My ISP' icon in the Quick Launch bar which was very handy. Now that I've managed to enable the Windows 7 Quick Launch, can anyone tell me how to put the My ISP icon there so that I can connect with just one click as with Vista?
Changing Quick-launch Icons?Quick Launch was a special, useful toolbar on the taskbar near the Start button. It was there since the Windows 9x era. With the release of Windows 7, Microsoft de-emphasized the Quick Launch toolbar in favor of pinning. Quick Launch however is not completely removed from Windows 8.1, Windows 8 and Windows 7. It is not obvious for a novice user how to enable Quick Launch as it involves numerous steps and cannot be automated.
I was getting a number of emails from Winaero readers on how to enable Quick Launch in Windows 8 as they prefer its compact size. Even with the modern taskbar, many users consider the Quick Launch toolbar still useful. For example, even if you set pinned icons to a small size, they are still spaced too far apart from one another. Another issue is that the taskbar mixes running programs with non-running ones, whereas if you use the Quick Launch toolbar, running programs will always appear to its right.
Quick Launch has a more customizable appearance; you can easily put any shortcut or folder there without having to use tools like Winaero Taskbar Pinner or Pin to 8. You can change their icons, have multiple rows of icons if you make the taskbar larger, and save overall space on the taskbar. In this tutorial, we will look at how to enable Quick Launch in Windows 8.1.
To restore the Quick Launch toolbar, follow these simple steps:
Right click on an empty space of the taskbar. From its context menu select the Toolbars -> New Toolbar. item.
The following dialog will appear on the screen:
In this dialog, select the following folder:
Replace the "YOUR USER NAME" text with your actual user name in Windows 8.1.
Alternatively, you can copy and paste the following text into the Folder text box in the dialog above:
The shell: protocol gives quick access to special folders as I covered previously. Or you can enter the following path instead of the shell command:
%userprofile% is an environment variable which points directly to your user profile in Windows 8.1.
The Quick Launch toolbar will get added to the taskbar:
Right click on the taskbar and untick Lock the taskbar .
Now drag the Quick Launch toolbar from the right to the left, using the dotted bar which appears after your have unlocked the taskbar. Drag all the way to the left of any pinned icons you may have.
After that, right click on the Quick Launch toolbar and untick the following options:
Advertisement
After installing Windows 7, the first thing most users want to know is how they can launch the programs quickly without cluttering up the desktop and taskbar. So far I know of three methods, that are easy, fast, and simple.
Method 1 – JumpList LauncherThis is the first application launcher released for Windows 7. What it does is simple, add all programs in the JumpList so that they can be easily accessed later. You can add and organize the applications and then pin the program to the taskbar. Now whenever you need to access the application just click the JumpList Launcher and choose your app.
Method 2 – Using RUN CommandThis is by far the oldest, famous, and quickest method available for launching programs. It is used by almost every Windows geeks. In Windows 7 it is no different, just drop the program in Windows directory, start Run dialog, enter the program name, and hit Enter.
Method 3 – Adding Quick Launch Bar