


 Рейтинг: 4.0/5.0 (1870 проголосовавших)
Категория: Windows: Ping, trace, whois
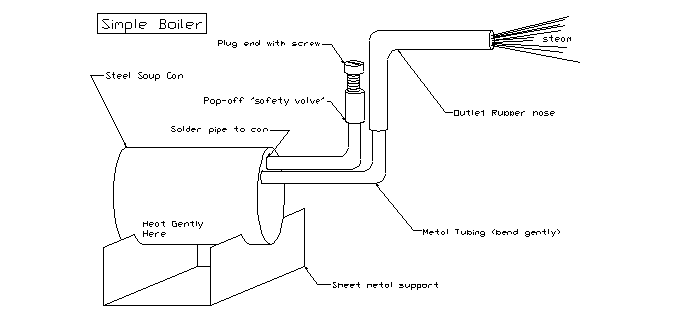
Press down on one end of the 3 1/2-inch-long brass tube with a pair of pliers until it is flattened.
Attach the rotary wheel to your rotary tool and use it to cut a 1/4-by-3/8-inch rectangle into the piece you just flattened to form the whistle's mouth. Flatten the tube above and below the mouth you just cut into it.
Sharpen the whistle mouth's top edge with a small metal file.
Solder the small scrap of flattened brass onto the inside of the whistle mouth, leaving a gap between it and the bottom edge of the mouth.
Attach a small drill bit to your electric drill and drill a small hole on the opposite end of the brass tube, so the hole is between the flattened piece of brass and the end of the whistle, closer to the end of the whistle.
Insert the small brass tube into the hole you just drilled and solder it in place. Blow into your whistle to ensure it works. Adjust the filed end of the whistle mouth if it is not making any sound. After you confirm that the whistle works, solder the other end of it to the steam source.


![]() Very simple steam engines can be made from a variety of materials. Basically, they use a container of some sort, which is sealed except for the steam exit(s). The container must be fireproof, and must be able to hold water. Whatever container you use should be clean inside and out, and free of any substance or coating that may prove hazardous if heated. The steam exits are usually tubes that direct the steam so that the reaction of its escape will propel the engine in a particular direction (for every action there is an equal and opposite reaction). Lastly, the engine must be mounted on some sort of bearing so that it may freely move perpendicular to the axis of the exiting steam.
Very simple steam engines can be made from a variety of materials. Basically, they use a container of some sort, which is sealed except for the steam exit(s). The container must be fireproof, and must be able to hold water. Whatever container you use should be clean inside and out, and free of any substance or coating that may prove hazardous if heated. The steam exits are usually tubes that direct the steam so that the reaction of its escape will propel the engine in a particular direction (for every action there is an equal and opposite reaction). Lastly, the engine must be mounted on some sort of bearing so that it may freely move perpendicular to the axis of the exiting steam.
 A metal cylindrical can, sealed at both ends, is fitted with thin metal (copper) pipes in the centers of both ends. The tubes should be soldered in place. There are two bends in each tube, the first an up bend on one end, and a down bend on the other. The second bend will point forward on one end, and backwards on the other, so that the ends of the tubes point opposite, but in the same horizontal plane. The whole apparatus is partially filled with water, and the tube sections nearest the can are rested on notches in metal brackets, which raise the engine high enough to rest in the flame of an alcohol lamp.
 A nice little engine can be made with a glass tube. Seal one end of the tube in a flame, and blow a small bubble, 1/2 to 3/4 inch or so in diameter. While the glass is still soft, make a little dimple in the bottom of the bubble with a pencil. At about 2 inches above the bubble, bend the tube 90 degrees, and then bend it again 90 degrees horizontal. The end should taper somewhat, but be careful not to seal it. It is held by a piece of fairly stiff wire bent into an open-sided rectangle, the top of which is coiled to loosely hold the neck above the bubble, and the bottom of which points upwards to fit into the dimple in the bottom of the bubble. The whole apparatus needs to be clamped into place somehow, and partially filled with water. The simplest way to fill it is to heat the bulb, and place the open end under water. As the air in the bulb cools and contracts, it will draw water inside. An alcohol lamp is place beneath.
![]() Eggshells can be made into steam engines. The must be emptied through a hole in one end, preferably the blunt end. The hole should be as small and centered as possible. It will not be easy to empty the egg this way, but it helps if you stick something into it first to break up the yolk. You will use 4 eggs. Wash out the shells before using them. A thimble is attached to the eggs with a rig made from very fine wire. You will need to experiment with this to get it right. The thimble should hang centered from below the egg when the egg is held horizontally. There should be a small loop in the wire rigging at the top of the egg (opposite the thimble) from which the egg will hang. The whole thing should be balanced. Suspend the whole rig by the top loop and make certain it is balanced, with the opening of the thimbles remaining horizontal. A carousel is made from a cork and two stiff wires, which are stuck in to the cork so that they protrude from 4 sides equally and perpendicularly (they should make a symmetrical cross with the cork serving as a hub). The cross should be about 4 to 5 inches across from arm tip to tip. Bend the tips to hold the egg rigs in place. Insert a straight pin into the bottom center of the cork. Balance the carousel on a metal capped bottle. If it does not balance, try pushing the wires in and out until it does. Fill the eggs about 1/4 full with water, and hang them on the carousel. They all need to point in the same circular direction (hole end to not-hole-end). If it does not balance, adjust the volume of water in the offending eggs. Half fill the thimbles with alcohol, and light. If constructed carefully, this will work very well. Do not operate it near anything flammable or any surfaces that may be damaged easily. It can (and probably will) dribble burning alcohol, so be very careful.
Eggshells can be made into steam engines. The must be emptied through a hole in one end, preferably the blunt end. The hole should be as small and centered as possible. It will not be easy to empty the egg this way, but it helps if you stick something into it first to break up the yolk. You will use 4 eggs. Wash out the shells before using them. A thimble is attached to the eggs with a rig made from very fine wire. You will need to experiment with this to get it right. The thimble should hang centered from below the egg when the egg is held horizontally. There should be a small loop in the wire rigging at the top of the egg (opposite the thimble) from which the egg will hang. The whole thing should be balanced. Suspend the whole rig by the top loop and make certain it is balanced, with the opening of the thimbles remaining horizontal. A carousel is made from a cork and two stiff wires, which are stuck in to the cork so that they protrude from 4 sides equally and perpendicularly (they should make a symmetrical cross with the cork serving as a hub). The cross should be about 4 to 5 inches across from arm tip to tip. Bend the tips to hold the egg rigs in place. Insert a straight pin into the bottom center of the cork. Balance the carousel on a metal capped bottle. If it does not balance, try pushing the wires in and out until it does. Fill the eggs about 1/4 full with water, and hang them on the carousel. They all need to point in the same circular direction (hole end to not-hole-end). If it does not balance, adjust the volume of water in the offending eggs. Half fill the thimbles with alcohol, and light. If constructed carefully, this will work very well. Do not operate it near anything flammable or any surfaces that may be damaged easily. It can (and probably will) dribble burning alcohol, so be very careful.
Show All Items
Recently I saw a video of a remote controlled boat powered by a miniature steam engine and was instantly hooked on the idea. After doing a bit of research I found miniature steam engines cost hundreds of dollars or require some very advanced skills and tools to build. Yet looking at the actual mechanism which allows them to run they are really quite simple so I decided to try and make one on the cheap.
The point of this project was really to see how cheaply and easily a miniature steam engine could be built. I built this engine in one day and for under $10 in materials so I think it's safe to call it a success.
This engine is 7.2cm (2.8") tall.
Some Things to Note:
First off I should state that this steam engine is only a steam engine. This instructable does not include instructions on how to build a boiler to produce steam. Instead I run the steam engine on compressed air. If you don't have a compressor a bicycle pump works well too, it's just a lot more work for you. ; )
I should also note that even if you did build a boiler this engine probably wouldn't work well because many of it's major components are wood. In the presence of steam the wood would swell and warp causing problems. A simple solution to this problem would be to replace the wood parts with aluminum ones.
I am a very visual teacher so be sure to read the 'Image Notes' (hover your mouse over the yellow boxes on the images), it will likely make my instructions clearer.
How it Works:
You could read my lengthy description below or you could check out the totally awesome animation by the guys over at www.animatedengines.com, find it here! I should note that this animation is of a "double acting" engine, in that is has ports on both the bottom and the top of the cylinder where mine is a "single acting" engine with ports just on the top. This just means that the engine relies more heavily on the momentum of the flywheel to keep it running but is a lot simpler to build.
This type of engine is called an Oscillating Steam Engine. If you watch the video below you will see that the cylinder on this engine actually moves back and forth as the flywheel turns (it oscillates!), this action is what opens and closes the ports which let compressed air enter the engine and exhaust air leave.
The cylinder has one port at it's top which is pressed up against the main body of the engine. The main body on the other hand has two ports, one for the compressed air and one for exhaust. As the cylinder tilts to the right it aligns with the compressed air port allowing air to flow into the cylinder and push down the piston. This causes the crankshaft to turn, thus tilting the cylinder over to the left and allowing the air to exit the cylinder though the exhaust port as the piston comes back up. Then the process repeats.
Since I was very young I've always been fascinated by steam engines, although it has only been recently that I've managed to acquire a collection of my own.
Many simple engines, both static and mobile, are available for sale priced in the region of £40-£100, which makes them an affordable hobby.
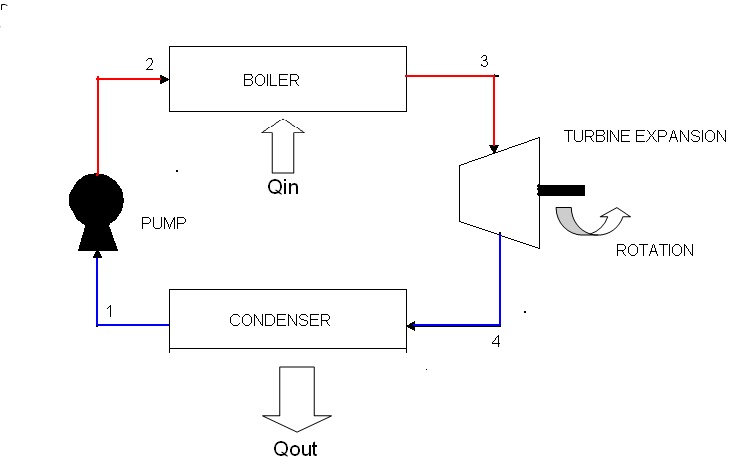
All steam engines work in the same basic fashion: A heat-source, usually solid fuel, (possibly burning spirits), heats up a boiler of water. This water then converts to steam, and is used to push a piston, or two, producing motion. (There is a nice how steam engines work video on YouTube which is worth a watch if you're curious.)
As most models are pretty small their water-capacity, and thus steam-capacity, is pretty limited. This means that you should only expect to receive 10-15 minutes of output from an engine before having to wait for it to cool down so that it may be refilled.
Still you can get a lot of fun out of an engine even with only a small amount of runtime.
Static EnginesEven though static engines don't actually do very much - they are literally just engines mounted on a base typically with a rotating wheel as the only output, they are very interesting.
Because there is nothing between you and the engine it becomes very simple to understand what is going on, and how they work.
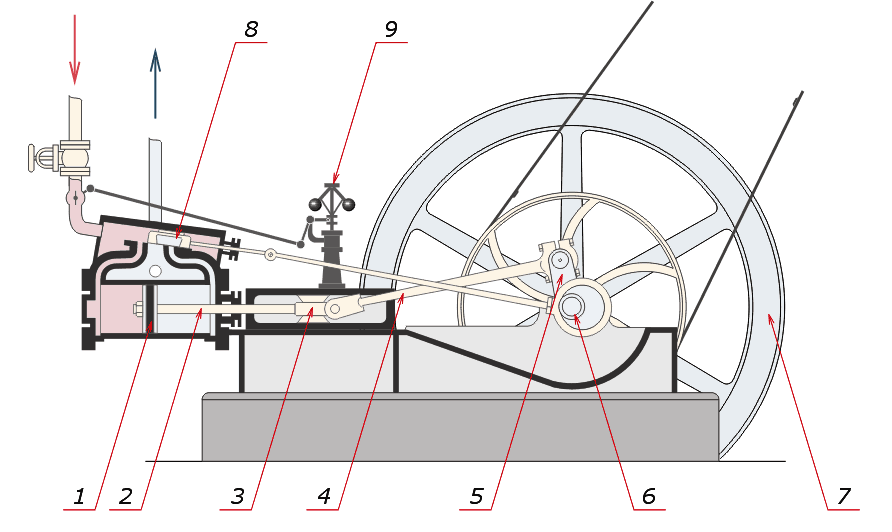
Here's a picture of the Mamod SP4 engine I have:
When the engine is fired up the wheel rotates: This isn't terribly exciting to most people, but good enough for me! Most people prefer the mobile engines, and below you can see pictures of two of mine.
Simple EngineThis engine is very similar to the static engine shown above, but a much more decorative and simple one.
Because the engine is less "disguised" it is very obvious how simple it is, and because of that and the sheer shinyness it is an excellent (working) model.
Игрок CS:GO-состава HellRaisers, ![]() Александр «s1mple» Костылев, занял шестую строчку в рейтинге игроков по версии hltv.org.
Александр «s1mple» Костылев, занял шестую строчку в рейтинге игроков по версии hltv.org.
Из-за s1mple словак опустился на строчку ниже в рейтинге
После вчерашних матчей Caseking of the Hill в этом списке появился ![]() s1mple (преодолел отметку в 50 сыгранных карт на официальных турнирах). Он обогнал не только всех своих тиммейтов, но и
s1mple (преодолел отметку в 50 сыгранных карт на официальных турнирах). Он обогнал не только всех своих тиммейтов, но и ![]() Ладислава «GuardiaN» Ковача. снайпера Na`Vi, который до перехода в состав «рожденных побеждать» даже некоторое время лидировал в этом рейтинге.
Ладислава «GuardiaN» Ковача. снайпера Na`Vi, который до перехода в состав «рожденных побеждать» даже некоторое время лидировал в этом рейтинге.
Heat engines take many forms, from the internal combustion engine in the family car to the giant turbines that generate electricity for our homes. What they have in common is they steal some of the energy moving between something hot and something cold, and convert it into motion.
When you heat a gas like air or steam, the molecules in the gas move around faster. The faster they move, the harder they hit anything that is in the way. If we put something in the way, such as a propellor or a pinwheel, we can make them spin (this is how turbine generators spin to create electricity). If we confine the gas in a container with a lid, we can pop the lid off (this is how the engine in a car works). If we let the fast moving molecules push on one side of a container, and escape through a small hole on the other side (so they are pushing on one side more than on the other) then we have a rocket or a jet, which moves in a direction away from the side with the hole.
In this chapter we will make a working version of the first heat engine (a form of steam turbine), a gas turbine engine that runs from the small heat difference between your warm hand and the cooler air around it, and some tiny rockets that can be made in the kitchen in a couple minutes, and then shoot across a driveway.
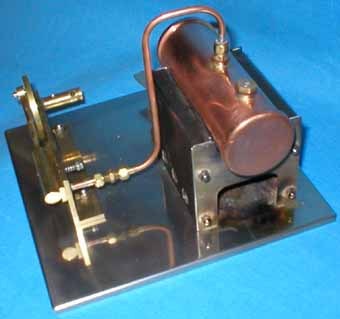
Hero's steam engine.In the first century AD, the mathematician Hero of Alexandria described a device called the aeolipile, in which steam was conducted through pipes from a boiler to a sphere which had two jets from which the steam could escape.


 Hero's steam engine was probably a toy (if it was ever actually built) and not put to any useful purpose. Continuing in that fine tradition, we will build a version of his engine for the same purpose. Our version will be much simpler to build, since we will need no steam-proof bearings for an axle.
We start with a tin can. The can will be both the boiler and the rotating part with the jets. This simplification eliminates any need for steam to enter the jet chamber through tight fitting bearings. We insert two thin brass tubes into the can near the top, and opposite one another. We bend the tubes so they are tangent to the can, and crimp them almost shut, so the steam pressure can build up inside the can.
I have made several aeolipiles from various tin cans, and some work better than others. Small cans like those tomato sauce comes in work well, but they have no convenient screw tops through which to add water. One must draw the water in through one tube by sucking on the other, which is not a very dignified way to show off first century high technology. The best can I have found to date is a small can used to hold 'Oatey Purple Primer', a solvent for PVC plumbing pipe. This product is inexpensive, and easy to find in most hardware stores. Pour out the contents into a jar and give it to your favorite plumber, and wash out the can well.
The Oatey can has a wire soldered to the lid, and a ball of fibers at the other end of the wire to act as a brush for applying the primer. Cut the wire off as close to the lid as possible using diagonal wire cutters. Purists may unsolder the wire, but this takes longer. Dispose of the wire, we won't be needing it.
Next we use a very small nail (actually I usually use an old jeweller's screwdriver, but a small nail works fine) to punch two holes near the top of the can (1/8th of an inch from the top, so we have a little wiggle room). The holes must be directly across from one another, or the engine will wobble a lot (it will wobble a lot anyway, so don't worry too much about precision). Two small brass tubes, about one inch long and as thin as you can find now go into the holes, one tube in each hole. The brass tubing can be found in most hobby stores. It can be cut with the diagonal cutters, but then one end must be filed down so it is wide open. The other end can be opened by squeezing it with a pair of pliers, since we don't want it open all the way. The tiny opening you get by squeezing makes a perfect nozzle for the steam to escape.
The wide open end of the tube goes inside the can, and the nozzle end sticks out. The tubes are pressed against the can so they are tangent to the can, rather than sticking out straight.
Now we solder the tubes to the can. Use a high wattage soldering gun or iron (the Radio Shack 100 watt soldering gun works great), since the can will absorb a lot of heat, and the little soldering pencils used for fine work in printed circuit boards aren't good for the kind of plumbing we are doing. Always use lead-free solder on any toy or object that will be handled, especially by children, who are more sensitive to lead poisoning.
Now solder a length of beaded brass chain (the kind used as a pull chain to turn lights on and off) to the top of the lid, in the center. This chain will act as a support to hold up the engine, and as a bearing, to allow the engine to spin. I have tried fishing swivels, and they work, but the chain has less friction, and is cheaper (unless you have some fishing swivels lying around).
I usually solder the connector of the chain to the lid, since it is easier to handle with a pair of long nosed pliers. But if you are making more than one engine from one chain, you can simply solder one of the beads to the lid, taking care that the hole in the bead where it connects to the rest of the chain is straight up. The chain can be anything from 3 inches to a foot long, depending on how far up you want to put the support (which we will describe later).
Next take the lid of the can and use it to trace a circle around some rubber sheet, either a piece of an old inner tube, or a bit from a tire patch kit. Cut out the circle and push it into the lid of the can as a seal (called a gasket) to keep the steam from coming out where it shouldn't.
The support is made of three pieces of wood. One piece is the base, which can be any flat piece of wood such as a 2x4. I found some nice pieces in a hobby store that had been shaped for plaques that work nicely. The base should be large enough that the engine does not topple over as it wobbles around. A minimum is probably 3 by 5 inches.
Two wooden dowels form the rest of the support. One dowel is a half inch or more in diameter and about 15 inches long, and forms the mast. Drill a hole in the base that fits the mast snuggly. If the fit is not tight, you can use glue to hold the pieces together. The last piece is a small dowel about 5 inches long and a quarter of an inch in diamter. Drill a quarter inch diameter hole in the mast about an inch from the top, and force the small dowel into it. The fit does not have to be snug, but a snug fit will keep the pieces together when the engine is transported. Do not glue this part, since it will be adjusted later.
The small dowel must also have a hole drilled through it about an inch from the end. This hole should be just a little larger than the beaded chain, since the chain will be threaded through this hole. If the fit is a little snug, you will not need anything more to hold the chain in place. If it is loose, then a little bit of wire can be wrapped around the chain above the hole to keep the chain from falling through when the can is full of water.
With the large dowel snug in the hole in the base, and the smaller dowel fitting in the hole near the top of the larger dowel, the chain now suspends the can a little above the base. Raise the chain enough to fit a small can of Sterno (jellied alcohol, used to keep food warm at buffets) under the Oatey can. Leave about a half of an inch between the two cans so air can get to the alcohol.
 Now fill the can with water, tighten the lid firmly, and light the Sterno to boil the water in the steam engine. If the can is full of water it will take a few minutes to boil. If the can has only a half inch or so of water, it will boil much sooner. Be careful not to let the can run dry, or the can will become an ugly color, the solder will melt, and the rubber gasket will smoke and stink.
As the water boils, the can will start to spin. The steam coming out the brass tubes should be cool enough to touch (I'll explain why later). If the steam does not exit with enough force to spin the can, there may be too much friction on the chain (too short a chain, not a brass chain, too heavy a can) but more likely the problem is with the nozzles. The nozzles must have very small openings, so the steam pressure can build up in the can, making the steam exit the nozzles at high speed. Try pinching the nozzles shut a little more using a pair of pliers. Make sure there is some small hole in each, or the can will rupture from the pressure. I have built several of these, and all of them worked the first time, although the ones with the smallest holes spin fastest.
As the can spins faster and faster, it will start to wobble. Even if you have built everything with the utmost precision, the water in the can is boiling, and there will be bubbles that make one side lighter than the other. You can ease the wobble quite a bit by holding the chain near the can, so the effective length of the chain is shorter. Be careful not to touch anything hot.
Why does it do that?As the water heats up, the molecules of water move faster. When the water boils, the molecules are moving too fast to stay stuck together as a liquid, and they move about freely as steam. The fast moving water molecules are bouncing around in the can, hitting the walls of the can from all directions. Because they hit the top as often as they hit the bottom, the can neither moves up nor down.
But there is one direction in which the molecules don't hit anything. This is the direction where the holes in the tubes are. Instead of hitting a wall of the can, the molecules hit nothing, and exit out into the air. The molecules in the can are pushing on all the walls the same amount, except where the holes are. Because nothing is pushing in that direction, there is nothing to hold the can back, and it moves away from the holes in the tubes.
Imagine a big box on the floor, with no top, no bottom, and one wall missing. Imagine inside the box are ten little kids, all running in different directions. When a kid runs into the wall of the box, the box moves a little bit, and the kid bounces off the wall and runs in another direction. Let's call the walls the left wall, the right wall, and the front wall. The back wall is the one that is missing. Some kids will hit the left wall, and the box will move to the left. Some kids will hit the right wall, and the box will move to the right. These movements will cancel each other out, and the box will stay in the center of the room. Each time a kid hits the front wall, the box will move towards the front. But since there is no back wall, no kids will ever move the box back. The result is a box that is moving across the room.
Rockets and jets move the same way the box moves. A rocket can work in outer space because it does not need to push against air or the ground. It works because the molecules inside the rocket are pushing in every direction except out the back. Our steam engine works because it has two rockets (the brass tubes) pushing the sides of the can in opposite directions, causing it to spin.
Why is the steam cool when it comes out?The steam is hot inside the can because of two things: the speed of the molecules, and the number of molecules crammed into that little space. The speed of the molecules is what creates the temperature. But temperature alone is not what burns your fingers. You need a lot of fast moving molecules hitting your fingers before you can feel it as heat.
When the fast moving molecules of steam leave the nozzles, they spread out in all directions as they run into the slow moving air molecules outside the can. What you feel with your hand is the steam molecules that have slowed down in the air, and the air molecules they bumped into and caused to move. Not only have they slowed down by the time they hit your hand, but they have spread out so they don't all hit the same place. The combination of moving slowly and spreading out makes them feel cool on your hand.
The worlds simplest steam powered boatThis next toy is an example of the simplest steam engine you will ever see. It has no valves, no moving parts (in the traditional sense of the phrase), and yet it can propel it's little boat easily across the largest swimming pool or quiet duck pond.
The photograph above tells nearly all the construction details.
The boat is a plastic bottle, cut in half lengthwise. I used a soft plastic bottle that contact lens saline solution comes in. It is made of white High Density Polyethylene (HDPE), and is very easy to cut using an Xacto knife or other sharp utility knife.
Near the bow of the boat is a small candle, such as those used to keep food warm on the table. I chose a candle that comes with a small aluminum can, and is less than an inch high, so it would sit low in the boat and not drip wax all over. The aluminum cup keeps the melted wax in place, so the boat can go for hours. I used a small amount of sticky tape to keep it in place.
The engine is made of 1/8 inch soft copper tubing. This can be found at the better hardware stores, and is normally used in refrigerators. You can use the easier to find 1/4 inch soft copper tubing, but the 1/8 works best with the candle's small heat source, and weighs less, so it is less likely to tip the boat.
The best way to cut the tubing is with a tubing cutter (get it at the hardware store when you get the tubing). You can use a hacksaw, but you will have to clean the debris out of the cut with a knife or sandpaper.
Gently bend the tubing around a large pen or pencil (I used the handle of a wooden spoon) to form the coil in the center. Poke two holes in the back of the boat with a nail, and force the copper tubes through the holes. The holes in the soft plastic will close around the tubing, forming a water-tight fit. It is also possible to simply lay the tubing on the top of the back part of the boat, and then bend it down so the ends are under water, and pointing to the rear.
Gently bend the tubing so the coil is just above the top of where the candle flame will be. The boat is now finished, and ready to launch.
The copper tubes must be full of water, and both open ends must be under water. The easy way to fill the tubes is to hold one end under water, and suck on the other end.
When the tubes are full of water, and the boat is resting in the water with both ends of the tubing under the water, light the candle.
When the coil of copper tubing is hot enough to boil the water inside, the boat will jerk ahead suddenly, then start moving evenly forward. If you put your fingers in the water just behind the tubes, you can feel little pulses of water, about 5 or 10 pulses per second. These pulses are pushing the boat along.
In the photograph above, the candle has been replaced with a lump of charcoal starter cake. This makes a bigger flame, and makes the boat move even faster. The candle is safer, however.
In the photograph you may be able to just barely see the ripples in the water behind the boat. These ripples are caused by the 5 to 10 pulses per second that the engine makes as it operates. The easiest way to view this is to watch the reflection of a bright light on the surface of the water.
How does it do that?When the water in the coil boils, the steam expands. This pushes the water out of the tubes. The reaction pushes the boat forward, as we explained above (and will explain in a different way when we look at rockets in a little bit).
As the steam continues to expand, it encounters the section of tubing that used to be full of water. This tubing is cold, and the steam condenses back into water. This causes a vacuum to form, which pulls more water back into the tubes.
You would expect that the water moving back into the tubing would cause the boat to go backwards. However, the water doesn't get very far before it hits the end of the tube (the two streams of water in the two tubes meet each other in the coil). Any motion caused by the water being sucked into the tubes is reversed by the water hitting the front of the tube (the coil) and pushing the boat forward again. As you saw when you put your finger near the tubes, this back and forth water motion is fairly rapid, and the comparatively heavy boat never actually moves backwards at all.
You can see a really nice little hand-made steamboat in our catalog. and shown below:
Click on photo for a larger picture
These are made in India on hand-operated presses, from tin plated steel. They are then hand-painted. They make a wonderfully loud "putt-putt-putt" sound as the steam around a bathtub, swimming pool, or pond.
They come with a tiny candle, and also a little wick so you can use olive oil as a fuel, which will run the engine for hours.
You can click here to see a video (with sound) of the little boat speeding around a bathtub. The video is 1,348,276 bytes long, and will take a little while to download, so be patient.
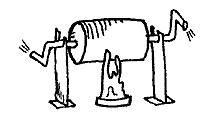
A rotary steam engineWe can use the same steam engine that pushes the boat in a different way. We can arrange that the engine causes something to turn.
We start with an aluminum soft drink can, which we cut about a third of the way up from the bottom to form a small cup.
We then carefully (so as not to cut our fingers) bend over the sharp edge, and crimp it with a pair of pliers to form a neat edge. Don't worry too much about neatness, since it will not affect the operation of the engine, only the looks.
We also put a large dent in the bottom of the can, which is normally bowed up in a dome, which is inconvenient, since we want to put a candle there later. We punch two neat holes in the side of the can, opposite one another, with a paper punch. These holes will hold our copper tubing.
Next we put in the candle, using the same kind of candle (with its convenient little cup to hold the melted wax) as we used for the boat. Around the candle, we put a rope of crumpled aluminum foil, to keep the candle centered in the can.
Now we make the tubing coil in the same way as we did for the boat. This time, however, we bend the ends out to fit through the punched holes. This is a little tricky to do at first, but you soon get good at it. In the version shown, I have added an extra coil to the engine, but this is not necessary, and does not improve the engine.
Next we bend the ends of the tubing gently so they curve into a right angle. Each end is bent opposite the other, so the can will spin when it is placed in the water and the engine started.
The final photograph shows the engine in operation. With a candle, it spins at about one rotation per second.
A simple rocket engine you can build in your kitchenThere is a fascination about rockets that delights children and adults alike. The arc of smoke, the idea of flight, and the fun of action at a distance combine to make rockets a wonderful toy. To these pleasures we will add the forbidden glee of playing with matches, and the satisfaction of learning how something magical actually works. Unlike most of the rest of this book, this really is rocket science.
The rockets we are about to build are perhaps the smallest toys in this book. They travel about ten feet, which is nonetheless 150 times their length. They are hot to the touch, and can blister a hand that catches them, so care must be used to fire them only outdoors, on a fireproof surface such as a driveway. Since they are notoriously inaccurate, the center of the driveway is suggested, so they don't land in dry grass somewhere. As always when playing with things that burn, a source of water such as a bucket or garden hose should be nearby in case of accidents.
These rockets are made out of aluminum foil and match heads, and take less than a minute each to manufacture. You will need a book of paper matches (or a box of wooden matches), a sheet of aluminum foil, a pair of scissors, a paper clip, and a straight pin.
Start by cutting a narrow strip of aluminum foil, about 1 inch wide and three inches long. Tear the head off of a paper match (or cut it off with the scissors), leaving as little of the paper as possible attached to the matchhead. Set the matchhead on the foil near one end, with the top of the head facing down towards you.
Roll the edge of the foil over the matchhead, forming a tube with the matchhead firmly in the center. Unfold the paper clip and insert one end of the wire into the tube so it touches the top of the matchhead (not the paper). Now press the foil tube flat to hold everything in place.
Fold the foil over one more time (or twice if you like), and tear off the excess foil. Now twist the foil at the free end tightly (without tearing it). Twist the end with the paper clip tightly around the paper clip, keeping the wire touching the matchhead at all times.
Lastly, cut off the excess foil from the top of the rocket (the end away from the paper clip). We are now finished with the rocket, and we are ready to build the launcher.
The rocket launcher is a straight pin stuck through a piece of cardboard (such as an empty matchbook) or a wad of aluminum foil. The pin should point upwards at a 45 degree angle. The rocket is removed from the paper clip, and slipped over the pin, so the pin is now where the paper clip used to be.
To launch the rocket, first aim it in a safe direction, where it won't start a fire or melt anything it hits. Then light a match, and hold it under the rocket.
The heat of the flame will cause the matchhead to catch fire inside the foil. The hot gases from the matchhead will have only one way to escape -- through the hole where the pin is. As the gases go one way, the rocket goes the other, with a sharp hiss, and a trail of smoke.
Depending on how big the matchhead was, and how much foil was used, the rocket will travel anywhere from a few inches to 20 feet.
If your rocket does not fly, but instead bursts through the side of the foil, you need to build one with more foil (by rolling it one more time before tearing off the excess foil). If it hisses but doesn't leave the pin, check to make sure that the rocket slides easily up and down the pin. The pin should not block the tube completely, but should leave some space between it and the foil. In other words, the pin should be skinnier than the paper clip. Be careful not to squash the tube flat while handling the rocket.
How does it do that?A matchhead makes a good rocket fuel because it carries both the burnable material and the oxygen needed to burn it. The burnable material in this case is the sulfur in the matchhead. The oxygen comes from compounds like potassium chlorate and potassium nitrate that are mixed with the sulfur.
Описание и инструкции
В это сборке предоставлены такие программы как :
XliveLess: Программа для блокировки проверки файлов редакции игры (Файлы перечисленные в files.txt)
Net Script Hook: Программа для подгрузки и активации Script'овых файлов и модов
Simple Native Trainer 6.4.1.1 [Adaptation]/ 6.4.1.1 [Steam]: Внутриигровой трейнер расширяющий ваши возможности (Обязательно нужно установить оба файла для работы данного чита)
_________________________________________________________________________________________________________________________________________________________________
Данная сборка была собрана для Steam версии и проверена только на ней. Но установка на пиратку не повлечёт за собой краш и т.п
_____________________________________________________
Буду рад плюсикам. >:D
Не обижусь если скажите спасибо. 3
Не откажусь от благодарствия :)
_____________________________________________________
По поводу ошибок и неисправностей писать МНЕ и не кому другому
Автором сборки и редактированных файлов являются: Skrebik97 (Тобиш я) и Создатели оригинальных файлов
Способ использования написан в файле "Установка"
Прошу прочитать ВЕСЬ файл, там есть оооочень важная информация
The Steam user community consists of over 125 million people around the world who run Steam in one of 26 languages. We do our best to translate everything for everyone, but we admit it's difficult to keep pace. With your help, Steam can now become fully localized in each of the 26 languages we support.
As a participant in Steam translation, you'll have access to all text elements within Steam's Client application, Store, Community, and even Valve's games. You'll have the tools you need to view what items are in need of translation, suggest translations of your own, and submit feedback on other translators' work. To participate, simply link your Steam Account with this site. Once logged in, you'll find all the information you need to get started. As you gain experience in providing translations and submitting feedback, you may become a language moderator yourself, guiding and approving other translators' contributions.
Below you'll find a list of current text elements, or "strings" in need of translation, plus a graph displaying the overall translation status of all language files within Steam. You can see there's much work to be done, and we're glad you're here to help - Your contribution to Steam translation will impact users worldwide. Please also find our FAQ for Steam Translation at the very end of this page for further information and we would like to thank Jimo for creating this guide for a brief introduction to Steam Translation.