.jpg)

.jpg)


.jpg)
 Рейтинг: 4.9/5.0 (1860 проголосовавших)
Категория: Windows: HDD утилиты
От производителя
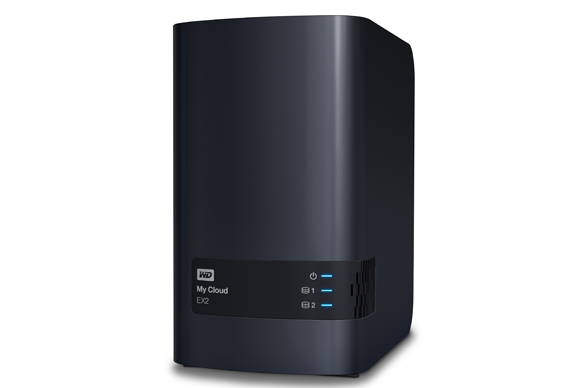
Персональный облачный накопитель WD My Cloud EX2 спроектирован с расчетом на высокий уровень качества и надежности, которого вы привыкли ожидать от продукции WDR. My Cloud EX2 - это надежная и скоростная система NAS с 2 отсеками, предназначенная для дома или небольшого офиса. Централизованно храните все свои файлы и защитите их с помощью массива RAID 1, а также резервного копирования в LAN, WAN или облачную систему. Транслируйте большие файлы на любой экран и расширьте функциональные возможности своего NAS с помощью полного комплекта программ.
Защита файлов на высшем уровне:
У вас есть несколько способов защитить свои файлы от утраты. Выберите вариант защиты файлов, который вам лучше подойдет: RAID 1 либо резервное копирование на USB-накопители, в LAN, WAN или облачную систему.
Легко управлять:
Многофункциональная приборная панель позволяет вам постоянно держать свою систему под контролем. Вы можете следить за состоянием дисков, управлять учетными записями пользователей и настраивать функции энергосбережения. Уведомления по электронной почте и на телефон помогают вам быть в курсе состояния устройства My Cloud EX2.
Трансляция медиа на сетевые устройства:
Фильмы и фотоснимки можно транслировать на сетевые телевизоры, медиаплееры, игровые приставки и другие устройства с поддержкой DLNAR/UPnPR. Встроенный медиасервер Twonky, сертифицированный DLNA. А поскольку накопитель My Cloud EX2 поддерживает iTunesR, вы можете легко транслировать музыку из своей коллекции.
Резервное копирование по-вашему:
Защитите свои файлы путем дистанционного резервного копирования на другое устройство My Cloud EX2 или My Cloud EX4, облачного резервного копирования, либо резервного копирования через LAN или WAN. С программами WD SmartWare Pro для PC и совместимостью с Apple Time Machine для Mac вы можете быть спокойны за сохранность своих данных.
Передовые возможности:
Полный спектр передовых возможностей для дома и офиса: целевые объекты iSCSI, все функции FTP, поддержка Jumbo-кадров, поддержка iPv4 и IPv6, поддержка UPS (с подключением по USB и локальной сети), монитор ресурсов в реальном времени, SNMP и виртуальные тома.
Процессор 1,2 ГГц
Память 512 МБ DDR3
Варианты конфигурации дисков: RAID 0, RAID 1, JBOD
Внутренние накопители: WD Red для NAS (только в моделях емкостью 4, 6 и 8 ТБ)
Поддержка ОС: Windows 8.1 / 8 / 7 / Vista / XP SP 3 (32-разрядная); Mac OS X Mavericks, Mountain Lion, Lion и Snow Leopard
Файловая система EXT4 для внутренних дисков
На внешних USB-накопителях поддерживаются файловые системы: FAT и FAT32, NTFS (чтение и запись), HFS+J (прописные и строчные различаются), Linux EXT2, EXT3, EXT4


Сетевой накопитель (NAS) WD My Cloud EX2 - обзор
 Тема сетевых накопителей (NAS) меня давно интересует. Потому что нынче без отдельных автономных накопителей, особенно в семье, где не ты один используешь компьютер, практически не обойтись.
Я поизучал немало моделей - от сильно продвинутых и дорогих до простых и достаточно дешевых - и продолжаю изучать то, что появляется на рынке.
Сегодня мы с вами рассмотрим вполне симпатично выглядящий домашний NAS от компании Western Digital под названием WD My Cloud EX2. В этой серии компания выпускает данную модель, двухдисковую, и четырехдисковую My Cloud EX4 .
Итак, двухдисковый домашний накопитель My Cloud EX2 .
Технические характеристики
Процессор: Marvell ARMADA 370, 2 × ARMv7, 1,2 ГГц
Оперативная память: 512 Мб DDR3
Количество дисков: 2
Протоколы: FTP, CIFS/SMB, AFP, NFS, SNMP, SSH, HTTP, P2P
Интерфейс: 2 × USB Host 3.0, Gigabit Ethernet
Размер: 171,45 × 99,06 × 154,94 мм
Вес: 800 г (без дисков)
Цена: по Москве 12-14 тысяч рублей (без дисков)
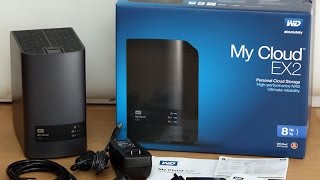
Комплектация
Коробка, раскрашенная фирменным для WD синим цветом.
Внутри: NAS, адаптер питания, сетевой кабель RJ-45, крепеж, брошюрки.
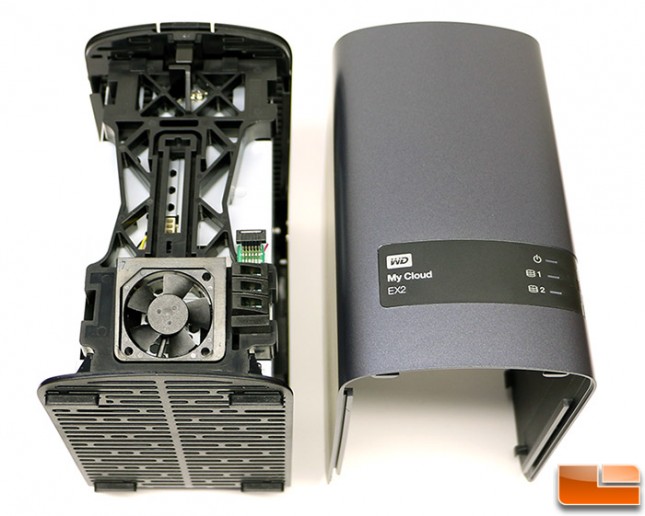
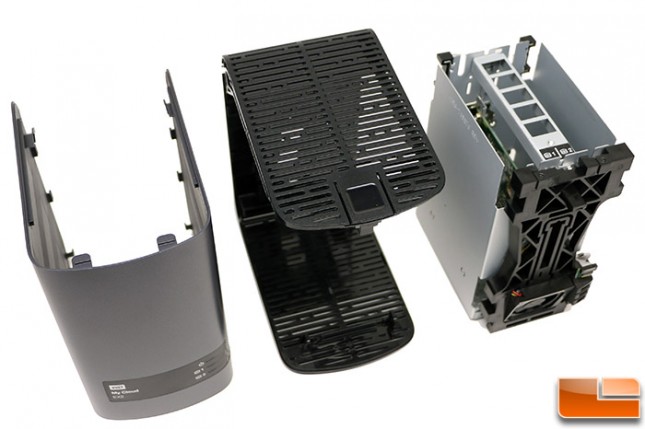
Внешний вид и особенности
Дизайн накопителя очень напоминает внешние диски от WD, которые выпускаются под маркой WD Passport (у меня была пара таких).
На передней панели - индикатор питания и два индикатора дисков.
На верхнем торце - защелка, которая при нажатии открывает два отсека для дисков.
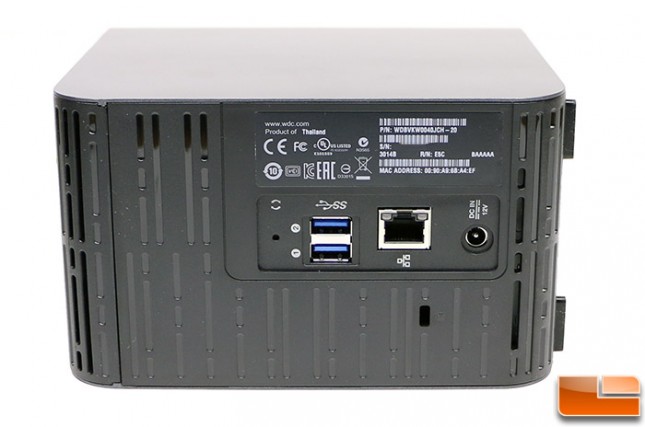
На задней панели - два порта USB 3.0, порт Gigabit Ethernet, вход адаптера питания и кенсингтонский замок.
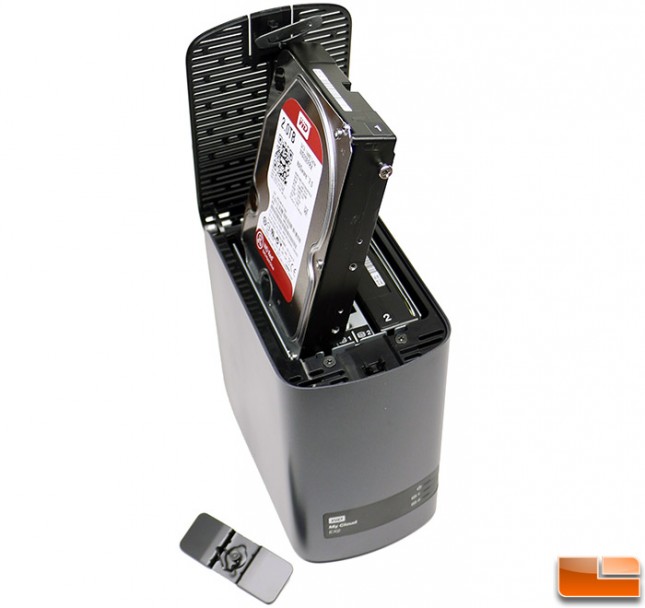
Открываем верхнюю крышку. Там два отсека для дисков и специальный фиксатор с винтом, который сначала нужно снять.
Компания Western Digital любезно предоставила для теста NAS два своих диска WD Red, предназначенных для работы именно в сетевых накопителях в режиме 24×7, я их в этот NAS и поставил.
Диски, кстати, разные - один WD Red Pro, другой просто WD Red. Я, вообще, дисками WD Red (равно как и WD Green для док-станций и WD Black для компьютера) давно пользуюсь - впечатления самые хорошие, проблем не было никогда.
Вставил диски, прикрутил фиксатор.
Выглядит NAS хорошо, качество исполнения и материалы - очень добротные. Накопитель немного короче обычных двухдисковых NAS, где диски обычно располагаются горизонтально, но зато выше.
Кнопки питания у него нет как класса, но, с другой стороны, такие устройства обычно работают в режиме 24×7, так что зачем им кнопка питания?
Работа устройства
Подключил NAS к питанию, подключил к роутеру прилагающимся кабелем RJ-45.
Для первичной настройки понадобится программа, которую нужно скачать с сайта WD вот отсюда. - "Программа установки WD My Cloud EX2".
Скачал, установил, запустил. Программа обнаружила устройство и предложила отформатировать установленные жесткие диски.
После форматирования программа запустила панель управления NAS.
В панели управления было сообщение о том, что со вторым диском какие-то проблемы и нужно обновить микропрограмму. Микропрограмму обновил, отправился в раздел "Хранилище", чтобы разобраться с диском и возможными вариантами конфигурирования.
В разделе "Хранилище" можно задать режим используемых дисков. А их, как и ожидалось, несколько.
Режим JBOD. В данном случае имеется в виду, что два диска используются строго по отдельности. (Хотя во многих сетевых накопителях под JBOD подразумевается использование двух дисков как единого пространства.)
Плюс есть возможность перейти с используемого режима на JBOD, то есть сохранить данные.
Режим объединения - два диска используются как одно пространство. То есть вы получаете как бы один диск на 6 Тб (при использовании двух по 3 Тб). Надежность небольшая: если один диск выходит из строя - вы, скорее всего, потеряете все данные. Ну то есть на втором диске сохранятся какие-то файлы, но какие именно и те ли, что вам действительно нужны, - это большой вопрос.
RAID0 - два диска предоставляют свой суммарный объем как один диск, производительность максимальная, но надежность - минимальная. Что-то случается с одним диском - накрывается все. Этот режим имеет смысл выбирать, только если данные постоянно бекапируются на другие носители.
RAID1 - содержимое первого диска зеркалится на второй диск. Надежность максимальная (две копии), производительность не очень высокая, суммарная емкость равна емкости одного диска.
Отформатировал диски в JBOD. Все прошло нормально, сообщений об ошибках не было. Получил два накопителя по 3 Тб.
Далее идем в раздел "Ресурсы" - настраивать папки. Там есть папка Public (для всех), папка SmartWare (для всех) и папка TimeMachineBackup, предназначенная для хранения копий файлов компьютеров Apple.
Вы можете создавать любые свои папки на любом диске (если они рассматриваются как разные) и задавать виды доступа различным пользователям: запись-чтение, только чтение, невидимая папка.
Также вы можете подключать к NAS внешние диски по USB, давать им свои названия и задавать виды доступа.
Пользователи задаются в разделе "Пользователи". Если вам нужно ограничить каким-то пользователям доступ к каким-то папкам (на запись или вообще скрыть некие папки в домашней сети) - тогда задайте соответствующих пользователей.
Делается это довольно просто, однако при этом почему-то нельзя использовать кириллицу.
Чтобы ограничить доступ пользователей к конкретной папке, нужно в ресурсах выключить доступ "Публичный" и задать разрешения конкретным пользователям.
Например, вот так. Доступ для чтения-записи, только для чтения, папка скрыта.
В разделе ресурсов также для каждого пользователя администратор (это вы) может задавать виды доступа. Для папок, открытых для всех, доступ по умолчанию установлен в чтение-запись, для папок не для всех можно устанавливать соответствующие разрешения.
Доступ к облаку - вы можете настроить доступ к вашему NAS через Интернет с любого смартфона-планшета (и компьютера).
Это защищено: нужно сначала получить специальный код для каждого устройства, после чего поставить на устройстве программу My Cloud, ну и далее для доступа ввести соответствующий код.
После этого на смартфоне-планшете из любого места вы получаете соответствующий доступ к вашим папкам накопителя и можете пользоваться выложенными медиафайлами.
Вот, например, доступ со смартфона. Папки - все файлы.
Аналогичным образом вы можете удаленно подключаться к этому диску и с обычных компьютеров - с помощью программы WD My Cloud.
В разделе "Резервные копии" можно задать сохранение различных папок на внутренних или внешних носителях.
Резервное копирование по USB - сохранение каких-то папок накопителя на подключенных к NAS внешних дисках.
Создание задания для копирования на подключенный диск.
Это можно делать автоматически, по расписанию. Также поддерживается режим добавления новых данных к уже созданному архиву.
Данные также можно копировать в облако, но тут поддерживаются только ElephantDrive и Amazon S3. А вот Dropbox не поддерживается, что слегка обидно. Впрочем, копирование в Dropbox вполне можно обеспечить другими средствами.
Раздел "Приложения". Тут можно настроить работу различных протоколов загрузки.
Ну и настройки накопителя. Есть возможность ухода дисков в спящий режим при неиспользовании - полезная штука.
Подключение сервера мультимедиа DLNA и iTunes.
И различные инструменты диагностики и восстановления. Кстати, тут еще настраивается поддержка образа ISO - тоже полезная штука.
Проверил, как все это работает. Копирование больших файлов с диска компьютера на диск NAS показал в среднем 55 мегабайт в секунду - это вполне нормальная скорость.
Аналогичное копирование на диск моего домашнего NAS (Synology DS213) показывает такие же результаты - 55-57 мегабайт в секунду.
Копирование больших файлов на подключенный по USB 3.0 внешний диск - в два раза медленнее: примерно 25-26 мегабайт в секунду. На моих NAS - то же самое.
Одновременное копирование больших файлов на первый и второй диски накопителя.
Одновременное чтение большого файла с диска накопителя и копирование большого файла на тот же диск.
Наблюдения при работе и выводы
Накопитель работает очень тихо - его практически не слышно, даже когда он находится под постоянной нагрузкой. Температура дисков находилась в норме (менее 40 градусов), вентилятор я вообще ни разу не услышал. Вот, например, данные диагностики в тот момент, когда на NAS закачивались огромные (несколько десятков гигабайт) файлы архивов.
Теперь о цене. Стоимость этого NAS без дисков по Москве составляет примерно 12-14 тысяч рублей (где-то $170 по текущему курсу). Самый дешевый аналогичный Synology (модель DS215j) - порядка 18 тысяч. Продвинутый Synology (DS213), который использую я, - сразу аж 34 тысячи.
Так что цена для WD My Cloud EX2 представляется вполне адекватной.
Устройство очень понравилось. Простая, удобная и очень наглядная админка, бесшумная, но при этом вполне производительная работа, удаленный доступ, наличие всех необходимых сервисов. За такие деньги - очень хороший вариант, как мне кажется.
Ссылки по теме:
Моя прелесть. ) Именно такие эмоции я испытывал, когда нес домой коробку с моим новым NAS от WD - My Cloud EX2. Надо сказать что у меня уже были устройства серии MyCloud от WD и вот, по стечению обстоятельств, я решил обзавестись еще одним, на этот раз двухдисковым и со штатной возможностью установки Transmission и других приложений. Надо сказать что на обычный MyCloud все это также можно поставить, тем более что есть и репозитарий, и инструкции, но я этого делать не стал, решив оставить MyCloud в "стоковом виде" для рабочих целей, а My Cloud EX2 использовать как домашнюю файлопомойку, файлокачалку, DLNA сервер и т.п. Для тех кто не представляет себе что это за устройство рекомендую ознакомиться с его техническими характеристиками и небольшими обзорами:
Я купил MyCloud EX2 с 0 Tb на борту, т.е. без HDD, поэтому для комплекта я купил еще 2 Tb WD'шку, серии Red, специально предназначенную для работы в NAS'ах:
Ну и собственно несколько фоток, иллюстрирующих процесс распаковки девайса и установки HDD в него. Что понравилось - все очень удобно, все продумано, присутствует куча мануалов с инструкциями по быстрой установке, так что проблем с установкой HDD не должно возникнуть вообще ни у кого. По-сути там даже отвертка не нужна, т.к. "болтики" можно вкрутить в HDD и рукой. Единственная их задача - быть вкрученными, т.е. на них ничего не держится, они просто выступают в качестве фиксаторов в отсеке для HDD.
WD, как производитель самых массовых накопителей на мировом рынке, предлагает еще и внешние жесткие диски и NAS – сетевые хранилища для файлов пользователей. WD My Cloud EX2 – вторая версия NAS, способная предоставить пользователю персональное "облако". Новинка поддерживает уже два жестких диска и может из них создавать RAID-массив для большей надежности.
Поставляется устройство в плотной синей коробке, в которой находится сетевое хранилище и комплект поставки к нему в отдельной коробке.
В комплекте с накопителем вы найдете не только инструкции, но и блок питания, сетевой кабель, две наклейки с номерами дисков (наклеиваются на торец HDD), детали крепления диска в направляющих пазах внутреннего корпуса WD My Cloud EX2.
Внешне продукт напоминает предыдущие модели стилистикой дизайна: WD начинал с накопителей My Book, поэтому аппарат чем-то напоминает толстенный том, который не стыдно поставить и на книжную полку.
Корпус перфорирован сверху и снизу для доступа воздуха и охлаждения, фронтальная панель выпуклая, на ней расположены световые индикаторы работы самих дисков и питания аппарата.
Никакой кнопки питания не предусмотрено, есть только кнопка сброса системы на случай зависания ПО на тыльной панели. Там же имеются два разъема USB 3.0, сетевой порт RJ45 (1 Гбит/с) и разъем блока питания.
Снизу только узкие резиновые ножки.
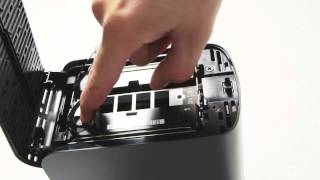
А вот сверху располагается откидная крышка, которая держится на защелке, чтобы её открыть, надо нажать на язычок спереди. Под этой крышкой находится два отсека для накопителей 3.5 дюйма с интерфейсом SATA.
Чтобы установить диски, нужно открутить стальную прижимную планку, для чего есть барашек с откидной ручкой посредине. Но и это не все. Чтобы установить два накопителя:
их нужно подготовить, для чего извлекается комплект, состоящий из двух пластиковых ручек и четырех винтов с цилиндрической головкой. Винты вкручиваются в крайние отверстия на боках накопителя (дальние от торца с разъемом SATA):
Один из винтов держит и пластиковую петлю – без неё извлечь накопитель из WD My Cloud EX2 будет нелегко.
После подготовки накопителей их можно аккуратно вставить внутрь корпуса NAS.
Если накопители одинаковые, то их стоит пронумеровать наклейками, чтобы номера совпадали с таковыми на корпусе NAS.
После чего на место привинчивается прижимная планка.
Ну, а дальше просто закрывается дверца. Устройство готово к использованию, достаточно только подключить питание и роутер.
Разбирается NAS несложно: достаточно отодвинуть вперед U-образную панель, обрамляющую корпус, затем вывинтить четыре винта, крепящие внутренний корпус к шасси и вынуть шасси с системной платой. После чего можно раскрутить и само шасси – винтов тут уже куда как больше.
Внутри к шасси привинчена пластиковая панель с вентилятором. Он, как и само шасси, прикреплен через резиновую прокладку, которая охватывает вентилятор целиком.
Вентилятор Sunon 35mm с магнитной левитацией (подшипник), довольно тихий, но справляется реально с накопителями на 5400 оборотов, более "горячие" 7200rpm с большим количеством "блинов" ему не по зубам – греются ощутимо.
Само шасси, как уже было сказано, крепится тоже при помощи резиновых вставок – никаких винтов.
Системная плата – суть компьютер на одной плате, внутри которого живет душа Linux с оригинальной оболочкой. Все, что я смог рассмотреть – это чипы оперативной памяти Nanya NT5CB256M8FN-DI, NAND Flash SK hynix H27U2G8F2CTR и чипсеты работы с сетью Marvell – название не удалось прочесть. Процессор оказался закрыт радиатором, отдирать который я просто побоялся, ибо нечем приклеить обратно. Что же касается характеристик, то ОЗУ насчитывает 512 Мбайт (256 Мбайт*2) LP DDR3 с частотой доступа 1600 МГц, а накопитель – 256 Мбайт чип SLC. Именно на этом SLC чипе содержится операционная система NAS, чего есть далеко не у всех производителей.
Процессор же – система на чипе Marvell Armada 370 с одноядерным процессором с тактовой частотой 1.2 ГГц и архитектурой ARMv7.
В принципе, такой платформы достаточно для работы и RAID, и сетевых функций.
После включения устройства вы попадаете (в случае, если ваш роутер выдал правильные настройки и вы нашли IP-адрес вашего нового NAS в интерфейсе роутера) на стартовое окно настройки. Если роутер поддерживает UPnP (а это фактически любой роутер), то достаточно просто набрать в адресной строке браузера "wdmycloudex2" для перехода в интерфейс. Можно воспользоваться и другими способами – правый клик на устройстве в сетевом окружении, утилиты WD Discovery и WD Quick View. Последняя вообще весьма полезна. Сам же интерфейс полностью переведен на русский язык и им можно пользоваться даже без инструкции, понравилось и то, что пункты четко поделены на группы и каждый легко найти, плюс высокая скорость реакции, а крупные элементы управления позволят использовать web-интерфейс даже на сенсорных устройствах.
Там вы вводите свои данные для начала работы, а потом потребуется настроить накопители. Вообще, NAS поставляется как без накопителей (как в данном случае), так и с накопителями на 2, 3, 4, 5 и 6 Тб с общей емкостью от 2 до 12 Тб в зависимости от накопителей и настройки массива. Чтобы настроить накопители, достаточно выбрать тип массива, после чего вы увидите похожее окно:
Вкладок же самого меню немного: это основная с информацией о работе NAS, вкладка "Пользователи" с настройками доступа к разделам для различных пользователей, которых разрешено добавлять и редактировать. Вкладка "Ресурсы" откроет возможности создания и менеджмента разделов на диске, а на вкладке "Доступ к облаку", понятное дело, располагаются настройки устройств пользователей, которым разрешается доступ к NAS извне. Когда настройка произведена, пользователь может установить приложение WD My Cloud для ПК или смартфона. Если пользователь приложения находится в одной сети с устройством WD My Cloud EX2, то подключение упрощается, но если смартфон или ПК находится в другом городе/районе/стране, то вот тут и пригодится "Доступ в облако", работающий через сервер WD My Cloud, который генерирует специальный код для объединения устройств. Остальные вкладки так же понятны, а вот вкладка "Приложения" скрывает в себе возможности установки приложений: например, есть приложения для работы с Torrent, Joomla, eMule, WordPress, phBB, phpMyAdmin, IP-камерами и рядом других приложений – NAS получает дополнительный функционал после их установки, а кроме того, SDK для разработки своих приложений.
Вообще же возможности WD My Cloud EX2 очень широки, несмотря на миниатюрные габариты. Особенно интересна функция "облака" – данные, сохраненные на устройстве, становятся доступными в любой точке планеты, достаточно один раз зарегистрировать в NAS устройства удаленного доступа, и все, вы можете загружать или читать данные. Для смартфонов, и для ПК предусмотрены приложения под названием WD My Cloud, которые обеспечивают доступ к вашим файлам.
Программа хороша тем, что позволяет, например, запустить камеру смартфона и сфотографированный снимок сразу же упадет на WD My Cloud EX2 и будет доступен для всех клиентов облачного сервиса, подключенных к вашему NAS. Понятно, что приложение дает возможность копировать файлы с телефона на NAS и обратно, удалять, переименовывать их, а также есть возможность подключить другие облачные сервисы, например, Google Drive, OneDrive или DropBox. Аналогичные возможности предлагает и приложение для ПК, которое предоставляет ту же легкость и удобство. Кстати, оно тоже адаптировано под тач-интерфейсы.
Утилита WD Quick View выводит на панель задач данные о состоянии NAS – в виде всплывающего сообщения при наведении на иконку в трее.
Western Digital My Cloud EX2
HDD: 2 x 3,5? SATA
Файловая система: EXT4
RAID уровень: Однодисковый том, JBOD, RAID 0/1
Процессор: Marvell ARMADA 370, ARMv7 @ 1,2 ГГц
Оперативная память: 512 Мбайт DDR3 SDRAM
Сетевые интерфейсы: 1 х Gigabit Ethernet RJ-45
Дополнительные интерфейсы: 2xUSB 3.0
Протоколы: FTP, CIFS/SMB, AFP, NFS, SNMP, SSH, HTTP, P2P
Клиенты: Microsoft Windows XP/Vista/7/8, Apple Mac OS X, Android, iOS, DLNA/UPnP-устройства
Система охлаждения: 1х вентилятор 35х35 мм, 9500 об/мин
Габариты: 172х100х155 мм
Масса: 800 г (без HDD)
Гарантия: 24 мес.
Цена (0/4/6/8 Тбайт): 9500/16700/20000/25500 руб.
Характеристики NAS достаточны для домашнего использования – это и поддержка всех нужных протоколов, проигрывание медиа через DLNA-сервер, расшаривание файлов в сетевые папки, скачивание торрентов, резервное копирование (в том числе с USB-накопителей и обратно), возможность доступа к файлам извне. Но и современные функции так же присутствуют – например, облачный сервис, а также работа с NAS с мобильных устройств. Из интересного можно отметить возможность работы с источниками бесперебойного питания – многие из них подключаются для контроля к USB, есть работа с IPv6, Active Directory, с фотокамерами (по USB можно настроить автоматическое копирование фотографий), виртуальными томами – все это может пригодиться людям с опытом системного администратора. Единственное, чего нет – это принт-сервер. В общем, функций достаточно и все они легко управляются через веб-интерфейс на русском языке.
WD My Cloud EX2 порадовал высокой скоростью работы с накопителями – созданный общий раздел из двух накопителей общим объемом 6 Тбайт легко читается на ПК и быстро работает. Сделал небольшое тестирование в домашних условиях.
В целом, проблем в работе NAS не обнаружилось, все работало стабильно и без сбоев. Видео Full HD и музыка воспроизводились с хранилища без зависаний и прерываний. Порадовала простота работы с NAS и высокая скорость передачи данных. Думаю, что для любых домашних применений WD My Cloud EX2 подходит без ограничений, а энтузиасты могут не только использовать те же функции, но и добавить своих, особенно если вы – программист.
WD My Cloud EX2 – домашняя рабочая лошадка с возможностями резервирования данных как на накопителе с внешнего диска и наоборот, в облаке, либо созданием массива RAID1 с объемом до 6 Тбайт. Производительности достаточно для любого контента, а функционал легко позволяет проводить любые операции с файлами и медиаконтентом. Разве что только сделать общий принтер не получится, но даже существующего функционала достаточно, чтобы сделать дома отменное медиахранилище – тихое и объемное, с быстрой сменой накопителей на случай выхода из строя. Есть только одна особенность: быстрые и объемные жесткие диски изрядно нагреваются во время работы, очевидно вентилятор не справляется с задачей охлаждения "горячих" дисков, но это единственные накопители, которые у меня были, более холодные накопители с меньшей скоростью вращения не греются в таких условиях – у меня стоит такой в неохлаждаемом боксе – не греется даже в жару. WD My Cloud EX2 – это тихое устройство и использовать в нем горячие диски не стоит, рассматривайте это как предостережение. В итоге каких-либо недостатков устройства я просто не нашел. Может быть потому, что я обычный пользователь без претензий? Может быть.
Понравилось? Да 81 / Нет
Компания Western Digital выпустила новую версию фирменной утилиты для проверки накопителей собственного производства. DLDIAG представляет собой довольно небольшой тест под операционную систему Windows. Способен считывать показания S.M.A.R.T. с поддерживаемых моделей жестких дисков и контроллеров (преимущественно стандартных), указывать на критические значения параметров, а так же отображать информацию о модели (объем и версию прошивки).
Включает в себя два теста (а также отдельный пункт для просмотра подробных результатов) и возможность затирания рабочей зоны нулями. Первый– быстрый, собирает данные о состоянии S.M.A.R.T. а так же служебную информацию, по которой определяет степень дефектности и работоспособности жесткого диска. Как показала проверка, способен выполнятся не только на дисках производства WD, но и Samsung (хотя, скорее всего, и на решениях других производителей). Вся проверка занимает около двух минут. Второй тест – расширенный, его длительность может занимать от 30 минут до целого часа. Отличается от быстрого только лишь способностью определять битые (bad) сектора под операционными системами семейства 9x и исправлять или изолировать их (по возможности).
Функция забивания данных нулями предназначена для полного уничтожения данных на накопителе. Работает в двух режимах: быстром и длительном. Последний более надежен в плане уничтожения. Перед использованием программы рекомендуется сделать резервную копию данных для предотвращения их возможной потери.
Скачать тест можно с сайта производителя:Компания Seagate также не отстает. Стала доступна обновленная версия комплекса под названием Seagate SeaTools. Это специализированное приложение для диагностики собственных моделей накопителей, предназначенное для работы в ОС MS DOS.
Программа может проводить несколько видов проверки: быструю, полную, структурную (по файлам), тест контроллера и системной памяти. Самая длительная из них – полная, займет около 2-3 часов, при этом будет исследован каждый сектор диска. Используется также несколько цветовых режимов для оповещения о возможных проблемах: зеленый (все хорошо), синий (тест пройден, но есть замечания), красный (тест провален), желтый (функция или устройство не поддерживается программой), серый (пропущен) и белый (не тестирован).
Скачать один из вариантов дистрибутива можно по следующим ссылкам:Быть блогером хорошо и полезно. За время, пока я пишу всякие обзоры, я сильно прокачал свои музыкальные нужды (про это будет отдельный материал) и прямо сейчас совершенствую свои хранилищные нужды. Недавно я писал про 2,5″ винчестер WD My Passport Ultra, которым я обзавелся для расширения возможностей моего MacBook Air, но сейчас я решил пойти дальше и обзавестись недавно представленным WD My Cloud.
Главная функция этого устройства — хранить информацию и обеспечивать доступ к ней практически с любого устройства. Это персональный Dropbox, только намного доступнее и персональнее. Есть версия MyCloud на 2, 3 и 4 ТБ, их стоимость — 150, 180 и 250 долларов соответственно. А за сколько денег вы приобретете такое же хранилище в DropBox или другом сервисе? За дорого и всего на год, а тут раз и навсегда.
При помощи WD My Cloud можно хранить любые файлы, создавать учетные записи пользователей, чтобы другие не имели доступа к определенному содержанию, иметь доступ к контенту на My Cloud откуда угодно и создавать резервные копии как облака, так и на него. Все, что попадает на My Cloud, шифруется по алгоритму AES со 128-битным ключом.
Что меня порадовало, так это ПО для устройства. Оно удобное и симпатичное, хотя я ожидал совершенно невероятного УГ. Привык просто, что стандартное ПО для подобных устройств совершенно неюзабельное и глючное, но тут это совершенно не так. Софт доступен для iOS, Android, Mac и PC. Удобно, что прямо в приложениях можно настроить синхронизацию с Google Drive, Dropbox и другими для удобного перемещения файлов между всеми клаудами.
Расположение всего на корпусеWD My Cloud устанавливается в вертикальном положении, на нижней грани присутствуют четыре резиновые ножки.
На передней стороне есть светодиод, демонстрирующий, что устройство функционирует. Выражаю огромную благодарность разработчикам, которые сделали возможным отключить его в настройках, потому что он довольно ярко светит, ночью освещает все пространство под столом.
Боковые стороны свободны, сзади размещены разъемы для подключения питания, USB 3.0 и RJ45. Внутри же работает жесткий диск серии WD Red.
Сверху и снизу есть решетки для вентиляции устройства.
Старт работыПодключение подобного рода устройств, как мне кажется, и наводит людей на мысли обращаться в службы поддержки типа “Настройка Windows любой сложности”. Это же сетевое хранилище, тут без сисадмина не обойтись. Но My Cloud — устройство для домохозяек, если хотите. Оно даже выглядит не так. Это маленькая коробочка, которая просто обязана легко настраиваться, поэтому для включения необходимо просто подключить WD My Cloud к сети электропитания и к роутеру сетевым кабелем. После этого отсюда можно загрузить программу быстрой настройки (все ссылки также есть в инструкции) и уже через пару минут вы будете в веб-админке вашего облака.
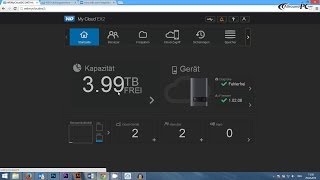
Тут, на первый взгляд, кажется, что не каждая домохозяйка разберется. Но для этого и есть мы. Да и давайте будем честными — облачное хранилище будут приобретать те, кто хоть немного понимает, зачем оно нужно. А они точно смогут разобраться во всем. На главном экране вы видите самую важную информацию: доступное дисковое пространство, сколько устройств подключено к My Cloud, сколько зарегистрировано пользователей, количество ресурсов и др.
Главное, в чем разбирался я, — как убрать общий доступ для определенных папок. Это не совсем очевидно, если вы сталкиваетесь с интерфейсом впервые. Но, сделав это один раз, уже не заблудишься. Дело в том, что по умолчанию для всех созданных пользователей все ресурсы (папки) доступны, если эти пользователи находятся в одной сети с My Cloud. Мне это не подходит, потому что я делюсь паролем к Wi-Fi со всеми гостями, но я не хочу, чтобы они имели возможность смотреть мои фотографии, к примеру. Поэтому я оставил папку Public открытой для всех. Туда я залил музыку, фильмы и всевозможные файлы, которые было бы круто быстро открыть на любом устройстве, а личные файлы хранятся в моей пользовательской папке.
Пользователей можно добавлять в отдельной вкладке, это делается легко: нужно ввести имя пользователя (логин), имя, фамилию и электронную почту. Также можно добавить пароль к его учетной записи.
При просмотре пользователя вы видите, какие ресурсы ему доступны. Чтобы изменить их, нужно пройти во вкладку настройки ресурсов. Тут вы можете назначить доступ пользователей к любому ресурсу и, конечно же, добавить новые папки.
Для того чтобы иметь доступ к своему облачному хранилищу в любом месте, где есть Интернет, необходимо ввести код в мобильное приложение, который можно получить в админке для определенного пользователя. Это сделано в целях безопасности. После этих действий у вас появится полноценный Dropbox без абонентской платы.
Мобильные приложения и доступКак я сказал выше, приложения WD My Cloud для Android и iOS сделаны хорошо, пользоваться ими удобно. Кроме того что вы можете добавить ваш накопитель WD, можно залогиниться также и в другие хранилища (Dropbox, Drive и Skydrive) для удобного перемещения контента между ними.
Но чаще всего я пользуюсь устройством именно с компьютера. Хранилище отображается просто в стандартном файловом менеджере Windows и Mac.
Комфорт с работой устройства зависит от скорости подключения и количества пользователей. Если в вашей семье до 5 человек, переживать точно ни о чем не стоит. Главное, насколько быстрый Интернет вы оплачиваете. С гигабитной сетью скорость 50-60 МБ в секунду реальная.
Дополнительные возможностиДля тех, кому нужна резервная копия вашего хранилища, можно использовать функцию Safepoint. Самый простой способ хранить образ диска — подключить второй винчестер по USB. К тому же, он станет дополнительным пространством в облаке, то есть тоже будет одним из ресурсов. Более того, если купить USB 3.0 хаб, его можно подключить к My Cloud и расширить свое облако ТБ так до 10, к примеру.
Для пользователей мака реализована поддержка Time Machine, я впервые начал пользоваться этой функцией именно с WD My Cloud.
Не могу сказать, что устройство не без недостатков, но все, что мне не нравится, связано с ПО. Да, оно лучше, чем я предполагал, но всевозможные недочеты и баги всплывают то тут, то там. Становится понятно, что главный акцент сделан на хардвер. К примеру, был случай, при входе в админку сервис циклично запрашивал пароль и не пускал далее даже после его ввода.
Но даже в сумме все недочеты, которые я встретил, являются незначительными и некритичными. Пожалуй, именно вышеописанный баг стал самым досадным, но и он решился как-то сам по себе.
Для чего нужно подобное устройство? Мне, в основном, для хранения фотографий и музыки и доступа к ним с любого устройства. Если у вас есть смарт-тв или медиаплеер, все фильмы можно запросто проигрывать с WD My Cloud. Для жены я сделаю отдельную папку, так как на ее компьютере доступно всего 48 из 64 заявленный ГБ на SSD-накопителе.
Думаю, каждый из вас найдет применение для подобного устройства, если вы пользуетесь Dropbox или подобным сервисом. Главные особенности персонального облачного хранилища WD My Cloud: доступность, простота в настройке, возможность расширения пространства в разы, бекап всего, хранение файлов в заведомо известном месте.
WD My Cloud EX2 ™ Personal Cloud Storage User Manual.
Page 2: Wd Service And Support, Registering Your Wd ProductYour product includes 30 days of free telephone support during the warranty period. This 30-day period starts on the date of your first telephone contact with WD Technical Support. Email support is free for the entire warranty period and our extensive knowledge base is available 24/7. To help us keep you informed of new features and services, remember to register your product online at http://register.wd.com.
Page 4: Table Of ContentsVolume Virtualization. 92 Managing Apps on WD My Cloud EX2. 97 About Apps .
Page 5: Table Of ContentsAppendices. 141 Appendix A: WD My Cloud EX2 Quick User Guide. 141 Appendix B: Joomla!®.
Page 6: Important User Information, Important Safety InstructionsIf the product has been dropped or the chassis has been damaged. If the product exhibits a distinct change in performance, contact WD Customer Support at http://support.wd.com.
Page 7: Recording Your Wd Product InformationIMPORTANT USER INFORMATION Recording Your WD Product Information Remember to write down the following WD product information, which is used for setup and technical support. Your WD product information is found on the label on the back of the device. Serial Number.
Page 8: Product Overview, About The SystemRAID 1, cloud or LAN/WAN backup options. Stream large files to any screen and expand your NAS features with a full suite of apps.The WD My Cloud EX2 personal cloud storage system is a high-performance system providing secure wireless access to your media and files from any computer, tablet, or smartphone when connected to a wireless router.
Page 9: About The Online Learning CenterBack up, your way – Protect your data via remote backup to another My Cloud EX2 or My Cloud EX4, integrated cloud backup or local LAN/WAN backup. PC users, WD SmartWare™ Pro offers options for how, when and where you back up your files for up to ®.
Page 10: Package ContentsCanada www.shopwd.ca www.wdstore.ca Europe www.shopwd.eu www.wdstore.eu All others Contact WD Technical Support in your region. For a list of Technical Support contacts, visit http://support.wd.com and see Knowledge Base Answer ID 1048. Operating System ® ® Windows Mac OS X .
Page 11: Pre-installation Instructions, Handling PrecautionsHandling Precautions WD products are precision instruments and must be handled with care during unpacking and installation. Rough handling, shock, or vibration can damage the device drives. Observe the following precautions when unpacking and installing your external storage product: .
Page 12: Product ComponentsPRODUCT OVERVIEW Product Components Front View Power LED Drive LEDs WD MY CLOUD EX2 PERSONAL CLOUD STORAGE USER MANUAL.
Page 13: Back ViewConnects the device to an AC adapter and the power outlet. Kensington For device security, the device is equipped with a security slot that security slot supports a standard Kensington security cable. Visit http://www.kensington.com/ for more information. WD MY CLOUD EX2 PERSONAL CLOUD STORAGE USER MANUAL.
Page 14: Getting Started, Installing Drives In The Driveless ModelAccessing Content It’s easy to set up the WD My Cloud EX2 Personal Cloud Storage device -- all you have to do is unpack your device, connect it, and wait for the Power LED on the front of your device to turn a solid blue.
6. When looking down on the top of the unit with the front panel towards you, and with the connectors at the bottom of the drive facing in, gently slip the drive into a slot. 7. Make sure the tab is sticking up at the back of the unit. WD MY CLOUD EX2 PERSONAL CLOUD STORAGE USER MANUAL.
Page 16: Physically Connecting The Device11. Continue to “Physically Connecting the Device” on page 11. Physically Connecting the Device Follow the steps below to connect the WD My Cloud EX2 Personal Cloud Storage device to a home or small office network. Important: To avoid overheating, make sure the device is upright as shown in the illustration above and nothing is blocking or covering the slots and openings on the top and bottom of the device.
4. Plug the other end of the power adapter into a power outlet. The unit powers up automatically. Important: Wait for the WD My Cloud EX2 device to finish powering up (approximately three minutes) before configuring it. You will know it is ready when the power LED stops flashing and turns blue.
Page 18: Getting Started Using Online Setup SoftwareUse the following steps to download and run the online setup software, discover the device, and get started using your device. The online setup software is available from WD’s Online Learning Center at http://wd.com/setup/wdmycloudex2.
4. Click the Download Setup Software button. The setup software downloads to your computer. 5. Access your downloaded files, and then double-click Setup.exe (Windows) or WD My Cloud EX2 Personal Cloud Storage Setup.dmg (Mac) to open the setup software. The Getting Started window displays. WD MY CLOUD EX2 PERSONAL CLOUD STORAGE.
2. Read the Western Digital End User License Agreement that displays, and then select the “I accept the terms of the License Agreement” check box and click Next. 3. Review the information on the screen, WD MY CLOUD EX2 PERSONAL CLOUD STORAGE USER MANUAL.
GETTING STARTED 4. When the power LED on your WD My Cloud EX2 device is solid blue, click Next. The software discovers your device. Note: If your device is not detected, follow the on-screen directions. 5. Select your WD My Cloud EX2 device and click Next. The Set up your personal cloud screen displays.
Note: You may need to check your email spam folder if your spam filter does not allow email from WD. The Congratulations! screen displays. You’ve successfully set up your WD My Cloud EX2 device. WD MY CLOUD EX2 PERSONAL CLOUD STORAGE.
• If the option is enabled, the firmware turns on automatic updates at 3:00 AM daily. To change settings for automatic updates, see “Firmware” on page 2. Click Finish to close the setup wizard. WD MY CLOUD EX2 PERSONAL CLOUD STORAGE USER MANUAL.
Page 24: Getting Started Without Online Setup Software, Accessing ContentIf you do not use the online setup software to get started, you can still: Use your WD My Cloud EX2 personal cloud storage device as an external hard drive, dragging and dropping files to and from it. .
File > Make Alias. Mapping the Public Folder (Windows) To map the WD My Cloud EX2 Public folder for quick access in the future: 1. In Windows Explorer, under Network, click WDMYCLOUDEX2. 2. Right-click the Public folder and select Map Network Drive from the menu.
Page 26: Accessing Your Cloud Remotely, Enabling Cloud Access For The Wd My Cloud Ex2 DeviceEnabling Cloud Access for the WD My Cloud EX2 Device Before you can use your WD My Cloud EX2 device remotely, you have to enable it for cloud access. To enable the WD My Cloud device for remote access and to check the status of its remote connection(s), see “Cloud Access”.
Make sure to write down the access codes you generate. Click OK. Once you use the code(s), the Configure Access page displays the cloud devices to which the user now has access, along with the activation code used. WD MY CLOUD EX2 PERSONAL CLOUD STORAGE USER MANUAL.
Page 28: Mobilizing Your Files With Ios And Android Mobile AppsOr, take a photo or video clip and instantly upload it from your gallery directly to your WD My Cloud EX2 device with ease.WD Photos is compatible with leading Apple mobile devices and many popular Android devices. Photos are automatically optimized for viewing on your mobile device.
ACCESSING YOUR CLOUD REMOTELY To install WD Photos on your mobile device: Download WD Photos from the Apple App or Google Play store and install it on your mobile device. Launch WD Photos on your mobile device to display the WD Photos page.
“To generate an activation code for a user’s mobile device(s):” on page 22. Enter your user name and password. Tap your WD My Cloud EX2 device to view your album(s), and then tap an album to display the photos contained within it. Note: If you have problems installing WD Photos, visit http://wd.com/setup/wdphotos.
. Note: WD My Cloud app brings your data from the WD My Cloud EX2 device to your tablet, handset, or other portable devices using Google Android or Apple iOS. WD My Cloud provides a convenient file list of the WD My Cloud EX2 device contents and then launches your favorite player or viewer for any files you wish to open.
In the Add Manually section, tap to the left of WD Device. Enter the activation code generated on the WD My Cloud’s dashboard and tap Activate. You must generate one code for each app you want to activate. Codes are valid for 48 hours from the time of request and can be used one time only.
Add and remove device content by dragging and dropping files and folders from your computer. Requirements WD My Cloud EX2 personal cloud storage or with the most recent firmware, connected to the Internet. A PC or a Mac computer.
ACCESSING YOUR CLOUD REMOTELY In the Software Downloads area, click Go to Downloads. In the WD My Cloud for desktop area, click Download. The setup software downloads to your computer. Access your downloaded files, and then double-click wdmycloud.exe (Windows) or wdmycloud.dmg (MAC).
ACCESSING YOUR CLOUD REMOTELY Select a language from the drop-down menu, and then click OK. Read the WD License Agreement, and then click I accept the terms of the License Agreement. Click Next. 10. Read the Apple License Agreement, and then click I accept the terms of the License Agreement.
ACCESSING YOUR CLOUD REMOTELY 12. Once the installation is complete, click Done to close the WD My Cloud installer. Mac: Complete Steps 1 - 5 above. Click Downloads and select WD My Cloud Installer. If asked to install a Java runtime, click Install.
ACCESSING YOUR CLOUD REMOTELY Read the WD Software License Agreement, and then click I accept the terms of the License Agreement. Click Install. The installation begins. Once the installation is complete, click Done to close the WD My Cloud installer.
User” on page 21. Click Activation Code to log in using the activation code generated by WD My Cloud EX2. (To generate an activation code, see “To generate an acti- vation code for a user’s mobile device(s):” on page 22.) The WD My Cloud Desktop app opens.
Page 39: Managing Users, Groups, And Shares, About UsersThe Administrator, normally the device owner, is the person in charge of setting up the device. As the WD My Cloud EX2 device owner, you have a special user account (admin) that provides you with administrator privileges. With these privileges, you can set up and configure the device to your specific needs and add other users to your personal cloud.
2. Enter the User Name, First Name, Last Name and Email address (optional) of the user you’d like to add in the applicable fields, and then click Next. WD MY CLOUD EX2 PERSONAL CLOUD STORAGE USER MANUAL.
5. Enter the Quota Amount, or leave the values blank for unlimited space, and then click Save. (See “Quota Rules” on page 40 for information on quotas.) Your new user account displays on the left pane of the Set Up Users screen. WD MY CLOUD EX2 PERSONAL CLOUD STORAGE USER MANUAL.
Number of Users: Enter the number of User accounts you’d like to create. The maximum number you can add displays to the right. Password: Enter a password for the user accounts. Confirm Password: Confirm the password for the user accounts. WD MY CLOUD EX2 PERSONAL CLOUD STORAGE USER MANUAL.
3. Enter the Quota Amount, or leave the values blank for unlimited space, and then click Next. (See “Quota Rules” on page 40 for information about quotas.) 4. Your new user accounts display on screen. Click Save to save them to your device. WD MY CLOUD EX2 PERSONAL CLOUD STORAGE USER MANUAL.
Page 44: Editing User Settings(no password is the default setting). Use the following steps to update a user password. 1. On the Set Up Users screen, select a user from the list on the left. WD MY CLOUD EX2 PERSONAL CLOUD STORAGE USER MANUAL.
Use the following steps to assign a quota to a user account. A quota determines the amount of disk space allocated to the user on the WD My Cloud EX2 device. 1. On the Set Up Users screen, select the user from the left pane.
Page 46: About GroupsMANAGING USERS, GROUPS, AND SHARES 2. In the Quotas field, click Configure. 3. Enter the amount of space to assign to the user on the WD My Cloud EX2 device. To assign unlimited space, leave the Quota Amount field(s) blank.
Page 47: Adding A Group4. Enter the Quota Amount, or leave the values blank for unlimited space, and then click Save. Your new group account displays on the left pane of the Set Up Groups screen. WD MY CLOUD EX2 PERSONAL CLOUD STORAGE USER MANUAL.
Page 48: Editing Group SettingsOnce a group account is created, you can assign access to the various shares on your WD My Cloud EX2 device using the following steps. 1. On the Set Up Groups screen, select the group for which you’d like to assign a share.
Page 49: About SharesGroup account list. About Shares A share is an area on the WD My Cloud EX2 device for storing files (similar to a folder or directory). Note: In this manual, we use the terms share and folder interchangeably.
1. On the navigation bar, click Shares to display the About Shares page. 2. Click a share to display its profile and share access information. Note: Only private shares can be edited. Public shares always have read/write access and are therefore grayed out. WD MY CLOUD EX2 PERSONAL CLOUD STORAGE USER MANUAL.
Page 51: Creating A New ShareNote that share descriptions must begin with an alphanumeric value and can contain up to 256 characters. Enable Recycle Bin (optional) The Recycle Bin contains any files deleted from the WD My Cloud EX2 device. If you’d like to use the Recycle Bin, click the toggle button .
2. Modify the required and optional settings as desired. Making a Share Private If you decide there is a reason to limit access to a public share, convert it to a private share. WD MY CLOUD EX2 PERSONAL CLOUD STORAGE USER MANUAL.
Page 53: Deleting A ShareNote: For information on accessing the contents of a share remotely, see “Accessing Your Cloud Remotely” on page 21. Several options are available for opening a WD My Cloud EX2 share. For a private share, the user must have: .
Click the WD Quick View icon in the menu bar and (Mac OS X) move the cursor over the name of your WD My Cloud device to display the submenu. Select Open on the WD Quick View submenu. The shares display in a second submenu.
Page 55: The Dashboard At A Glance, Launching The DashboardObtaining Customer Support Common Tasks Use the WD My Cloud EX2 dashboard to configure settings and to manage the device as you prefer. For example, you can set up user accounts and restrict access to the files on your WD My Cloud EX2 device, set up folders for storing files, enable remote access, and customize the device to suit your needs.
Learning Center Downloads page at wd.com/setup/mycloudex2apps. Accessing the Dashboard for the First Time Use the following steps when you initially access the WD My Cloud EX2 dashboard. Password When you initially log into WD My Cloud EX2, leave the field blank 2.
Click the Automatically update device firmware when available check box. Click the Register the WD My Cloud EX2 device to receive continuous product support check box. 9. Click Finish. The WD My Cloud EX2 dashboard displays. WD MY CLOUD EX2 PERSONAL CLOUD STORAGE.
Page 58: The Dashboard HomeTHE DASHBOARD AT A GLANCE The Dashboard Home Page The WD My Cloud EX2 Home page has an information bar at the top right, an navigation icon bar across the page, and an instant overview of the status of the device’s main functions with links for updating settings.
Monitor remote access status. Backups Create backups to: • A USB drive • Another WD My Cloud EX2 on your local network or on a remote network • Another location on your WD My Cloud EX2 device • A Cloud backup site.
The main body of the Home page shows the status of the device and its functions and provides shortcuts to the most necessary tasks. Capacity The Capacity panel displays the amount of free storage left on your WD My Cloud EX2 device. WD MY CLOUD EX2 PERSONAL CLOUD STORAGE.
Diagnostics The Diagnostics section displays a snapshot of the system’s components and identifies the overall health of the WD My Cloud EX2 device. WD MY CLOUD EX2 PERSONAL CLOUD STORAGE USER MANUAL.
Close Firmware The Firmware section displays the current version of firmware loaded on your WD My Cloud EX2 device. A green check mark indicates that your firmware is up-to-date. 1. To view whether an updated version of the firmware is available, click the arrow to the right of Firmware to display firmware availability: .
WD My Cloud EX2 device. At a glance, you can see the network, CPU, and RAM activity. 1. To view a list of all the system activities and processes that are running on your WD My Cloud EX2 device, click the arrow on the right of the panel to display: .
The Cloud Devices panel displays the number of cloud devices currently accessing the WD My Cloud EX2 device remotely. In this example, one cloud device is accessing it remotely. 1. To add cloud access for a user, click the plus sign (+) in the lower right of the panel to display: 2.
WD My Cloud EX2 device. Users The Users panel displays the number of users currently set up to use the WD My Cloud EX2 device. 1. To add a user, click the plus (+) sign in the lower right of the panel.
Save. You’ve added a new user. Apps The Apps panel displays the apps currently installed on your WD My Cloud EX2 device. 1. To view the installed apps, click the arrow in the lower right of the panel to display.
THE DASHBOARD AT A GLANCE Note: To install an app, see “Managing Apps on WD My Cloud EX2” on page 97. 2. To return to the Home page, click Close Managing Alerts Alerts display system messages containing pertinent information about the status of your WD My Cloud EX2 device.
Page 68: Obtaining Customer SupportTo dismiss all alerts, click View All, and then Dismiss All. Obtaining Customer Support To open the Support page: 1. Click the Help icon on any page to display the Help menu. 2. Click Support to display the following page: WD MY CLOUD EX2 PERSONAL CLOUD STORAGE USER MANUAL.
THE DASHBOARD AT A GLANCE If a problem occurs with the WD My Cloud EX2 device, WD Technical Support will need information about your device to troubleshoot and determine the best solution. There are two ways to get your device info and request support: .
Page 70: Common TasksTHE DASHBOARD AT A GLANCE Common Tasks The next few chapters step you through the procedures for configuring and using the WD My Cloud EX2 device. The following table provides shortcuts to instructions for some common tasks. How do I.
Page 71: Backing Up And Retrieving Files, About Backups, Managing A Usb Device And Usb BackupsConnecting A USB Drive Connect a USB hard drive to the USB port on the rear of your WD My Cloud EX2 device for additional storage and backup capabilities. The USB drive appears as a share on the WD My Cloud EX2 dashboard.
BACKING UP AND RETRIEVING FILES Creating a USB Backup Use the following steps to back up your data on your WD My Cloud EX2 to or from a USB device. On the navigation bar, click Backups to display the Backups screen.
On the USB Backups screen, under USB Backup Jobs, select the job you’d like to modify, and then click the Edit Job button Review the USB Details screen, and then click Close to close the screen. WD MY CLOUD EX2 PERSONAL CLOUD STORAGE USER MANUAL.
Page 74: Remote BackupsUSB Backup Jobs list. Remote Backups Back up your WD My Cloud EX2 device to another WD My Cloud EX2 or a WD My Cloud EX4 device. Before you proceed with a remote backup, ensure the following: .
In the Remote IP field, enter the IP address of the remote backup server. (Example 192.168.1.16) In the Password field, enter the password for the remote backup server, and then click Next. WD MY CLOUD EX2 PERSONAL CLOUD STORAGE USER MANUAL.
Click Yes to begin your remote backup now. Click No to create a remote backup job for future backup. 9. Review the details of your Remote Backup job, and then click Finish WD MY CLOUD EX2 PERSONAL CLOUD STORAGE USER MANUAL.
On the Remote Backup screen, under Remote Backup Jobs, click the Recover button next to the job you’d like to view. On the Recover screen, click OK. Your data recovery begins. WD MY CLOUD EX2 PERSONAL CLOUD STORAGE USER MANUAL.
Page 78: Internal BackupsWD My Cloud EX2 device. Creating an Internal Backup Use the following steps to back up your WD My Cloud EX2 internally. On the navigation bar, click Backups to display the Backups screen. Click Internal Backups, if not already selected.
On the Internal Backups screen, under Internal Backup Queue, select the job you’d like to modify, and then click the Details button. Review the details of your Internal Backup job, and then click Close. WD MY CLOUD EX2 PERSONAL CLOUD STORAGE USER MANUAL.
Page 80: Cloud BackupsInternal Backup Jobs list. Cloud Backups A cloud backup allows you to create remote backups that are accessible over the Internet and through various mobile devices. WD My Cloud EX2 device uses the following cloud services to create remote backups: .
Email address: Enter the email address you’ll use to receive information from ElephantDrive. Password: Enter a password for your new account Verify Password: Reenter your password. You’ve now enabled your ElephantDrive cloud backup. WD MY CLOUD EX2 PERSONAL CLOUD STORAGE USER MANUAL.
Once your Amazon S3 account is set up, use the following steps to create a cloud backup. On the navigation bar, click Backups to display the Backups screen. Click Cloud Backups, if not already selected. Click the Amazon S3 button at the top of the screen. WD MY CLOUD EX2 PERSONAL CLOUD STORAGE USER MANUAL.
Enter the following information, and then click Next: Type Select one of the following options: • Upload: Backs up your WD My Cloud EX2 data to your Amazon S3 bucket. • Download: Backs up your Amazon S3 bucket to your WD My Cloud EX2 device.
• Incremental Backup: Overwrites files with source files that are newer then the target files. In the Local Path field, enter a path for your backup on your WD My Cloud EX2 server. Click Browse to browse to a location for your backup on the device.
13. Review your settings, and then click Finish. Your Amazon S3 Cloud backup is created. The new job displays in the Amazon S3 Queue section of the Amazon S3 Backup page. 14. Access your Amazon S3 Cloud backup bucket to view your device backups. WD MY CLOUD EX2 PERSONAL CLOUD STORAGE USER MANUAL.
Page 86: Managing Storage On Wd My Cloud Ex2, Storage TypesThe Storage page allows you to configure the storage within your device and view the status and capacity of the disks within your device. This chapter provides details on managing the storage on your WD My Cloud EX2 device. WD MY CLOUD EX4 PERSONAL CLOUD STORAGE.
Page 87: Raid StorageThere are several different levels of RAID, each one providing a different method of sharing or distributing data among the drives. Your WD My Cloud EX2 device allows you to select from the following storage modes.
Page 88: Changing The Raid ModeMANAGING STORAGE ON WD MY CLOUD EX2 Changing the RAID Mode Use the following steps to change the current RAID mode on your WD My Cloud EX2 device. WARNING! Changes made to your RAID Mode will delete all of your data and your user settings.
MANAGING STORAGE ON WD MY CLOUD EX2 Select the RAID mode you’d like to use for your WD My Cloud EX2 device. Options include: JBOD The use of one or more drives not in a RAID configuration but managed as separate logical volumes.
MANAGING STORAGE ON WD MY CLOUD EX2 Using the Volume slider, select the amount of space you’d like to dedicate to the selected RAID mode. If you choose not to use the entire volume for your RAID selection, you can configure the remaining disk space as Spanning by selecting the Configure the remaining disk space as Spanning check box.
Page 91: Disk StatusAuto-Rebuilding your RAID The Auto-Rebuilding option allows you to automatically rebuild the RAID for your WD My Cloud EX2 device in case of drive corruption. Use the following steps to enable the auto-rebuild option. On the navigation bar, click Storage to display the Storage screen.
Viewing Hard Drive Information Use the following steps to view status of the disks on your WD My Cloud EX2 device. On the Storage page, click Disk Status, if not already selected. Select Drive <drive #> next to the disk for which you’d like to view information.
Page 93: Iscsi StorageWD My Cloud EX2 allows you to create and manage iSCSI targets. The iSCSI target provides storage, similar to a local hard disk drive, but is accessed over a network rather then locally.
MANAGING STORAGE ON WD MY CLOUD EX2 Click iSCSI, if not already selected. Click the toggle button to enable iSCSI. Click Create iSCSI Target at the bottom of the screen. On the Create iSCSI Target screen, enter the following information: .
MANAGING STORAGE ON WD MY CLOUD EX2 Enabling / Disabling an iSCSI Target Use the following steps to enable or disable an iSCSI target. Enabling an iSCSI Target On the Storage page, click iSCSI. Under iSCSI Target list, click Details next to the target you’d like to enable.
MANAGING STORAGE ON WD MY CLOUD EX2 Click the toggle button to ON to enable iSCSI. In the iSCSI iSNS Client field, click the toggle button Click Configure. Enter the iSNS client server address, and then click Save. WD MY CLOUD EX4 PERSONAL CLOUD STORAGE.
Page 97: Volume VirtualizationVolume Virtualization Volume Virtualization simplifies scalability by allowing you to map iSCSI targets on other network storage devices and present them as volumes on your WD My Cloud EX2 device. Creating a Virtualized Volume Use the following steps to create a virtualized volume on your device.
MANAGING STORAGE ON WD MY CLOUD EX2 Select an iSCSI target from the retrieved list, and then click Next. To add authentication to the target, click the toggle button to ON, enter a User Name and Password, and then click Next.
MANAGING STORAGE ON WD MY CLOUD EX2 Review the Volume Virtualization summary to ensure that your settings are correct, and then click Save. A virtual volume is created. Connecting a Virtualized Volume to a Target Use the following steps to connect a virtualized volume to a target on your device.
Once your virtual volume is formatted, click Close. The state of the volume is changed to Connect. Your new virtual volume is now available on your WD My Cloud EX2 device. WD MY CLOUD EX4 PERSONAL CLOUD STORAGE USER MANUAL.
MANAGING STORAGE ON WD MY CLOUD EX2 Modifying a Virtualized Volume Use the following steps to modify a virtualized volume on your device. On the Storage page, click Volume Virtualization, if not already selected. Select the virtual volume you’d like to modify, and then click Modify.
Page 102: Managing Apps On Wd My Cloud Ex2, About Apps, Managing AppsNote: Support for each app should be obtained through the individual vendor. WD My Cloud EX2 comes with various apps installed. There is also a list of available apps for you to choose from on the Add an App screen.
MANAGING APPS ON WD MY CLOUD EX2 Adding an App Use the following steps to add an app to your WD My Cloud EX2 device. 1. On the navigation bar, click Apps to display the Apps screen. 2. Click the Add an App icon in the lower left side of the screen.
Manually Adding an App If you have an app you’d like to add that is not listed on the Add an App screen, use the following steps to manually add that app to your WD My Cloud EX2 device. Note: WD recommends that you fully understand the nature of any app before you install it on your device.
Updating an App Use the following steps to update an app that you’ve added to your WD My Cloud EX2 device. 1. On the navigation bar, click Apps to display the Apps screen.
Page 106: Playing/streaming Videos, Photos, & Music, Media Servers, you can just transfer your multimedia content to “Enabling DLNA and iTunes” on page 103) the Public share on your WD My Cloud EX2 device, and you are ready to stream and view ® content on your home entertainment center, game consoles (for example, Xbox 360 ®.
Page 107: Media Types SupportedM2TS MPEG1 MPEG2 MPEG4 QTIF SPTS Xvid Note: Some devices may not support playback of all these files. Please refer to your device’s user manual to see which formats are supported. WD MY CLOUD EX2 PERSONAL CLOUD STORAGE USER MANUAL.
Page 108: Media Storage, Enabling Dlna And ItunesMedia Storage You can access and store media content on the WD My Cloud EX2 device by means of network shares. Shares, similar to folders or directories, are areas set up to organize media and access them from your network.
The DLNA area displays the current version, the number of music, video, and pictures available on your device, and when the last update occurred. To view DLNA media server information, on the Settings screen, click Media in the left panel. WD MY CLOUD EX2 PERSONAL CLOUD STORAGE USER MANUAL.
Click Browse, and then navigate to the folder where iTunes can access your media. Click Save at the bottom of the iTunes area. 3. In the Password field, enter a password to be used when accessing your WD My Cloud EX2 device on iTunes. WD MY CLOUD EX2 PERSONAL CLOUD STORAGE.
3. Follow the same process to place your videos and pictures into their respective Pictures and Video folders. Note: You can also access your media files using WD My Cloud Desktop app (see “WD My Cloud for Desktop App” on page 27). WD MY CLOUD EX2 PERSONAL CLOUD STORAGE.
Page 112: Accessing Your Personal Cloud Using Media PlayersYou can connect the various WD TV and WD Media Players to your home network for access to media content stored in a network drive such as the WD My Cloud EX2 device. For details on using a WD Media Player to access files on your device, see Knowledge Base Answer ID 2676 or refer to your WD Media Player User Guide.
Page 113: Accessing Your Personal Cloud Using ItunesPLAYING/STREAMING VIDEOS, PHOTOS, & MUSIC DLNA Devices See specific DLNA media device user manuals for instructions on connecting a DLNA device to your local area network so you can access content on the WD My Cloud EX2 device. Go to http://www.dlna.org for a list of DLNA-certified devices and for further information.
Page 114: Configuring Settings, GeneralFirmware Update The Settings option on the navigation bar allows the Administrator to view and customize the WD My Cloud EX2 device’s system, network, media, utilities, notifications, and firmware settings. This chapter explains how to configure the various settings for your WD My Cloud EX2 device.
32 characters long and can not include special characters (e.g. @, #, $ etc.). Serial Number Displays the WD-assigned number that identifies the specific unit. This field can not be updated. WD MY CLOUD EX2 PERSONAL CLOUD STORAGE USER MANUAL.
In this section of the General screen, you can change the language that displays in the WD My Cloud EX2 device’s interface and set the date and time. The date and time are synchronized to the NTP (Network Time Protocol) server by default. You have the option of setting the date and time manually or allowing the NTP to access the Internet and automatically set the time.
Use the following steps to turn cloud access on or off for all users (i.e. control whether computers and mobile devices can access the content on the WD My Cloud EX2 device) Note: This turns on cloud access for the entire device. To turn on access for an individual user, see “Configuring Cloud Access for a User”.
Example: If you set up your manual HTTP port as 5040, you’d use the following address to access your device: http://<Device IP Address>:5040. WD MY CLOUD EX2 PERSONAL CLOUD STORAGE USER MANUAL.
Energy Saver The Energy Saver fields allow you to reduce the energy required to run your WD My Cloud EX2 device. Use the following information to configure the energy saving options on your WD My Cloud EX2 device. View or change the following settings.
Services This section of the General screen enables or disables various services available on your WD My Cloud EX2 device. WD MY CLOUD EX2 PERSONAL CLOUD STORAGE USER MANUAL.
Folder information, or select the folder from the Select a Folder drop-down list at the right of the field. 5. Click Get Remote Share Folder to connect to your remote folder. WD MY CLOUD EX2 PERSONAL CLOUD STORAGE USER MANUAL.
CONFIGURING SETTINGS 6. Click Save. Active Directory Enabling this function allows you WD My Cloud EX2 device to join an existing Windows domain. Active Directory is disabled by default. 1. To enable Active Directory, click the toggle button to ON.
Page 123: NetworkEnter the Active Directory server host name. 5. Click Save. Recycle Bin The Recycle Bin contains any files deleted from the WD My Cloud EX2 device. To clear the recycle bin for your device, click Clear. Note: Recycle Bin is only available for SMB protocols.
Page 124: Network ServicesIPv4 Network Mode By default, the network mode is set to DHCP, which means the WD My Cloud EX2 device automatically gets the IP address and other settings from your network. Select the method of assigning the device’s unique IPv4 address: •.
Server Message Block, version 2. Select this option to support Windows File History in Windows 8. • To enable/disable SMB2, click the toggle button Note: If you enable SMB2, read/write performance will be impacted. WD MY CLOUD EX2 PERSONAL CLOUD STORAGE USER MANUAL.
Link Layer Topology Discovery protocol. Select this option to enable LLTD on your network for enhanced network discovery and diagnostics on Microsoft Windows machines. • To enable/disable LLTD, click the toggle button WD MY CLOUD EX2 PERSONAL CLOUD STORAGE USER MANUAL.
Simple Network Management Protocol. Select this option to manage devices over IP networks. • To enable/disable SNMP, click the toggle button Note: See the WD Tech Support Downloads page at http://support.wd.com to download the MiB configuration file. Secured Shell protocol. Select this option to securely access your personal cloud and perform command-line operations via the Secured Shell (SSH) protocol.
The Remote Server section of the Network screen allows you to enable your WD My Cloud EX2 device to act as a remote server, allowing you to back up shares from another WD My Cloud EX2 on the local LAN or WAN.
Page 129: Port ForwardingFor additional information on Port Forwarding, see Knowledge Base Answer ID 10649. Adding Port Forwarding Services 1. Click Add to add port forwarding service(s) to your WD My Cloud EX2 device. 2. On the Port Forwarding Settings screen, click either Select the default service scan or the Customize a port forwarding service, and then click Next.
Page 130: Media, Utilities“Playing/Streaming Videos, Photos, & Music” on page 101. Utilities On the Utilities page, you can test the WD My Cloud EX2 device and get diagnostic information, restore the device to factory defaults, reboot or shut down the device, and import or export a configuration file.
Page 131: System RestoreSystem Restore The system restore allows the Administrator to perform a full factory restore on the WD My Cloud EX2 device. This option restores your device to factory default settings with no data loss. Important: Before doing a factory restore or a system update, you may choose to save your device’s current configuration.
Page 132: System ConfigurationOnce the reboot is complete, launch the dashboard. Device Maintenance The Device Maintenance area allows you to shut down and reboot your WD My Cloud EX2 device. This area also displays the amount of time the device has been up and running.
Page 133: NotificationsThe Scan Disk area allows you to scan your device’s hard disks for any errors. Scanning Your Disk Use the following steps to run a disk scan on your WD My Cloud EX2 device. 1. In the Scan Disk area, select the volume you’d like to scan from the drop-down menu.
7. Repeat steps 5 - 6 to enter up to 5 email addresses. 8. Click Send Test Email to validate the email addresses you entered. 9. Click OK, and then check your email for a validation email. WD MY CLOUD EX2 PERSONAL CLOUD STORAGE USER MANUAL.
Critical Only: Send only critical alerts. Critical and Warning: Send both critical and warning alerts. All: Send all alerts (Informational, Critical, Warning). The system automatically updates with your selection. WD MY CLOUD EX2 PERSONAL CLOUD STORAGE USER MANUAL.
Page 136: Firmware UpdateCONFIGURING SETTINGS Firmware Update The Firmware Update page allows you to set up the device to update the My Cloud EX2 firmware automatically or to manually check for an update file. The current version number and the date of last update of the firmware also display on this screen.
Follow this procedure to perform a manual update. Note: Ensure that you’ve downloaded the firmware file you need to install on your device from the WD Tech Support Downloads page at http://support.wd.com/product/download.asp. Manually Installing an Update 1. In the Manual Update section, click Update from File.
Page 138: Replacing A Drive, Identifying A Faulty Hard DriveKnowledge Base Answer ID 8 to get detailed instructions on obtaining a replacement drive for this product. Following are instructions for replacing a faulty drive or, if your WD My Cloud EX2 model did not come with drives, for inserting drives.
Replacing a Drive If you bought a WD My Cloud EX2 device without hard drives, or if you are replacing an existing drive, you may use a drive made by another company. For a list of compatible drives, go to wd.com/mycloudex2.
Preparing a Drive The My Cloud EX2 comes with a bag holding the screws, tabs, and labels needed for inserting the new drive. For WD replacement drives, you can reuse the parts attached to the faulty drive.
Page 141: Returning A Wd DriveDo not disassemble the internal drive and attached assembly components. Return the entire internal drive assembly intact to WD. Return the faulty drive following the instructions provided in the WD Knowledge Base Answer ID 8. WD MY CLOUD EX2 PERSONAL CLOUD STORAGE.
Page 142: Regulatory And Warranty Information, Regulatory Compliance, Warranty Information (all Regions Except Australia/new Zealand)Connect the equipment into an outlet on a circuit different from that to which the receiver is connected. Consult the retailer or an experienced radio/television technician for help. Any changes or modifications not expressly approved by WD could void the user’s authority to operate the equipment. ICES/NMB-003 Compliance Cet appareil DE la classe B est conform à.
Page 143: Limited WarrantyLimited Warranty WD warrants that the Product, in the course of its normal use, will for the term defined below, be free from defects in material and workmanship and will conform to WD’s specification therefor. The term of your limited warranty depends on the country in which your Product was purchased.
Page 144: Warranty Information (australia/new Zealand Only)Australian Consumer Law. Warranty WD warrants that the Product, in the course of its normal use, will for the term defined below, be free from defects in material and workmanship and will conform to WD’s specifications. The term of your warranty is 2 years in Australia and New Zealand, unless otherwise required by law.
WD or the dealer from whom you originally purchased the Product determines that your claim is valid, WD or such dealer shall, at its discretion, either repair or replace the Product with an equivalent or better Product or refund the cost of the Product to you. You are responsible for any expenses associated with a claim under this warranty.
Page 146: Appendices, Appendix A: Wd My Cloud Ex2 Quick User Guide, Appendix B: Joomla!В® Setup GuideThis guide is primarily for WD My Cloud EX2 users, rather than the administrator. Logging into WD My Cloud EX2 1. Enter the name of your WD My Cloud EX2 device (default name: wdmycloudEX2) in the browser’s address field: .
APPENDICES The Dashboard Home Page The WD My Cloud EX2 Home page has an information bar at the top right, a navigation icon bar across the page, an instant overview of the status of the device’s main functions and links for updating settings.
• Another WD My Cloud EX2 on your local network or on a remote network • A Cloud backup site Viewing the Home Page The Home is your gateway to the WD My Cloud EX2 device. From this page you can find: The capacity of the device .
Cloud Access Links The Cloud Access Links allow you to access the software necessary to gain access to the WD My Cloude EX2 device from your desktop and mobile apps. Downloads and Apps Information The Downloads and Applications area displays information on the number of downloads and apps available on your device.
Apps The Apps page provides access to the various apps available for your use on the WD My Cloud EX2 device. Available apps vary depending on what your administrator has implemented. WD MY CLOUD EX2 PERSONAL CLOUD STORAGE USER MANUAL.
Web sites and powerful online apps. For additional information on Joomla. visit http://www.joomla.org// Joomla! is one of the many apps available for use from your WD My Cloud EX2 device. Provided in this section are the steps you’ll need to set up Joomla!.
You can also use the randomly generated table prefix pre-loaded into this field. Old Database Process: Select one of the following options: Backup: Backs up the old database. Remove: Removes the old database WD MY CLOUD EX2 PERSONAL CLOUD STORAGE USER MANUAL.
Admin Password: Enter the password you’ll use to log into your Joomla! site. Confirm Admin Password: Reenter the password you entered in the Admin Password field. 11. Click Install Sample Data. 12. Click Next. WD MY CLOUD EX2 PERSONAL CLOUD STORAGE USER MANUAL.
Page 154: Appendix C: Phpbb Setup GuideInternet connection. phpBB is one of the many apps available for use from your WD My Cloud EX2 device. Provided in this section are the steps you’ll need to set up phpBB.
Database username: Enter your MySQL account user name. If you’re using the phpMyAdmin app, enter admin. Database password: Enter your MySQL password. If you’re using the phpMyAdmin app, enter admin. WD MY CLOUD EX2 PERSONAL CLOUD STORAGE USER MANUAL.
Administrator password: Enter the password you’ll use to log into your bulletin board. Confirm administrator password: Reenter the password you entered in the Administrator password field. Contact e-mail address: Enter the email address of the individual administering the board. WD MY CLOUD EX2 PERSONAL CLOUD STORAGE USER MANUAL.
10. Review the Administrator details screen to ensure that the administrator configuration was successfull, and then click Proceed to next step. 11. Review the screen, and then click Proceed to next step. WD MY CLOUD EX2 PERSONAL CLOUD STORAGE USER MANUAL.
Administration Control Panel after phpBB is installed. 13. Review the information on the screen, and then click Proceed to next step. 14. Review the information on the screen. phpBB is now installed. WD MY CLOUD EX2 PERSONAL CLOUD STORAGE USER MANUAL.
Page 159: Appendix D: Supported Raid Modes, Appendix E: Raid MigrationsSpanning RAID 0 RAID 1 JBOD Appendix E: RAID Migrations The chart below identifies the RAID migration path allowed on your WD My Cloud EX2 device. From JBOD (1 disk) RAID 1 (2 disks) Appendix F: Safe Mode Firmware Update Procedures If you see the following screen, use the steps outlined below to recover your server from safe mode.
7. Once your device has completed the reboot, we recommend that you do a system restore (“System Restore” on page 126). WD MY CLOUD EX2 PERSONAL CLOUD STORAGE USER MANUAL.
Page 161: Appendix G: Technical SpecificationsDC output Output voltage: 12 VDC, 3A Power supply: 36W Temperature Operating temperature: 5°C to 35°C (41°F to 95 °F) Non-operating temperature: -20°C to 65°C (-4°F to 149 °F) RoHs compliant WD MY CLOUD EX2 PERSONAL CLOUD STORAGE USER MANUAL.
APPENDICES WD MY CLOUD EX2 PERSONAL CLOUD STORAGE USER MANUAL.
Page 163: Index44 navigation icons 54 quotas to users 40 deep sleep 114 share access to groups 43 deleting automatic support an app 100 requesting 64 an iSCSI target 90 auto-rebuilding 86 WD MY CLOUD EX2 PERSONAL CLOUD STORAGE USER MANUAL.
43 an iSCSI target 90 quota rules 40 cloud access for a user 21 removing 44 DLNA 103 viewing 41 ElephantDrive backup 75 GS Mark 137 iSCSI iSNS Client 90 WD MY CLOUD EX2 PERSONAL CLOUD STORAGE USER MANUAL.
105 media types 102 enabling 105 other 107 overview 101 WD 107 refreshing 106 media servers streaming media 108 about 101 overview 101 settings 103 Joomla Media settings setup guide 146 WD MY CLOUD EX2 PERSONAL CLOUD STORAGE USER MANUAL.
123 phpBB Setup Guide 149 removing a group 44 Port Forwarding 124 removing users 41 adding 124 replacing a drive 133 deleting 124 rescanning/rebuilding the DLNA Database modifying 124 WD MY CLOUD EX2 PERSONAL CLOUD STORAGE USER MANUAL.
56 internal backups 74 system report 64 remote backups 72 sending to Customer Support 64 the RAID mode 82 System Restore USB backup details 68 about 126 Virtualized Volume WD MY CLOUD EX2 PERSONAL CLOUD STORAGE USER MANUAL.
WD Technical Support contacting ii WD’s Online Learning Center 13 Web Access Timeout 114 Web browser compatibility 6 WebDAV Service 121 Windows mapping a public folder 20 Windows Vista/Windows 7/Windows 8 WD MY CLOUD EX2 PERSONAL CLOUD STORAGE USER MANUAL.
Western Digital, WD, the WD logo, My Book, My Passport, and WD TV are registered trademarks in the U.S. and other countries; and WD My Cloud, WD Red, WD SmartWare, WD GreenPower, WD Photos, and WD TV Live are trademarks of Western Digital Technologies, Inc.