


 Рейтинг: 4.5/5.0 (1897 проголосовавших)
Категория: Windows: Мониторинг
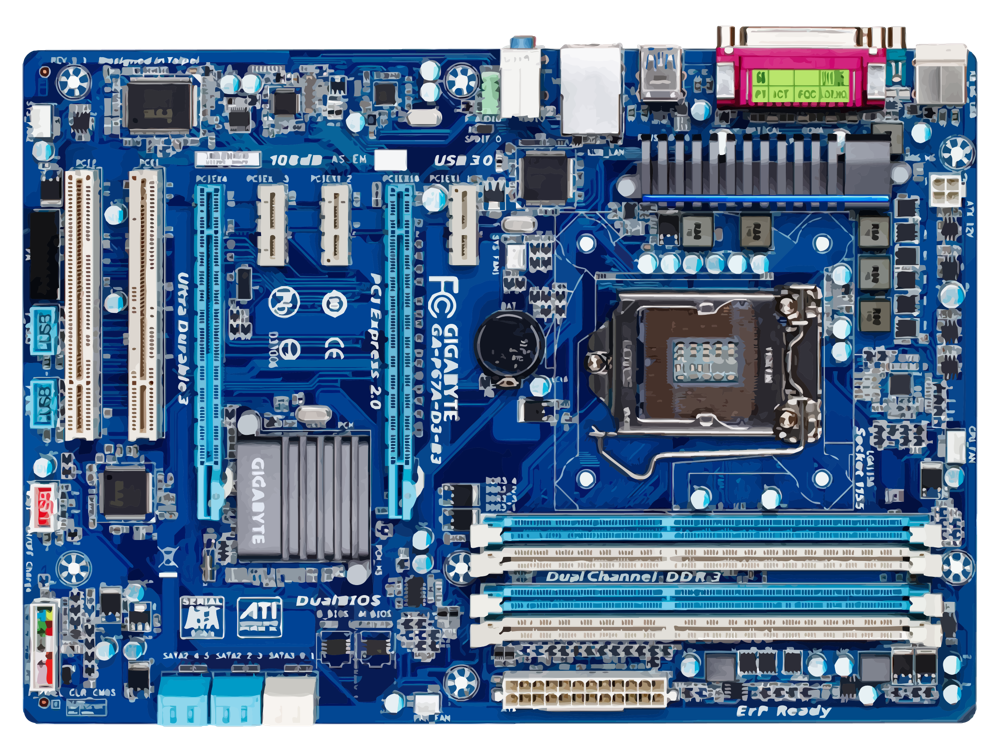
Определить насколько хорошо, стабильно и долго будет работать купленная вами плата можно только в процессе эксплуатации, но уже на этапе выбора можно попытаться отбраковать заведомо неудачные экземпляры. Проверьте, если ли на чипсете выбранной материнской платы вентилятор. Некоторые производители материнских плат экономят и вместо вентилятора ставят обычный радиатор. Хорошее охлаждение — это очень важный фактор для стабильности и скорости работы вашего оборудования, особенно, если вы планируете разгонять процессор, когда к надежности и отсутствию сбоев в работе компьютера предъявляются повышенные требования.
 Еще одним немаловажным моментом для стабильной работы карты является количество и емкость конденсаторов-стабилизаторов. Название "стабилизатор" говорит само за себя. Смотрите, чтобы их было хотя бы 10–12 штук, в идеале и больше, с емкостью выше 4000 мкФ.
Как это ни банально, хороший внешний вид тоже является косвенным признаком качества материнской платы. Если производитель серьезно подходит к дизайну внешнего вида устройства, комплектации, качеству упаковки, то и к качеству производства можно ждать как минимум такого же отношения.
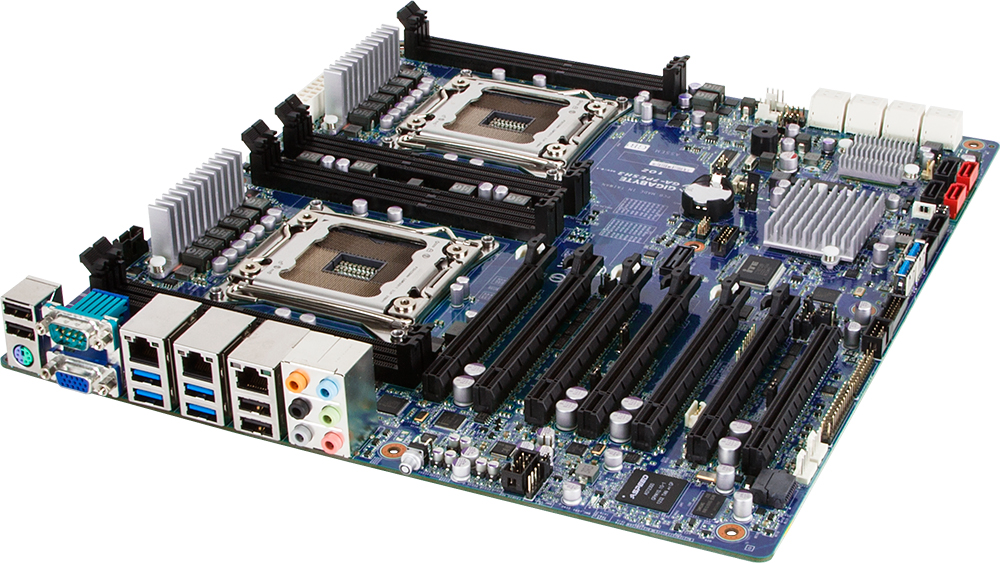
ФункционалМатеринские платы "все в одном" — не лучший выбор для требовательных пользователей. Интегрированная видеокарта очень сильно замедляет работу компьютера, отнимает немало ресурсов оперативной памяти. А вот слотов для подключения дополнительных устройств надо много. Неизвестно, как долго вы будете работать на своем компьютере, и что вам захочется подключить к нему в будущем. Чем больше на материнской карте разъемов для подключения дополнительных вентиляторов (желательно с мониторингом состояния и оповещением о нарушениях в работе), а также USB-портов, тем лучше. Если на материнской карте есть интегрированный RAID-контроллер, то это дополнительный аргумент в выборе именно данного экземпляра. Возможность объединять диски в массивы может быть очень полезной как для скорости, так и для надежности работы компьютера. Как правило, интегрированные RAID-контроллеры, позволяют создавать массивы 0 и 1 уровня.
Эргономика Материнская плата не является "вещью в себе". Она устанавливается в корпус, в который крепятся и различные дополнительные устройства — CD-ROM, жесткие диски, на материнской плате устанавливаются модули оперативной памяти, видеокарта и т. п. Грамотное распределение разъемов на плате обеспечивает удобное подключение всех устройств и гарантирует беспрепятственный доступ к любому из них. При выборе платы надо четко представлять себе, как она будет крепиться в корпусе, и как будут крепиться остальные устройства. Наиболее частые проблемы при сборке компьютера могут возникнуть в следующих случаях:При установке или переустановке материнской платы очень легко можно что-нибудь повредить. Ниже приведено несколько советов по правильному обращению с материнской платой. Будьте осторожны. Перед работой снимите с себя заряд электричества, дотронувшись до какого-нибудь металлического предмета. Беритесь за материнскую плату только с краю. Не дотрагивайтесь до элементов или мест пайки.
При извлечении процессора лучше использовать предназначенный для этого специальный инструмент. В виде исключения можно использовать согнутую под прямым углом вилку. Обратите внимание на ножки процессора.
Не слишком туго закручивайте винты, крепящие материнскую плату, так как в многослойных платах можно легко пережать проводящие дорожки.
Устанавливайте процессор без усилия. Перед этим проверьте, находится ли рычаг в ZIF-разъеме в открытом положении. В платах без ZIF-разъема обратите внимание на правильность положения процессора и лишь после этого осторожно вставьте его в разъем.
Перед включением компьютера проверьте правильность установки процессора, DIMM-модулей и карт расширения.
Если в вашу материнскую плату интегрированы звуковой и графический адаптеры, то производитель добавляет в название платы обозначение VM (Video and Media), например P4R800-VM.
Программы для работы с материнскими платамиMotherboard Monitor — популярная утилита, которой известно о более чем 87 производителях материнских плат и более 1000 моделей плат этих производителей. Утилита позволяет в реальном времени контролировать изменения температуры различных компонентов платы, снимая показания с встроенных датчиков температуры. Для каждого датчика можно установить сигнал тревоги, если значения заданных параметров выйдут за определенные рамки. Программа показывает текущие значения напряжений на плате, скорости вращения кулеров, частоту процессоров. При помощи Motherboard Monitor можно также контролировать поведение удаленной машины. В случае возникновения проблемы программа отошлет на указанный адрес электронное письмо. Также возможна запись обо всех случаях перегрева в специальный лог-файл в разных форматах (TXT, CSV, XML, HTML). К сожалению, программа давно не обновляется, и рекомендовать ее для использования на современных материнских платах не представляется разумным. Если вы хотите скачать эту программу, то воспользуйтесь поисковыми службами для нахождения файла программы.
MSI PC Alert - Фирменная утилита от компании MSI для использования с родными материнскими платами. Производит мониторинг температур CPU и системы, скоростей вентиляторов, напряжений. Если заданные параметры при работе будут превышены, то программа вовремя предупредит пользователя, привлекая его внимание к возникшей проблеме.
Производители материнских плат


Alternatively referred to as the mb. mainboard. mobo. mobd. backplane board. base board. main circuit board. planar board. system board. or a logic board on Apple computers. The motherboard is a printed circuit board that is the foundation of a computer, located at the bottom of the computer case. It allocates power to the CPU. RAM. and all other computer hardware components. Most importantly, the motherboard allows hardware components to communicate with one another.
The first motherboard is considered to be one used in the IBM Personal Computer, released in 1981. At the time, IBM referred to it as a "planar" instead of a motherboard. The IBM Personal Computer and the motherboard inside it would set the standard for IBM-compatible computer hardware going forward.
Below is a picture of the ASUS P5AD2-E motherboard with names of each major component of the motherboard. Clicking on the image below gives you a larger more detailed version of the picture below.
Motherboard componentsBelow are links to pages with more details for each of the above mentioned motherboard components. Links are listed in clockwise order going from the top-left corner of the image. Components not listed above or found on other motherboards are listed in the next section.
Other motherboard componentsBelow is a listing of other motherboard components that are not shown in the picture above or were part of older computer motherboards.
Motherboard form factorsAs computers advanced, so have motherboards. Below is a listing of the various motherboard form factors and additional information about each of these form factors including ATX, the most commonly used motherboard form factor today.
Since there is a motherboard, is there a fatherboard?No, there is no such thing as a fatherboard when talking about a computer. However, there is such a thing as a daughterboard .
Part of the Hardware glossary:
A motherboard is the physical arrangement in a computer that contains the computer's basic circuitry and components. On the typical motherboard, the circuitry is imprinted or affixed to the surface of a firm planar surface and usually manufactured in a single step. The most common motherboard design in desktop computers today is the AT, based on the IBM AT motherboard. A more recent motherboard specification, ATX. improves on the AT design. In both the AT and ATX designs, the computer components included in the motherboard are:- Planned obsolescence is the concept that a product should be designed and produced with the knowledge that it will only be popular, useful and functional for a limited length of time. (WhatIs.com )
- A mesh network is a local area network (LAN) that employs one of two connection arrangements, full mesh topology or partial mesh topology. (IoT Agenda )
- A laser is a coherent and focused beam of photons; coherent, in this context, means that it is all one wavelength, unlike ordinary light which showers on us in many wavelengths. The acronym laser s. (WhatIs.com )
Glossaries- Terms related to computer hardware, including definitions about cables, connectors and power supply units and words and phrases about computing peripheral devices including the keyboard, mouse, au.
- This WhatIs.com glossary contains terms related to Internet applications, including definitions about Software as a Service (SaaS) delivery models and words and phrases about web sites, e-commerce.
Prior to the advent of the microprocessor. a computer was usually built in a card-cage case or mainframe with components connected by a backplane consisting of a set of slots themselves connected with wires; in very old designs the wires were discrete connections between card connector pins, but printed circuit boards soon became the standard practice. The Central Processing Unit, memory and peripherals were housed on individual printed circuit boards which plugged into the backplate. During the late 1980s and 1990s, it became economical to move an increasing number of peripheral functions onto the motherboard (see below ). In the late 1980s, motherboards began to include single ICs (called Super I/O chips) capable of supporting a set of low-speed peripherals: keyboard. mouse. floppy disk drive, serial ports, and parallel ports. As of the late 1990s, many personal computer motherboards supported a full range of audio, video, storage, and networking functions without the need for any expansion cards at all; higher-end systems for 3D gaming and computer graphics typically retained only the graphics card as a separate component.
The early pioneers of motherboard manufacturing were Micronics. Mylex, AMI. DTK, Hauppauge. Orchid Technology. Elitegroup, DFI. and a number of Taiwan-based manufacturers.
The most popular computers such as the Apple II and IBM PC had published schematic diagrams and other documentation which permitted rapid reverse-engineering and third-party replacement motherboards. Usually intended for building new computers compatible with the exemplars, many motherboards offered additional performance or other features and were used to upgrade the manufacturer's original equipment
The term mainboard is applied to devices with a single board and no additional expansions or capability. In modern terms this would include embedded systems and controlling boards in televisions, washing machines, etc. A motherboard specifically refers to a printed circuit board with expansion capability.
A motherboard, like a backplane. provides the electrical connections by which the other components of the system communicate, but unlike a backplane, it also connects the central processing unit and hosts other subsystems and devices.
A typical desktop computer has its microprocessor. main memory, and other essential components connected to the motherboard. Other components such as external storage. controllers for video display and sound. and peripheral devices may be attached to the motherboard as plug-in cards or via cables, although in modern computers it is increasingly common to integrate some of these peripherals into the motherboard itself.
An important component of a motherboard is the microprocessor's supporting chipset. which provides the supporting interfaces between the CPU and the various buses and external components. This chipset determines, to an extent, the features and capabilities of the motherboard.
Modern motherboards include, at a minimum:
The Octek Jaguar V motherboard from 1993. [ 5 ] This board has few onboard peripherals, as evidenced by the 6 slots provided for ISA cards and the lack of other built-in external interface connectors.
Additionally, nearly all motherboards include logic and connectors to support commonly used input devices, such as PS/2 connectors for a mouse and keyboard. Early personal computers such as the Apple II or IBM PC included only this minimal peripheral support on the motherboard. Occasionally video interface hardware was also integrated into the motherboard; for example, on the Apple II and rarely on IBM-compatible computers such as the IBM PC Jr. Additional peripherals such as disk controllers and serial ports were provided as expansion cards.
CPU socketsA CPU socket or slot is an electrical component that attaches to a printed circuit board (PCB) and is designed to house a CPU (also called a microprocessor). It is a special type of integrated circuit socket designed for very high pin counts. A CPU socket provides many functions, including a physical structure to support the CPU, support for a heat sink, facilitating replacement (as well as reducing cost), and most importantly, forming an electrical interface both with the CPU and the PCB. CPU sockets can most often be found in most desktop and server computers (laptops typically use surface mount CPUs), particularly those based on the Intel x86 architecture on the motherboard. A CPU socket type and motherboard chipset must support the CPU series and speed.
Сегодня я хочу представить вам обзор одной из лучших программ — мониторов аппаратных параметров компьютера. Итак, встречайте: Motherboard Monitor.
Сайт программы: сайт
Вес: 1,7 Мб
Лицензия: freeware
Версия: 5.3.3.0
Эта софтина имеет славную историю. Разработка ведется человеком по имени Alexander van Kaam уже несколько лет (кстати, Motherboard Monitor написана на Delphi). За это время программа несколько раз меняла интерфейс, общую концепцию, но самое главное — она смогла накопить огромную базу материнских плат, поэтому, когда вы устанавливаете Motherboard Monitor, можете быть уверены на 90% — все необходимые функции мониторинга будут работать. А функциональность действительно огромна:
— мониторинг частоты процессора;
— мониторинг текущих напряжений включая напряжение на процессорном ядре;
— мониторинг скоростей обращения вентиляторов;
— возможность быстро выключить компьютер при достижении важными параметрами критических значений (так называемый alarm);
— возможность отправки лога на e-mail и ftp-сервер;
— наличие загрузчика (описан ниже);
— отображение всех параметров на панели индикаторов;
— остальные, менее важные, функции.
Ко мне на тестирование попала версия 5.3.3.0, на официальном сайте можно скачать уже более новую. Тем не менее, названная версия стабильна, и за все время работы я не заметил ни одного глюка или сбоя. Все работало на ура — сами понимаете, это очень приятно.
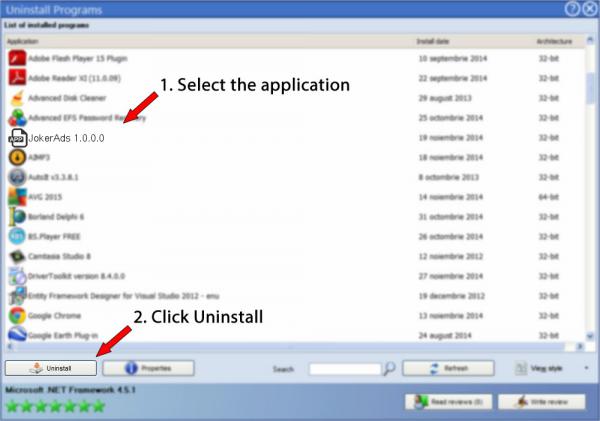
Итак, файл установки попал к вам на винчестер тем или иным способом. Давайте вкратце рассмотрим процесс установки. Сначала все стандартно: соглашаемся с лицензией и указываем директорию для будущей программы, однако далее у начинающего могут возникнуть трудности. Нам предложат установить MBM IO драйвер, необходимый для работы. Этот драйвер мониторит низкоуровневые параметры материнской платы и передает их основному модулю МВМ. В соответствующем диалоговом окне требуется выбрать один из трех способов его загрузки. Лично я согласился со значением, предложенным по умолчанию (System), и у меня все нормально заработало. Если у вас возникнут какие-то проблемы, попробуйте поэкспериментировать с другими значениями этого параметра.
После того, как мы указали способ загрузки нового драйвера, мастер установки предложит выбрать уже готовый профиль для материнской платы (МВ). Это нужно в том случае, если ваша MB обладает специфическими особенностями. Итак, внимательно просматриваете список, выбираете вашу модель материнской платы или Default Settings, если вашей модели в нем нет, и нажимаете Next. Далее все еще более зависит от конкретной материнской платы. Мастер установки проверяет наличие специфических адресов на МВ и предлагает настроить их использование. В моем случае программа нашла два адреса: 2Eh и 4Eh. Здесь часто располагаются сенсоры вентиляторов, поэтому я разрешил мониторинг. Нас, однако, заранее предупреждают о возможных сбоях в работе, особенно если ваша модель матплаты достаточно стара или перечислена в черном списке (см. рис.).Теперь осталось последний раз нажать кнопку Next, и начнется процесс установки, затем нас попросят перезагрузиться. Это необходимо для загрузки нового драйвера.
Работа с программой
После перезагрузки Motherboard Monitor полностью готов к работе. Когда вы его запустите, в системном трее появится вот такая иконка.
Основного окна у приложения нет, все взаимодействие пользователя с программой осуществляется через эту иконку. Щелкните по ней правой кнопкой и выберите пункт Settings, так как приложение необходимо настроить.
В первую очередь кликаем по кнопке Temperatures и настраиваем температурный датчик. Логика работы проста: нам необходимо соотнести программный датчик с аппаратным, который установлен на материнской плате. В списке MBM5 Sensor выбираем пункт Sensor1, а в Should display board sensor — первый датчик из списка, как на рисунке.
Точно так же настраиваем второй, третий и все остальные датчики. Теперь мы уже можем мониторить температуру. Обратите внимание: в списке появляется одно нормальное имя датчика и еще одно такое же, только со словом Diode после имени. Это связано с тем, что большинство микросхем для мониторинга имеют два типа входящих данных: либо от диода, либо от обычного терморезистора. Их показания могут существенно отличаться, поэтому не удивляйтесь. Я выбрал в качестве источника данных терморезистор, так как показываемая им температура выглядела более правдоподобно. Вам лучше поэкспериментировать самим.
На моей материнской плате установлено три температурных сенсора: на процессоре, на системной плате и тот, что меряет температуру в корпусе. Более новые МВ имеют по 6 и даже по 8 сенсоров — разумеется, Motherboard Monitor будет мониторить их все (еще раз вспомните о размере базы матплат). Теперь нужно узнать, какой датчик какой температуре соответствует. Если вы наведете курсор мыши на иконку МВМ в трее, то всплывающая подсказка покажет текущую температуру для каждого сенсора. Теперь запустите какую-либо аналогичную программу мониторинга — например, Everest (бывшая AIDA32) — и сравните показатели. Если нет Everest, можно посмотреть температуры в BIOS'е матплаты. Так я определил, что первому температурному датчику у меня соответствует процессор, второму — системная плата, а третьему — температура воздуха в корпусе. Каждому из них я назначил свое осмысленное имя, дабы не путаться. Разумеется, у вас может быть все по-другому. Аналогичным образом следует поступить и с датчиками вентиляторов (кнопка Fans) и, если надо, напряжений (кнопка Voltages). Теперь все готово, чтобы лицезреть "приборную панель" с нашими параметрами. Щелкаете правой кнопкой по иконе в трее и выбираете пункт Dashboard.
Появится картинка наподобие этой. Здесь отображается все, что программа получает от материнской платы. Конечно, далеко не всем пользователям требуется постоянно знать напряжение на питающих шинах, ядре процессора, а также скорости всех кулеров и прочее. Для оверклокера это, разумеется, большое подспорье, а вот для обычного пользователя вполне достаточно трех-четырех самых важных значений. К счастью, автор позаботился о нас с вами, поэтому содержимое Dashboard можно редактировать. Во-первых, квадратики легко перетаскиваются мышкой в нужное место. Во-вторых, при помощи значка можно регулировать количество строк в "приборной панели". Ну и, наконец, Dashboard можно сделать полупрозрачной, установить поверх всех окон, к тому же, она замечательно "приклеивается" к углу экрана и может запускаться автоматически вместе с основным приложением.
Предлагаю ознакомиться с еще одной полезной функцией Motherboard Monitor. Это возможность поднимать тревогу при достижении датчиком/датчиками критического порога, когда работа компьютерного железа становится небезопасной. Когда это происходит, ваш системный динамик начинает пищать, а на экране появляется соответствующее сообщение, где вы можете быстро выключить машину. Для каждого датчика в программе предусмотрены свои критические значения. Например, для вентиляторов пороговым значением числа оборотов программа считает 1500 RPM, для температурных датчиков это 70°С и т.д. Разумеется, пороговые значения легко изменяемы, поэтому пользователь может максимально точно подогнать их под свои нужды. Должен отметить, что это очень полезная возможность. Со мной однажды произошел курьезный случай. Мой температурный датчик воздуха в корпусе располагается близко к блоку питания, поэтому всегда выдает немного завышенное значение температуры. Ток воздуха в этом месте практически отсутствует, поэтому после многих часов работы датчик разогревается до "астрономических" температур. Когда Motherboard Monitor впервые подняла тревогу, я подумал, что у меня остановились как минимум все вентиляторы. Представьте себе температуру воздуха в системном блоке, равную 70°С! С ужасом я открыл крышку корпуса и только после получасового раздумья наконец понял, в чем же дело. Впоследствии я предпринял необходимые меры: организовал небольшой воздуховод, чем "охладил" датчик примерно на 50 градусов, однако без Motherboard Monitor я вряд ли бы когда-нибудь узнал о его нелегкой жизни:). Вот такой полезной опцией обладает описываемая мной сегодня программа.
Ведение лог-файла
Помимо хорошего монитора, Motherboard Monitor обладает возможностью вести лог-файл, куда записывает все показания за определенный интервал времени. Программа может вести лог в четырех типах файлов: TXT, CSV, HTML и XML. Также настраивается расположение лог-файла, интервал между записями в него показаний датчиков и количество измерений. О важности лога, думаю, говорить не стоит, ведь, используя его, мы всегда сможем уверенно сказать, что же вывело компьютер из строя: процессорный кулер или блок питания. Разработчик Motherboard Monitor предлагает нам также очень любопытную функцию отправки лог-файла на ftp-сервер или почтовый ящик. Возможно, она придется по душе системным администраторам, которые теперь смогут контролировать необходимые показания всех своих машин в сети.
Последнее, о чем мне хотелось бы рассказать, — функция Launcher. Если какое-либо ненужное приложение активно нагревает ваш процессор, то Motherboard Monitor завершит его при достижении кристаллом необходимой отметки. Для этого нужно сначала загрузить это приложение в Launcher и прописать ММ в автозагрузку.
На этом я заканчиваю описание Motherboard Monitor, поэтому пора делать выводы. Если вы хотите быть постоянно в курсе всех дел, происходящих в вашем системном блоке, то Motherboard Monitor для вас — однозначный must have. Остальным настоятельно рекомендую к ознакомлению.
P.S. В Сети мне удалось найти достаточно подробный русский хелп, а также несколько примеров дополнительных способов применения этой программы и, разумеется, великое множество различных рекомендаций по работе. Дерзайте!
Алексей Голованов
Many Motherboard manufacturers release updates that resolve crucial issues related to system crashes and/or slow performance. Also known as BIOS updates or updating chipset drivers, doing so ensures that your system is in top working order. Motherboard Drivers are responsible for communication between the varied components in your computer: the processor (CPU), the video card, the hard drives, PCI devices and system memory. Keeping these drivers up to date is important - especially if you are experiencing generally sluggish system performance. Updating your Motherboard Drivers can help correct issues with incompatibility with hardware, update hardware capacity and capabilities or add the capability of adding new hardware into the computer. Run a Free Scan for outdated or incorrect Motherboard Drivers and solve your driver problems instantly or search our driver archive to find the exact Motherboard driver that fits your needs.
Browse our most popular companies and drivers for your Free Motherboard Driver Download from the lists below.
Note that these steps correspond with decision points on the flowchart and are reached directly by clicking on the diamond symbols. The text below cannot be read sequentially.
Do es the PC start the boot process and get at least as far as displaying a message from the BIOS or any signs of life from Windows? If all you get is a text message telling you that the monitor can't detect a video signal, it doesn't count, since the monitor can display that message with no computer present.
Does the system power up? Do you hear any beeps, drives spinning up, fans, etc. If the power isn't coming on, proceed to Power Supply Failure flowchart. The power supply diagnostics will only send you back here if you are getting a definitive sign of life, in the form of a beep.
If you haven't performed the Video Failure diagnostics for a dead screen yet, do so now, and don't ignore the obvious steps, like checking the power cord and the outlet. You may be tempted to skip forward if you hear beeps, but there's no reason to assume at this point that beeps and the dead screen are the same problem.
Is this system a new build, or have you just upgraded any components? If you've just upgraded the hardware, power down, unplug the cord and swap the old components back one at a time. Check the motherboard manufacturer website to make sure that the exact CPU and memory modules (brand and specifications) are listed as compatible with the motherboard.
Of all the issues that can go wrong after you replace the motherboard or upgrade the memory, failure to install the memory modules properly is the most frequently encountered problem. Modern motherboards all use some form of DIMM (Dual Inline Memory Modules). All DIMM sockets are equipped with a locking lever on either end, and these levers must be opened (lowered) before inserting the DIMM, and should rise up and snap closed of their own accord as it seats. It can take quite a bit of force to seat a DIMM properly, but if you don't get it lined up first, you're going to damage the DIMM or the socket.
Depending on the motherboard design and the chipset used, motherboards can combine DIMMs to increase either performance or address space. Older designs used multiple banks to increase speed through interleaving or to "gang" 64 bit wide DIMMs together to create a 128 bit bus for the CPU. Newer "unganged" designs allow multi-core and multi-threading CPUs simultaneous and independent access to DIMMs. The DIMM sockets will be labeled or colored to show matching sockets for populating a bank or a channel, with up to four identical DIMMs required to populate an individual bank in quad channel designs. Further complicating issues is that some motherboard designs can treat multi-sided or multi-ranked DIMMs as if they were multiple DIMMs in the same bank, so see your motherboard documentation. In all cases, the DIMMs should be exactly matched, the same part from the same manufacturer. If different speeds are mixed, some mother-boards will fail to boot, the others will default all memory access to the lowest speed DIMM detected.
Even though DIMM memory is designed to exacting standards, the timing signals are so fussy that memory which has not been tested and approved for a particular motherboard will often fail. The speeds increase and the voltages fall with each new generation (initial releases of DDR4 were specified to operate at 1.20 V dropping to 1.05 V), so don't try to change the BIOS settings based on what you remember from an older PC. Generations of DDR memory are not backwards compatible and motherboards will only support one type. The DDR4 DIMM is up to 284 pins, compared to 240 pins for DDR3 and DDR2, and 184 pins for the original DDR DIMM. If your PC is more than twelve years old, you may have the obsolete RIMM (Rambus Inline Memory Module) memory which required CRIMMs (Continuity RIMMs) in empty slots. I don't remember the last time I saw a SIMM (Single Inline Memory Modules), but they were 16 bit, so 32 bit processors required matched pairs.
The CPU version of faulty DIMM insertion is both harder to spot and harder to check. While memory modules can be popped in and out in a second, the massive heatsinks on today's high power processors are secured to the motherboard with strong spring clips that aren't designed for frequent operation. As the number of electrical contacts on CPU packages has soared above a thousand, Intel has largely dropped putting the pins on the CPU in favor of putting the pins in the socket, the LGA (Land Grid Array) design. AMD still uses PGA (Pin Grid Array) on some CPU packages, LGA on others.
LGA CPU's are more likely to sit flat and clamp down evenly than the older packages with pins or legs that could easily bind in the socket and hold one side of the CPU package out of contact while seemingly seated. Inspect the edges of the socket with a bright light and a small mirror if possible. If the heatsink obstructs your view completely, you can either remove the heatsink now to check and reseat the CPU, or you can continue troubleshooting, always remembering that you haven't done this test and that you certainly should before spending any money on replacement parts. With the CPU out, always inspect the bottom for discolorations and signs of melting or overheating, and check the socket (LGA) or the CPU (PGA) for bent or crushed pins.
Did you change the BIOS settings (CMOS Setup) or flash the BIOS (replace it with a newer BIOS version) immediately before the failure occurred? If you were playing with your timing settings for the memory to try to boost performance or clear up a random freeze, or if you were overclocking, odds are your most recent setting is preventing boot. If you can't access the BIOS, the only solution is to clear the settings so that the BIOS will insert the default values for safe operation on the next power up. See your motherboard manual because there are many different approaches to clearing the settings and the wrong approach could damage your motherboard.
Some motherboards provide a jumper or motherboard button for clearing the nonvolatile memory in a few seconds, though you must unplug the power supply first. Otherwise, you need to locate and remove the motherboard battery, unplug the power supply, and let it stand for a good hour or two to let the battery backed settings dissipate. Some manufacturers will suggest you short across the motherboard terminals for the battery after it's removed. The procedures vary according to whether BIOS settings are stored in battery backed CMOS (the old scheme from which CMOS Setup got its name), in an EEPROM, or integrated in the chipset. If you get desperate, see YouTube for CMOS clearing hacks.
A stone dead CPU is another reason for a system to fail. All modern CPUs require a heatsink, and these are active heatsinks, with a fan on top. You may encounter a heatsink without a fan in an old mass-manufactured brand-name PC, but those were much less powerful CPUs. Check the action on all motherboard mounted heatsink fans There may be a heatsink fan on the chipset (the Northbridge handles communications between the memory and graphics systems and the CPU so it can run very hot) or a motherboard integrated GPU.
The heatsink fan must be hooked up to the correct power point on the motherboard for the BIOS to monitor its condition and turn it off and on. Depending on the BIOS programming, the CPU fan may not spin up immediately when the system is powered on because the CPU is cold. While CPUs should be able to shut themselves down to prevent thermal self destruction, if you just installed a new CPU and powered the system up with no heatsink at all, it may be too late for the CPU.
If the fan on your active heatsink doesn't spin up, replace it (clean the heatsink and CPU and reapply thermal compound) and hope for the best. Avoid prying when removing the heatsink, twist it back and forth after the retention mechanism is removed to break the adhesion of the thermal compound. If you don't trust the power point on the motherboard, it won't hurt the CPU to run a fan directly from a power supply lead through a "Y" adapter, so it comes on instantly and always stays on. Just make sure that the fan can tolerate the voltage, and realize that if you replace a PWM (Pulse Width Modulation) controlled fan with a full-on constant DC voltage fan, the background noise from the PC will be louder.
Make sure that the geometry of the bottom of the heatsink will bring it in full contact with the exposed CPU die or the top of the CPU package. Apply an approved thermal grease or thermal tape before reinstalling the heatsink. Don't put on too much thermal grease or you'll just make a mess. The thermal media is only there to fill the microscopic gaps between the die surface and the heatsink. Don't improvise your thermal material, go to a computer or electronics store and buy some if it didn't come with the parts you purchased online. Installing heatsinks can be frustrating, but this isn't a "bash away at it" process. You can damage the CPU if you start cracking the heatsink against it in an attempt to get the heatsink to sit right. Be patient, study the mechanical connections, make sure you aren't hitting some poorly placed component on the motherboard and check that your heatsink isn't so oversized it just won't fit on the particular motherboard. Just because a heatsink is certified to work with a CPU doesn't mean it's certified to fit on a particular motherboard design.
Do you hear more than one beep from the system on power up? You should hear a single short beep, not a long, continual beep that can mean that the required auxiliary power isn't connected to a video adapter. Note that very old PCs used the case speaker, rather than an onboard piezoelectric for beep codes, so you won't hear anything unless the case speaker is attached to the four pin speaker block (the outside two pins were used) on the motherboard.
If you hear an unending string of beeps, it's often bad RAM (or a stuck key on the keyboard after boot), while a repeated sequence can be RAM or video. Other beep codes have been largely abandoned since they pertained to what are non-user replaceable surface mount components today. Beeps or no beeps, I always reseat the video adapter and the RAM, paying special attention to the locking levers on the memory sockets.
If you have more than one DIMM installed on a motherboard that only requires one DIMM to boot, try swapping your RAM through the first slot, one DIMM at a time. Read up on your motherboard's use of ganged and unganged, single or double-sided DIMMs (which no longer literally means chips on both sides) and alternating banks to determine the permissible arrangements. It's also a good time to try known good working RAM from another PC that uses the same technology if you have access to some. If the RAM currently installed doesn't meet the motherboard manufacturer specs or isn't on their approved list, it's suspect, even if it worked in the past. Improperly selected RAM can be the cause of problems ranging from no-boot to intermittent lock-ups.
You can try to clean the DIMM slots with a soft cloth or a can of compressed air, just make sure you aren't leaving threads, hairs or dust in the slot when you are done, because it doesn't take a lot of insulation to break a contact. While you'll rarely see this today, if a PC uses tinned (silver color) contacts against gold contacts, the dissimilar metals can cause corrosion over time due to a constant electrical current when the power is off.
Check your motherboard documentation to determine whether there are any jumpers or switch blocks used for operational settings. With the exception of a jumper for clearing CMOS Setup, these are obsolete today (replaced with CMOS Setup settings), but they were still in wide use with early ATX PCs, some of which are still in use today.
Running the motherboard without a case is a common technique used by technicians to eliminate any weird grounding or unintended shorting issues or mechanical stresses. It also makes it much easier to swap the CPU if that's required. I normally do my bench testing on top of a cardboard box, with a static free bag or foam between the bottom of the motherboard and the cardboard. You don't walk away from a test like this or you might come back to find the box on fire! If your motherboard powers up on the bench with the same power supply that you used in the case, you have a geometry problem. Ideally, you should have a spare power supply for bench testing if you're going to do regular repair and testing work.
Make sure some standoffs aren't higher than others, putting unacceptable stress on the motherboard. Check that every standoff appears under a screw hole. The easiest way to be sure is to count the standoffs, count the screws, and make sure there are no screws leftover after you install the motherboard. There could be a short caused by a misplaced standoff, a loose screw, metal chips from shoddy materials. I've encountered standoff shorts that produce an endless string of beeps like RAM failure, without damaging the motherboard. There's also the possibility that the case geometry is so messed up (out of square or out of level when the cover is forced on) that it's putting an unacceptable mechanical stress on the motherboard, resulting in an open circuit. If you can't find the cause of the problem, don't hesitate to try another case and power supply.
If you still have a "no power" situation with the motherboard running out of the case, there's always the last refuge of a scoundrel. Swap in a known good CPU, not forgetting to install a good heatsink and to connect the fan, even just for a quick test. I try to keep around some cheaper CPUs for this purpose, just in case the motherboard is a CPU eater. You can usually find very inexpensive CPUs for sale on eBay as "pulls," removed from PCs with other problems, and you should try the lowest speed CPU (lowest cost) of the family that your motherboard supports. It's another good reason to leave all the motherboard settings on the default "Automatic" setting, so you don't have to fool around with them at this stage.
If your old CPU is bad and the heatsink fan is dead, it's a pretty good bet that the dead fan caused the CPU failure. If the heatsink fan is working, determining whether the CPU failure was due to poor heatsink contact, improper motherboard settings (overclocking), or lousy power regulation from the motherboard is a guessing game. If the motherboard is an older make and you have a couple bucks to spare, replace the CPU and the motherboard together. Replacing just the CPU, even if the motherboard tests out OK, is kind of risky and usually tough to justify from a price/performance standpoint unless the system was practically new, say less than a year old.
If you still have no beeps and no video, you're probably looking at a bad motherboard. But unless you have a DVM and the experience to check the live power supply voltages at the motherboard through back-picking the connectors, I would first try swapping the power supply (if you have access to one) just because it's easier. Again, this diagnosis assumes that you went through the Video Failure diagnostics, which would have forced you through the Power Supply Failure diagnostics as well. Get the PC operating with a replacement motherboard and all the identical parts that the old motherboard failed with before you make the trash can decision.
Does the screen light up and the PC power on, only to freeze when the operating system begins to load? Some of the reasons a PC will freeze at the beginning of the boot process are different from those that cause freezes during normal operations, which we deal with on the motherboard performance flowchart. If you complete this flowchart and don't solve your boot problem, try the motherboard performance flowchart.
Does the system freeze when you strip it down to the minimum configuration required to start the boot process? This consists of the power supply, motherboard, CPU, the minimum required RAM, and a GPU (this can be an add-in video adapter, a video adapter integrated on the motherboard, or one of the newer CPU/GPU on a single chip solutions). You can also leave the primary hard drive connected for the first try, though powering up without a hard drive should result in a missing boot device error message rather than a frozen BIOS screen on a healthy PC.
If your system failed with a popping noise or a smoky smell before the freeze-up happened, do your best to locate the failed component by visual inspection (and smell) before you reassemble the PC. If the system boots, or at least passes the point of the freeze-up when it's stripped down, you can start replacing the parts one-by-one, always remembering to unplug the power supply or turn off the power strip when replacing motherboard adapters. When the freeze up returns after you replace a part, you've found the culprit, but double check that the issue is with the component and not with the motherboard slot or the power connector by trying the part in another slot or on another power lead.
Are you able to access the BIOS (CMOS Setup) by pressing the hot key(s)? The most common hot keys are F2 or Del, but there are dozens of possibilities with older PCs, including multiple keys held down simultaneously, including the CTRL and ALT keys. Most BIOS will normally flash the CMOS Setup hotkey(s) as a text message on the screen at the beginning of the boot process, but some major manufacturers suppressed this to discourage owners from altering the settings and creating a tech support headache. You can always find the key combination through a patient Internet search with the brand and model of your PC. If you cannot access the BIOS settings, the diagnostic approach is the same as it would be with a dead screen, and you should review the dead screen steps before proceeding.
If you aren't using the default CMOS settings, try restoring the factory settings. Even if you don't remember ever changing any advanced settings for the chipset, memory timing or CPU, it's a good idea to just restore the defaults at this point. You can usually restore these from a major CMOS Setup menu item like "Restore Default Settings" or "BIOS Default Settings." The default settings usually put everything on autodetect and use the recommended timing for the RAM. This means if you're overclocking, stop it, at least until you get the system running again. It doesn't matter whether or not overclocking the exact same CPU or RAM in a friend's system worked without a hitch, you're exceeding the manufacturers recommendations so it's a gamble.
Are the temperature and supply voltages stable? The BIOS monitors CPU temperature and reports various supply voltages, in some cases using these measurements to determine whether to shut down the PC for thermal overload or voltage instability. These settings can usually be viewed through CMOS Setup, and for future reference, you can access them with 3rd party tools from Windows as well. If your CPU supports DTS (an Internet search will tell you), make sure that the temperature you see displayed is based on DTS and not on a thermocouple that may or may not have good thermal contact with the CPU.
The low voltages (less than 3.3 V) are created on by the motherboard using higher voltages from the power supply, so if the power supply output is stable and the memory voltage is wandering around, the fault lies on the motherboard. If the temperature proves to be unstable, see the text associated with the "Fan on heatsink active?" decision point which addresses the issues involved with reinstalling the heatsink.
Is the brand and model number of the RAM installed in the PC certified and tested to work with the motherboard? The days are gone when you could assume that if the notches in the DIMM matched the keys in the DIMM sockets, the memory would work. The high performance demanded from today's memory requires increasingly exquisite timing that isn't always achieved by adherence to a general specification. Check the motherboard manufacturer website to see if the RAM you are using is explicitly listed as being tested with the motherboard and CPU.
If you have more RAM installed than is required to boot, it's a good idea to shuffle the DIMMs in and out of the PC to see if there was a problem DIMM causing the freeze up once the operating system started loading. And if you have access to RAM that is compatible with your motherboard, even if it's slower than the DIMMs you are using, try swapping it in for the sake of process of elimination.
Does the system boot from a CD or DVD, or from a bootable memory stick? In order to run this test, you may have to enter CMOS Setup and change the boot order to set the CD, DVD or USB memory stick as the first boot device. Otherwise, the BIOS will continue trying to boot from a corrupted hard drive (if that's the problem) and the system will freeze rather than going on to try booting from other devices.
If the PC boots from an alternative device, the problem is most likely data corruption, either with the hard drive's master boot (MBR) record or with the operating system. You can test whether the hard drive data is still accessible by exiting to the command prompt from a bootable Windows disc, rather than trying to repair the installation or do a fresh Windows install. If you can access some or all of the data, you can add the drive to a bootable PC as a second hard drive and then either burn the data to DVD or copy it to the host hard drive. See the Hard Drive Performance flowchart for possible causes and solutions.
If the system won't boot from a CD or DVD, proceed to the ATA Drive Failure flowchart. Note that older system with the CMOS option to boot from a USB memory device were often finicky about it, so it's safer to use an original operating system disc for the test.