


 Рейтинг: 4.7/5.0 (1918 проголосовавших)
Категория: Windows: Деинсталяторы
Note - Wrapper scripts are not needed, but helpful so you don’t have to type java -jar apktool.jar over and over.


(Note: on earlier versions than 12.04 LTS a plain install will also install Xorg - bug #628039. This is probably not what you want for a headless VM. Use the "--no-install-recommends" workaround)
Installing from packages.vmware.comTo add the repository and install tools do:
Note: using apt-add-repository will also add an entry for sources, which are not available in the vmware repository. You'll need to manually delete the deb-src entry for "packages.vmware.com", which should be at the bottom of your /etc/apt/sources.list file
Installing from your VMware hostWarning: This install method does not use Ubuntu packages. Instead, it bypasses dpkg and writes files directly to your system. This is generally not recommended.
Start up a terminal window and do the following to ensure that you have the required packages for building VMware Tools or your kernel.
NOTE: linux-headers-uname -r is not required on a default build as these headers already exist. They are listed here in case you have made kernel modifications.
From the VMware menu, choose VM->Install VMware Tools. You should see a mounted CD image show up on the desktop. In the File Browser that pops up, right-click the VMwareTools*.tar.gz file and extract to the Desktop.
If the cdrom was not automatically mounted, mount the cdrom (in your guest OS) by doing
Open a terminal window, and run the following commands.
During vmware-install.pl, choose the default answers to everything (just hit the <enter> key).
You can configure the tools as root
Otherwise run them as a user (not root)
To have vmware tools auto start with your sessions, go to System->Preferences->Sessions->Startup Programs. Click Add, enter vmware-toolbox, Ok, Close.
If you are running a Kubuntu guest OS.
In order to get the scroll wheel to work again after the above install, you will need to make a minor change to the xorg.conf file.
In the "Configured Mouse" section, change the following line as indicated:
If you have more than five buttons (scroll wheel counts as three), then you might need the following line:
Restart X.
VMware-tools for Windows (for running Windows in VMware on Ubuntu)Power on the virtual machine. When the guest operating system starts, right-click VM and select "Install VMware Tools" (or for ESXi right-click and select "Guest"->"Install VMware tools). A "VMware Tools" ISO should appear in the Windows guest and auto-run. For more information see vmware.com. Installing VMware tools
Workarounds for guests running old Ubuntu releases Installing from Host Ubuntu 10.10This method installs VMware tools and makes the crucial auto start entry sorted for you as well.
First got to the Console Virtual Machine > Install VMware Tools.
Note: <x.x.x-xxxx> is the version discovered in the previous step which at the time of writing was VMwareTools-8.3.7-341836.tar.gz
Note: The -d switch assumes that you want to accept the defaults. If you do not use -d, press Return to accept the defaults or supply your own answers.
Auto start of vmware tools is essential to a stress free admin life.
Run this command to reboot the virtual machine after the installation completes:
Check if the VMware Tools status shows 'OK'on the vm summary tab of vSphere server. This method ensure proper permissions for executable and puts the file in startup as well.
Resolving VMware Tools compilation errors under Ubuntu 11.04 (Natty) and VMware Fusion 3.1.2This article provides an overview of the Arch Build System (ABS) along with a walkthrough for beginners. It is not intended to be a complete reference guide.
Note: ABS tree syncs once a day so it may lag behind what is already available in the repositories.
What is the Arch Build System?The Arch Build System is a ports-like system for building and packaging software from source code. While pacman is the specialized Arch tool for binary package management (including packages built with the ABS), ABS is a collection of tools for compiling source into installable .pkg.tar.xz packages.
What is a ports-like system?Ports is a system used by *BSD to automate the process of building software from source code. The system uses a port to download, unpack, patch, compile, and install the given software. A port is merely a small directory on the user's computer, named after the corresponding software to be installed, that contains a few files with the instructions for building and installing the software from source. This makes installing software as simple as typing make or make install clean within the port's directory.
ABS is a similar conceptABS is made up of a directory tree (the ABS tree) residing under /var/abs. This tree contains many subdirectories, each within a repo name and each named by their respective package. This tree represents (but does not contain) all official Arch software. retrievable through the SVN system. You may refer to each package-named subdirectory as an 'ABS', much the way one would refer to a 'port'. These ABS (or subdirectories) do not contain the software package nor the source but rather a PKGBUILD file (and sometimes other files). A PKGBUILD is a simple Bash build script — a text file containing the compilation and packaging instructions as well as the URL of the appropriate source tarball to be downloaded. (The most important component of ABS are PKGBUILDs.) By issuing inside the ABS makepkg command, the software is first compiled and then packaged within the build directory. Now you may use pacman (the Arch Linux package manager) to install, upgrade, and remove your new package.
ABS overview'ABS' may be used as an umbrella term since it includes and relies on several other components; therefore, though not technically accurate, 'ABS' can refer to the following tools as a complete toolkit:
ABS tree The ABS directory structure; directories syncs with SVN and are under /var/abs/ on your (local) machine. It contains many subdirectories, named for all available official Arch Linux software from repositories specified in /etc/abs.conf. but not the packages themselves. The tree is created after installing the abs package with pacman and subsequently running the abs script.
Note: The actual packages are available in svn and git repositories, and the abs script downloads them using rsync .
PKGBUILD A Bash script that contains the URL of the source code along with the compilation and packaging instructions. makepkg shell command tool which reads the PKGBUILDs, automatically downloads and compiles the sources and creates a .pkg.tar* according to the PKGEXT array in makepkg.conf. You may also use makepkg to make your own custom packages from the AUR or third-party sources. See Creating packages for more information. pacman pacman is completely separate, but is necessarily invoked either by makepkg or manually, to install and remove the built packages and for fetching dependencies. AUR The Arch User Repository is separate from ABS but AUR (unsupported) PKGBUILDs are built using makepkg to compile and package up software. In contrast to the ABS tree on your local machine, the AUR exists as a website interface. It contains many thousands of user-contributed PKGBUILDs for software which is unavailable as an official Arch package. If you need to build a package outside the official Arch tree, chances are it is in the AUR.
Why would I want to use ABS?The Arch Build System is used to:
ABS is not necessary to use Arch Linux, but it is useful for automating certain tasks of source compilation.
How to use ABSWarning: Official PKGBUILDs assume that packages are built in a clean chroot. Instructions below don't provide that, resulting in (officially-invalid) bugs like FS#47614 .
Building packages using abs consists of these steps:
To use the ABS, you need to install abs.
This will grab the abs-sync scripts, various build scripts, and rsync (as a dependency, if you do not already have it).
Before you can actually build anything, however, you will also need basic compiling tools. These are handily collected in the package group base-devel. This group can be installed with pacman.
/etc/abs.confEdit /etc/abs.conf to include your desired repositories.
Remove the. in front of the appropriate repositories. For example:
The ABS tree is an SVN directory hierarchy located under /var/abs and looks like this:
The ABS tree has exactly the same structure as the package database:
The source code for the package is not present in the ABS directory. Instead, the PKGBUILD contains a URL that will download the source code when the package is built. So the size of abs tree is quite small.
Download ABS treeYour ABS tree is now created under /var/abs. Note that tree branches were created corresponding to the ones you specified in /etc/abs.conf.
The abs command should be run periodically to keep in sync with the official repositories. Individual ABS package files can also be downloaded with:
This way you do not have to check out the entire abs tree just to build one package.
/etc/makepkg.confThis article or section is a candidate for merging with makepkg .
Notes: please use the second argument of the template to provide more detailed indications. (Discuss in Talk:Arch Build System# )
Setting the PACKAGER variable in /etc/makepkg.conf is an optional but highly recommended step. It allows a "flag" to quickly identify which packages have been built and/or installed by YOU, not the official maintainer! This is easily accomplished using expac.
Create a build directoryIt is recommended to create a build directory where the actual compiling will take place; you should never modify the ABS tree by building within it, as data will be lost (overwritten) on each ABS update. It is good practice to use your home directory, though some Arch users prefer to create a 'local' directory under /var/abs/. owned by a normal user.
Create your build directory. e.g.
Build packageIn our example, we will build the slim display manager package.
Copy the slim ABS from the ABS tree to a build directory:
Navigate to the build directory:
Modify the PKGBUILD to your liking, then run makepkg (with the -s flag to enable automatic build-time dependency handling):
Note: Before complaining about missing (make) dependencies, remember that the group base-devel is assumed to be installed when building with makepkg. See #Install tools .
Install as root:
That's it. You have just built slim from source and cleanly installed it to your system with pacman. Package removal is also handled by pacman with pacman -R slim.
The ABS method of installing software provides comfortability, while still maintaining complete transparency and control of the build and install functions included in the PKGBUILD.
Essentially, the same steps are being executed in the traditional method (generally including the ./configure, make, make install steps) but the software is installed into a fake root environment. (A fake root is simply a subdirectory within the build directory that functions and behaves as the system's root directory. In conjunction with the fakeroot program, makepkg creates a fake root directory, and installs the compiled binaries and associated files into it, with root as owner.) The fake root. or subdirectory tree containing the compiled software, is then compressed into an archive with the extension .pkg.tar.xz. or a package. When invoked, pacman then extracts the package (installs it) into the system's real root directory ( / ).
Preserve modified packagesUpdating the system with pacman will replace a modified package from ABS with the package of the same name from the official repositories. See the following instructions for how to avoid this.
Insert a group array into the PKGBUILD, and add the package to a group called modified.
If new versions are available in the official repositories during a system update, pacman prints a note that it is skipping this update because it is in the IgnoreGroup section. At this point the modified package should be rebuilt from ABS to avoid partial upgrades.
15 seconds ADB Installer v1.4.3
ADB, Fastboot and Drivers
What is this?
This is All-in-One installer for 3 most needed PC tools for Android. No need to download big SDK for 3 small things. I originaly made it for my Kurdish friend AnGrY DuDe in early 2013. I saw another ADB installer on XDA, but it wasn't good enough for me so i'm finaly posting it here. It's very small and fast installer for tools and drivers.
Fast - 15 seconds install (many times its even less)
AIO - ADB, Fastboot and also Drivers
Clean - ADB and Google Drivers from latest SDK
Install process:
1. Run it (Require administrator privileges)
2. Press Y/Yes to install ADB and Fastboot or N/No to skip
3. Press Y/Yes to install ADB system-wide or N/No for current user only
4. Press Y/Yes to install Drivers or N/No to skip
5. Continue Driver installation
6. 15 seconds passed - finished!
System-wide: ADB and Fastboot are installed to %SystemDrive%\adb directory, and added system-wide path.
Current user only: ADB and Fastboot are installed to %UserProfile%\adb directory, and added path for current user.
CMD can use ADB and Fastboot from any directory.
Drivers are installed to system - no need to install them from directories.
Installer automaticly decides if install 32-bit or 64-bit drivers.
If anybody got problem with detecting device, go see picture guide howto_driver.zip
If installation fails, then post here contents of "adb-installer.log" from desktop. (if there is any)
If you have problem with driver enumeration in Windows 8.1 install update KB2917929
If you have older Google USB Driver installed, please uninstall it from Control Panel before installing new
If you have previously installed it as system-wide and now you want it current user only (or vice-versa), it won't remove it, you must do it yourself. (at least for now)
Downloads: Version 1.4.2
Version 1.3 (If upper one doesn't work)
By default, the Android SDK does not include everything you need to start developing. The SDK separates tools, platforms, and other components into packages you can download as needed using the Android SDK Manager. So before you can start, there are a few packages you should add to your Android SDK.
To start adding packages, launch the Android SDK Manager in one of the following ways:
 in the toolbar.
When you open the SDK Manager for the first time, several packages are selected by default. Leave these selected, but be sure you have everything you need to get started by following these steps:
Get the latest SDK toolsAs a minimum when setting up the Android SDK, you should download the latest tools and Android platform:
How to install VMware Tools - Tutorial
Updated: December 27, 2008
In this article, I will teach you how to install VMware Tools in your virtual machines, so that you can increase the performance of your guest operating systems and use advanced features that VMware products offer.
Unfortunately, it turns out that this seemingly trivial procedure is not as simple as it sounds and has caused quite a bit of pain for many users. Having received a few emails from troubled readers, I decided to write this tutorial.
This article applies to VMware Server and Workstation products. The choice of the host is not important. We'll demonstrate the installation of the VMware Tools both for Linux and Windows guests.
In the next article, we'll talk about VirtualBox and Guest Addons. For much more information about virtualization, I most warmly recommend you read my entire Virtualization section. Let's rock.
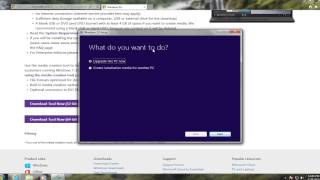
Install VMware Tools for Windows guestThis means you have already successfully installed and configured VMware Server or VMware Workstation. This also means you have successfully installed a Windows guest operating system. Now, it's time to enhance it. It's very simple. In the main menu of the VMware (Server) Console, click VM > Install VMware Tools.
This will popup an installation wizard inside the guest. This is identical to any other Windows installation. Click Install. follow the menu and that's it. After the installation is complete, reboot.
After the reboot, check the system tray. It should have a VMware icon in it, signifying that the VMware Tools are running. Bob's your uncle.
Install VMware Tools for Linux guestThe below guide is taken from my article Installing Linux Mint - Full tutorial. The procedure is documented in absolute detail on pages 3 and 4 of the tutorial. It covers not only the installation of the tools, it also explains what you need BEFORE you can install the Tools, because some compilation is involved (entirely automatically) and what you can do AFTER the installation, namely add the VMware Tools to the startup of your session, so they start when you login. Now, please note that although the functionality here is demonstrated using Linux Mint, it is perfectly valid for all distributions.
Install VMware ToolsIn the File Menu of the VMware Server. choose VM > Install VMware Tools. OK the warning message. This will mount a virtual CD-ROM drive containing the VMware Tools binaries.
The virtual CD-ROM contains two files - one with the extension .rpm and the other one with .tar.gz. The .rpm stands for RedHat Package Manager and is suitable for RedHat-based distributions. Since Linux Mint is Debian -based, this type of file is not suitable for us (instantly). Nevertheless, even if it were, we want to use the archive (.tar.gz.).
First, we need to extract it. This can be done via command line, as I have demonstrated in my Highly useful Linux commands & configurations article, but we'll do it using the GUI.
Right-click on the file > Extract-To.
Choose a destination.
After the archive has been extracted, we need to actually install the Tools. This must be done using the command line. First, we need to open a Terminal. The shortcut to Terminal can be easily found in the Menu. under System.
Once we hit the command line, we need to navigate to the directory containing the VMware Tools files. In the relevant directory, we need to locally execute the installation script (wizard). This can be done using the following command.
sudo ./vmware-install.pl
See below in the image; notice the geeky fortune.
The script is very simple and friendly. It asks questions, with default answers already selected. You will merely need to hit Enter several times - although you should read each step carefully.
After several steps, you'll hit a snag. But don't worry, I led you there deliberately. The purpose of this step is to show you that even when your installation supposedly fails, the workaround is simple and fast.
The reason you see the error below is because the default Linux Mint installation, like most Linux distributions, does not come with all the packages needed for compilation of sources. We will install the missing packages and then repeat the installation of VMware Tools.
If you read carefully, you'll notice that the installer even tells you which packages are missing - gcc. binutils. make. and kernel sources - and where to find them, on the installation CD. This means that even if you don't have a working Internet connection, you'll be able to obtain them.
This is extremely important because in a real life situation, the missing modules might be the network adapters, for example. Luckily, you would have the sources on the CDs that came with your hardware. But your compilation would fail, for the same reason the installation of VMware Tools failed. Without a working Internet connection, you would not be able to find the sources using the Synaptic Package Manager. If they were not included on the CD, you would have been stuck.
The missing tools can be found and installed using either the command line or the GUI. I'll show you both ways.
Install packages necessary for compilationFirst, we will launch Synaptic ( System > Package Manager ).
Next, we will search for the missing packages and mark them for installation. After you find the right packages, right-click > Mark for installation.
After all the packages are installed successfully, start the installation of VMware Tools again . This time, you should get no error messages and it should work.
You can simply restart the X session ( Ctrl + Alt + Backspace ) and the network service ( sudo /etc/init.d/networking restart ) for the relevant changes to take effect. Or if you feel uncomfortable, you can simply reboot the machine.
It is important to remember that the VMware Tools offer you to change the resolution. This is what we aimed for, among other things. Indeed, after you restart, you should enjoy the normal-sized desktop. Don't mind the lack of the bottom panel, I took the screenshot while the desktop was loading.
Now, we could have also installed all of the missing packages (gcc, binutils, make, kernel sources) with one simple command in the Terminal:
sudo apt-get install build-essential
See in the image below:
This comes to show that the command line is often simpler and faster - and should not be feared!
Setup VMware Tools to start with your sessionLastly, you might want to setup the VMware Toolbox. This toolbox allows you to synchronize time, the clipboard and the mouse movement between the host and the guest. It will not run by default. You can manually invoke it - or add it to auto-start with the session . Manually, just type in Terminal:
vmware-toolbox
Alternatively, add the VMware Toolbox to your session. Click on Menu > Preferences > Sessions.
Under Startup Programs tab, you can see all the programs currently listed and enabled for all sessions. This is what we need. You can also configure your Current Session and general Session Options. but that's another subject.
Click Add to create a new Startup Program.
Now, give the new entry a Name (e.g. VMware Toolbox), the Command (path to command) and an optional Comment. which can help you (or others) understand what the program does.
The path to VMware Toolbox is /usr/bin/vmware-toolbox - unless you specified a different path during the installation. If you're unsure, you can always look for the vmware-toolbox binary in several ways:
First, start typing vmware in the Terminal and tap the Tab key twice. This will suggest all possible commands starting with vmware, located in your PATH. The path is a list of all directories where the system expects to find programs.
Once you've found the command you like (vmware-toolbox), you can use the which command to see where it's installed.
which vmware-toolbox
You can also use the find and locate commands to look for vmware-toolbox.
find. -name vmware-toolbox
Once satisfied, type in the path to the vmware-toolbox binary (executable).
Now, once you restart the machine or manually run the Toolbox, you will see the VMware Tools Properties window come up, with all the relevant options that can be setup. In order to enjoy the extras, you must keep the VMware Toolbox running (most likely minimized ).
Scripts and Shrink require root permissions.
ConclusionInstalling VMware Tools is a trivial task on Windows. On Linux, it takes quite a bit of work. But if you're familiar with all the steps you need to take, it takes only about 5 minutes.
Linux-wise, this tutorial also teaches you the art of fiddling with archives, running command-line scripts, installing build-essential packages, compiling, and configuring the startup sessions. All these are valuable lessons useful in everyday computing.
I hope you've enjoyed this tutorial.
Mitm_install_tool.exe представляет собой разновидность файла EXE. связанного с Bitdefender Total Security 2012. который разработан BitDefender, LLC для ОС Windows. Последняя известная версия Mitm_install_tool.exe: 1.0.0.0, разработана для Windows. Данный файл EXE имеет рейтинг популярности 1 звезд и рейтинг безопасности "Неизвестно".
Что из себя представляют файлы EXE?Файлы EXE ("исполняемые"), такие как mitm_install_tool.exe – это файлы, содержащие пошаговые инструкции, которым компьютер следует, чтобы выполнить ту или иную функцию. Когда вы дважды "щелкаете" по файлу EXE, ваш компьютер автоматически выполняет эти инструкции, созданные разработчиком программы (например, BitDefender, LLC) с целью запуска программы (например, Bitdefender Total Security 2012 ) на вашем компьютере.
Каждое программное приложение на вашем компьютере использует исполняемый файл. ваш веб-браузер, текстовый процессор, программа для создания таблиц и т.д. Это делает исполняемые файлы одними из наиболее полезных видов файлов в операционной системе Windows. Без таких исполняемых файлов, как mitm_install_tool.exe, вы не смогли бы использовать ни одну программу на вашем компьютере.
Почему у меня наблюдаются ошибки в файлах типа EXE?Из-за своей полезности и вездесущности, файлы EXE обычно используются в качестве способа заражения вирусами / вредоносным ПО. Зачастую вирусы маскируются под неопасные файлы EXE (например, mitm_install_tool.exe) и распространяются через почтовый СПАМ или вредоносные веб-сайты, а затем могут заразить ваш компьютер, когда будут запущены на исполнение (например, когда вы дважды щелкаете по файлу EXE).
В дополнение, вирусы могут заразить, переместить или повредить существующие файлы EXE. то впоследствии может привести к сообщениям об ошибках, когда исполняется Bitdefender Total Security 2012 или связанные программы. Таким образом, любой исполняемый файл, который вы загружаете на свой компьютер, необходимо проверить на вирусы перед открытием, даже если вы считаете, что он получен из надежного источника.
В каких случаях появляются ошибки в файлах типа EXE?Ошибки EXE, например, связанные с mitm_install_tool.exe, чаще всего появляются во время запуска компьютера, запуска программы или при попытке использования специфических функций в вашей программе (например, печать).
Распространенные сообщения об ошибках в Mitm_install_tool.exeНаиболее распространенные ошибки mitm_install_tool.exe, которые могут возникнуть на компьютере под управлением Windows, перечислены ниже:
Такие сообщения об ошибках EXE могут появляться в процессе установки программы, когда запущена программа, связанная с mitm_install_tool.exe (например, Bitdefender Total Security 2012 ), при запуске или завершении работы Windows, или даже при установке операционной системы Windows. Отслеживание момента появления ошибки mitm_install_tool.exe является важной информацией при устранении проблемы.
This article explains how to install Parallels Tools in Windows virtual machines.
To install Parallels Tools in Ubuntu virtual machines, see KB 113394 .
If you chose Express installation mode in the Virtual Machine Wizard, Parallels Tools were installed automatically after initial Windows installation.
If you opted not to use Express installation mode or if you previously uninstalled Parallels Tools, you will need to install Parallels Tools manually:
Start your virtual machine
In Mac menu go to Actions > Install Parallels Tools. In previous versions of Parallels Desktop, go to the Virtual Machine menu > Install Parallels Tools.
You will be prompted to click Continue to start the installation process.
Select Install Parallels Tools .
Click "Yes" in the User Account Control dialog box.
Installation will now start and you will see the progress bar
When installation is finished, restart your virtual machine.